5 Bible Reading Strategies I Love and Recommend

5 Bible Reading Strategies I Love and Recommend
It’s been years since I started Bible reading and really began enjoying it. I’d say my zeal for reading Scripture is evidence that Christ is at work in me. That I’m growing to be more like Him. That my faith is maturing.
Don’t read this wrong. In no way am I trying to brag about being a great and diligent Bible reader. There are seasons that are harder than others. But usually reading is something I find pleasure in doing. Believe me, there are plenty of areas in my faith walk that are in need of improvement.
And here’s something weird about me liking Bible reading so much. I am really not much of a reader. I’m a listener. I like audiobooks, podcasts, and talk radio. Those kinds of things. When I was a kid my parents had a grand collection of those read-along-books that came with cassette tapes. I remember sitting in front of our large stereo system, looking at the pictures while the narrator did the hard work of actually reading. Oh, and joy of joys when I got my very own Teddy Ruxpin for Christmas! A talking teddy bear that read aloud. Yes please!! Really when I graduated from books with pictures to books with chapters the appeal was pretty much lost on me.
I really consider my date of Salvation to be sometime around age 13. (Shame on me for not knowing the exact day.) After that I had more interest in reading the Bible. But I still preferred to use the children’s NIV my church had given me at age 7. Basically because it had a few pictures in it that I could look at.
Eventually, I did graduate to a Bible (and other books) without pictures. First a teen Bible. Then a more adult version. My love for reading grew and grew. And years later when I discovered commentaries and interlinear resources I was a full-fledged Bible geek. I’m a curious kitten by nature. Those resources, while not adding to the Word, definitely helped answer questions that would pop in my mind. They gave me a better understanding of culture at the time the Bible was written. I have grown to understand the overall timeline of Scripture and see its bigger picture.
Maybe my most favorite part of Bible reading is that it never gets old, tired or boring. I can read and reread the same passage and the Holy Spirit still has new things to teach me. I’m giddy just writing this. I kind of want to stop and go pick up my Bible instead of sitting at the computer. I’ll finish what I started here though.
Gushing aside. I really didn’t mean to sit down to tell you how great I am at Bible reading. Or how much I love it.
I sat down because I know you may not be as big of a geek as me. Which is totally fine, and even preferable in many circumstances. If you struggle with reading, or getting excited about reading, here are some plans that I know and love. I hope they’ll help you out. The Word is so sweet and I just know if you stick with it, if your interest can be piqued, you’ll soon have cravings for it. Cravings even stronger than my cravings for Culver’s butter burgers and custard. (Anybody with me there??)
Let’s go.
Chronological
The first time I read the Bible in chronological order my whole understanding of Scripture was rocked. In a good way. The Bible is a very unique book. It’s put together in an order that makes sense. But that order is not what we modern Westerners are used to. Instead of being laid out in order, the books are grouped by genre. This means books of the law are together. Books of poetry are together. Books of history are together and books containing letters are together. You get the idea.
Also you might have noticed the Bible is looooong! Like longer than Gone With The Wind. (Which is the longest book I think I’ve ever read.) There’s a lot of information. And hundreds and hundreds of years are covered.
Reading through in chronological order helped me understand the “big picture” of the Bible. It also helped me make sense of the Old Testament. Which, by the way, is now one of my favorite things to study.
One of the really cool things about reading this way is that many of the Psalms are fit into to the “story line” where scholars believe they would have been written. This gave me a new understanding of David and how to pour my heart out to God.
Links to Chronological Bible Read Plans
I like this plan so much I created my own chronological Bible Reading Strategy through it a few years ago. (With Derek’s help.) Now you can have it too! Just click here or go to the tools page. FREE! ***Now, I need you to know this guide is NOT, daily reading. It’s just a list of chapters to read, in order. I’m never good at staying on those daily reading plans. So I just work through it at my own pace, reading some each day.****
If you prefer a daily chronological schedule I’ve got that too. This is a one year plan from Blue Letter Bible. (Which by the way is my go-to study site/app!)
The other explanations won’t be this long! Promise.
3 Month Challenge
For those of you who are ambitious Bible reading challenge. Two summers ago a friend said she was reading the entire Bible in the course of three months. YES. THREE MONTHS. I decided to try it too. Annnd, I fell just a bit behind, but finished in about 3 months, 3 weeks.
The great thing about this was that I got a great overview of the Bible as a whole. I tend to forget some things if I read over a year (or two). But since this plan was so quick, and had large chunks of reading each day I was able to retain the story. This really gave me good insight into the “main points” of the Bible.
Now, before you write this off as too much or too scary, just listen. We’ve already discussed that I’m not the best “text” reader. So, I actually listened to most days reading. I was doing this challenge while working on the Kautzmann’s house. Every day I’d listen to the daily reading. It took about 20 minutes. Most days I’d listen to it 2-3 times. And it really didn’t cramp my style or interfere with work. If you’ve got a commute, you could be doing this on your drive in and your drive home. If you go to the gym you could listen on the treadmill. The possibilities are endless.
If you like reading the actual book it’s still doable. Most days the actual reading would take just about the same amount of time for me to work through. Maybe slightly longer because I’m a slow reader. The point is, you can do it.
Links to 3-Month/90 Day Bible Reading Plans
Here is a printable, chronological plan complete with check boxes.
Bible Study Tools has a “straight through” plan. You can get that here.
Bible Gateway offers a “straight through” version that brings up the daily reading in the app or site. From there you can choose to read, or hear the audio. And you can opt to have reminders sent to you. Make sure the calendar is set to January first to get your first day’s reading.
The Proverbs
If you are trying to make Bible reading a habit, the Proverbs can be a great place to start. There are 31 chapters in the book of Proverbs. There are usually 31 days in the month. Just read one chapter per day. Because the Proverbs are not narrative, you can start anywhere. Whatever the date, start with that chapter. If you miss a day, don’t worry. Just start again with the chapter that matches the date. Proverbs is a collection of practical wisdom. It’s useful Scripture and this simple practice can get you in the habit of getting in the Word. It’s also simple enough that you can easily add this practice to another reading plan you are working on.
Acts and The Epistles
First of all, “epistle” is a fancy word for “letter.” This refers to letters in the New Testament written to new churches. Books like Galatians, Romans, and 1, 2, and 3 John are epistles.
This Bible reading plan takes you through the years after Christ ascended to heaven. It puts the events in Acts in order with letters to churches. It’s also got cool bonuses for geeks like me, including a timeline of the year with each reading, links to maps, and illustrations. Although it’s not broken down into “daily” readings, many are short enough to read in one sitting. You can see the plan from Blue Letter Bible right here.
Thematic Reading
I’ve gone through seasons when I just wanted to know what the Bible said about a specific topic. Anxiety/fear was one. What God is like as a Father was another. What the Bible had to say about using foul language was another. Maybe this is where you are. If that’s the case, I highly recommend popping over to Bible.com. They’ve got a HUGE selection of thematic reading plans. They vary in length, so I’m sure you’ll find you like.
3-Day Kick Start
Oh, and if you are wanting a boot in the booty to get you hyped, I HIGHLY recommend getting my 3-day Bible Reading Kick Start. It’ll come straight to your inbox. (I won’t spam you, pinky swear and your email address will be safe with me.) You can go through it solo, or with a friend. Up to you. It’s designed to get you excited about the Word and I really hope you like it!
Tomorrow I’ll be sharing my favorite ways to plant Scripture in your heart. Ways to make sure I’m not only being a hearer of the Word, but a doer also. (See James 1:22.)
Amy
The Long Way Around (avoiding God’s calling and remembering God is faithful)

Today, the first time I’ve written in months and months, I wan’t to talk about God’s calling.
**I’ve recorded this post so your ears can read it instead of your eyes. You’re welcome.***
But first…simply cannot believe it’s January. And not only that, but midway through the month. This time last year I’d done a lot of praying and thinking about what I wanted to do. About what God wanted me to do. About God’s calling for me. Where He had gifted me, what I naturally felt at peace doing. And it all came back to writing and teaching.
So I set out to revamp the website (something Derek says I do far too often…) And I did. The redo took way too long and the launch got pushed farther and farther behind. But I kept plugging away.
But then a funny thing happened. When it was done, I felt this tightness and pressure. Instead of reaping joy from writing and enjoying studying God’s Word I concocted a heaviness that scared me away from writing on my new, beautiful site. So I found lots of other things to do. I convinced myself that I’d know when the time was right. I’d have something perfect to say and I’d write it. In the mean time I filled up my schedule with contracts and projects and all kinds of things. Things that left me too tired to write or study. I knew God’s calling wasn’t to be stressed or not at peace, I knew God’s calling–but I avoided it.
Oh, yeah…and there was a terrible bout of anxiety in there too. It had nothing to do with writing or blogging. But it halted me. Because when I hit a patch like that I convince myself that a person struggling cannot contribute anything but more struggle. That’s a lie.
But as time went on the message became more and more clear. This is what God’s calling me to do–at least at this season in life. Not the struggling and the stress–the learning, teaching and studying. The soft voice I hear in my prayers has become louder and louder. Messages have been coming my way that are prodding me to move forward, be brave, continue. The radio, the Bible, the audio books I’m listening to, even strangers have lately (and by lately I mean over the last 6 months) have all been unknowingly speaking into my soul. I can hear God in my prayers asking me if I’ll listen to them. Because I’ve obviously been avoiding listening and obeying Him.
Maybe you can relate?
Maybe?
And perhaps the most nagging thing of all has been Abraham. Yes, from Genesis. And from the song about him having many sons. read more…
Hello Again
Wanna listen to this post instead of reading it? Click here to listen to the audio version.

Hello again. It’s been a while and I’ve got a lot to tell you.
Not in the sense that I know a ton and I’m smarter than you.
Or in the sense that I’m about to unload a TMI situation on you.
It’s just that it’s been a while, and a lot has happened and I’ve missed you and I’ve missed this. But we’ve got time. So, consider this an introduction to Amy Allender Bible Study Blog and resources.
Last time I really wrote, I was in New Mexico, after having moved away from Minot, ND. Things were good and I was good and it was hot as blazes. But a funny thing happened. Even though I was excited to write…nothing came out. It was like turning on an old rusty faucet. A few drips forced their way out, but nothing else came up. And the crazy thing was, I was okay with that.
That alone is a testament to God’s goodness, grace and activity in our lives.
In the past, I would have been upset that no words came out. That I had nothing to say. I would have bought into the lie that without a “real” job or activities worth writing about that I was doing something wrong. I would have bought into the lie that I needed to share my life with others to affirm that things were good in my world.
Now, mind you, that’s not the only reason I wrote, but it was a reason. It was a way of reminding myself that even though I didn’t have a regular, real job…I was doing things, I was busy and I really did enjoy my life.
I don’t know if that makes sense or it’s just me.
Any way, back to New Mexico.

So when I wanted to go back to writing and nothing came out…instead of forcing it–or thinking I had to force it out…I was totally cool. God gave me a great season of peace and contentment, at least where blogging and writing has been concerned. Once we traded the Southwest for South Dakota, I started to feel the familiar panic set in of being in a new place with no business, few connections, and little direction.
BUT–instead of falling into my normal, natural pattern of discouragement and despair I did something different. You see, last year at this time I was fervently calling on the Lord for help and He showed up in a miraculous way. (I pinky promise I’ll tell you about that later.) I saw God work, I knew He was for me and I wanted His guidance. So instead of pouting, I got to it. I decided that I wanted guidance and direction and His grace more than I wanted the familiarity of a post-move depression. (Being down in the dumps is no fun, but it is familiar, and tricks me into justifying bowls full of ice cream every evening.)
So I prayed with intention. I prayed with expectation. Not expecting God to give me a certain answer, but expecting Him to answer. I told the Lord the things that I love to do and asked Him if He’d like to use those skills–if in His great mercy He could release me from the fear preventing me from pursuing things that He created me to love…even if they don’t seem like “real” jobs.
I prayed and I listened and somehow I scraped up enough self-discipline to truly wait on an answer.
And then it came.
Around January of 2017 I knew I needed to return to writing. Not in a rush, but in a strategic, planned, thought out way. It didn’t happen with prophetic dreams, or from hearing a booming voice. I just knew with great peace that Ineeded to streamline the content I was writing, to write with purpose. The hardest part was feeling a calling to cut out some of the variety in my writing. Instead of writing about everything and anything, I knew God was calling me to write about Him and His Word. Instead of striving to re-start the photography/design/video/art teacher/artist business again…in an effort to generate some income and have some kind of answer to the ever-terrifying question: “So, what do you do…?”
God gave me peace and encouraged me to trust that He will provide. That writing about Him is a good answer to that question. God has given me so much freedom in my life and this was one more place that He freed me. He told me that I am free to pursue this calling, because this is a good calling, worthy because He gave it to me to pursue, and that my value is in His eyes, not my job title, anyway.
It’s been scary. No other cute way to put it. But God has blessed me along the way. He gave me a day job, He gave me ministry opportunities, He gave me opportunity to teach art and use my design skills in new ways. God gave me time to rebuild, reflect, dream and redesign. I wish this was done sooner. The maintenance mode thingy said I would be done in early March. But early March became late March. Which turned into April 8th, then just “sometime in April.” And somehow that was okay. Instead of beating myself up for failing or falling behind the schedule, I knew God was in control. I knew the website would be done when it was done and that He’d give me the words when it was time to start writing again.
These are those words.
I don’t know that this is eloquent or even makes sense. But I’m so happy to be here writing and sharing life with you again. I hope this reintroduction hasn’t put you to sleep. Unless you are listening to the blogcast version as you are drifting off in an effort to sleep–then I hope I’ve totally bored you and you are snoring by now.
Just kidding. Everyone knows my voice is anything but soothing. That’s why I taught high interval training instead of yoga. The voice. And the flexibility. But I digress.
Now that you know a little bit about the last year, let me tell you what is coming up–God willing. You probably noticed that the site looks different. That’s because I’ve totally redesigned with a singular focus in mind–getting folks excited and interested in the Word of God and knowing God more personally. To put it simply, I want you to leave here inspired by God, excited about His Word and motivated to walk in faith.
Bible study is like my all time favorite thing and I totally geek out over it. There is nothing more important than knowing God and connecting to Him. It’s what we are all created to do. When we intimately know God, when our relationship with God is right…we are doing what we were created for. We live in purpose, with purpose. Truly knowing God and understanding what He says in His Word will change. your. life. Change it. Remodel it. Always for the better–always, always, always. I love everything about God’s Word and I want others to know that joy too.
If you aren’t excited about the Bible or have lost your fervor–check out this super awesome three-day kick start! It’s a good place to start if your Bible is dusty and you wish you read it more…but it’s also interesting enough for a well versed (pun intended) Bible geek to enjoy.
I’ve really tried my hardest to tailor the site’s design with readers in mind. Here are some new, cool changes I think you’ll appreciate. First, I am creating and offering special courses and studies and series (like that three day kick-start I just told you about!!) that will be delivered right to your inbox. These are resources just for you that will come right to you. I’ll always tell you when a new tool or resource is available…or you can just check the resource page. And I’ll never, ever spam you. The email kind, or the mystery meat kind.
Next, to help information really take root, or to help you think through complicated topics, I’ve got worksheets and workbooks on the way. I learn best when I can think critically, answer questions and write things down, and I know some of you do too.
One of my very favorite things is learning about culture, context, politics, and society of Biblical times. Knowing a little background can shed a used car-lot spotlight’s worth of light on a passage that you’ve never understood before, or add a deeper level of meaning to a passage that you’ve read a million times. The Bible always has more to learn, more to tell us. In the coming days I’ll write about history and context and I know your interest will be piqued!
Over the last year and a half I’ve learned a lot about God’s character. This has been a HUGE game changer for me. I’m excited to share my experiences with you and examine Scripture to find the truth of who God is.
Now, you might be thinking–“Oh, man…this all sounds great, but I really liked reading Amy’s posts before when she’d tell us all the random and embarrassing things she did.” Never fear. I think our most powerful tool as Christians is our past experiences and testimony. My best testimony of God’s goodness and active nature is evidenced in my own misadventures. I’m looking forward to continuing to share my life with you in the form of true to life devotionals that may cover anything from an epic battle with depression and anxiety to trying to tame a raccoon in our hollow apple tree and everything in between. Because every moment of every day–every victory and every hurt and every smile–all point back to a wonderful God. (And if you get really desperate for the old posts, they are safe and sound over here.)
Lastly, if you know me, you know I L-O-V-E audio books. And talk radio, and audio Bibles, and anything else that allows me to learn on the go. I know we already talked about my less-than-yoga-instructor voice, but if you want to be part of this community and just don’t have time to sit down and read…I will record all blog posts and make them available for download. It’ll be fun.
I guess what I’m saying in all this is–I hope my gifting in the realm of Bible geekery will be a blessing to at least one of you. I’m honored that you are here. I’m excited to learn with you.
Amy
Hello Again | 5.16.2017
5 Last Minute Ways to Decorate For Fall
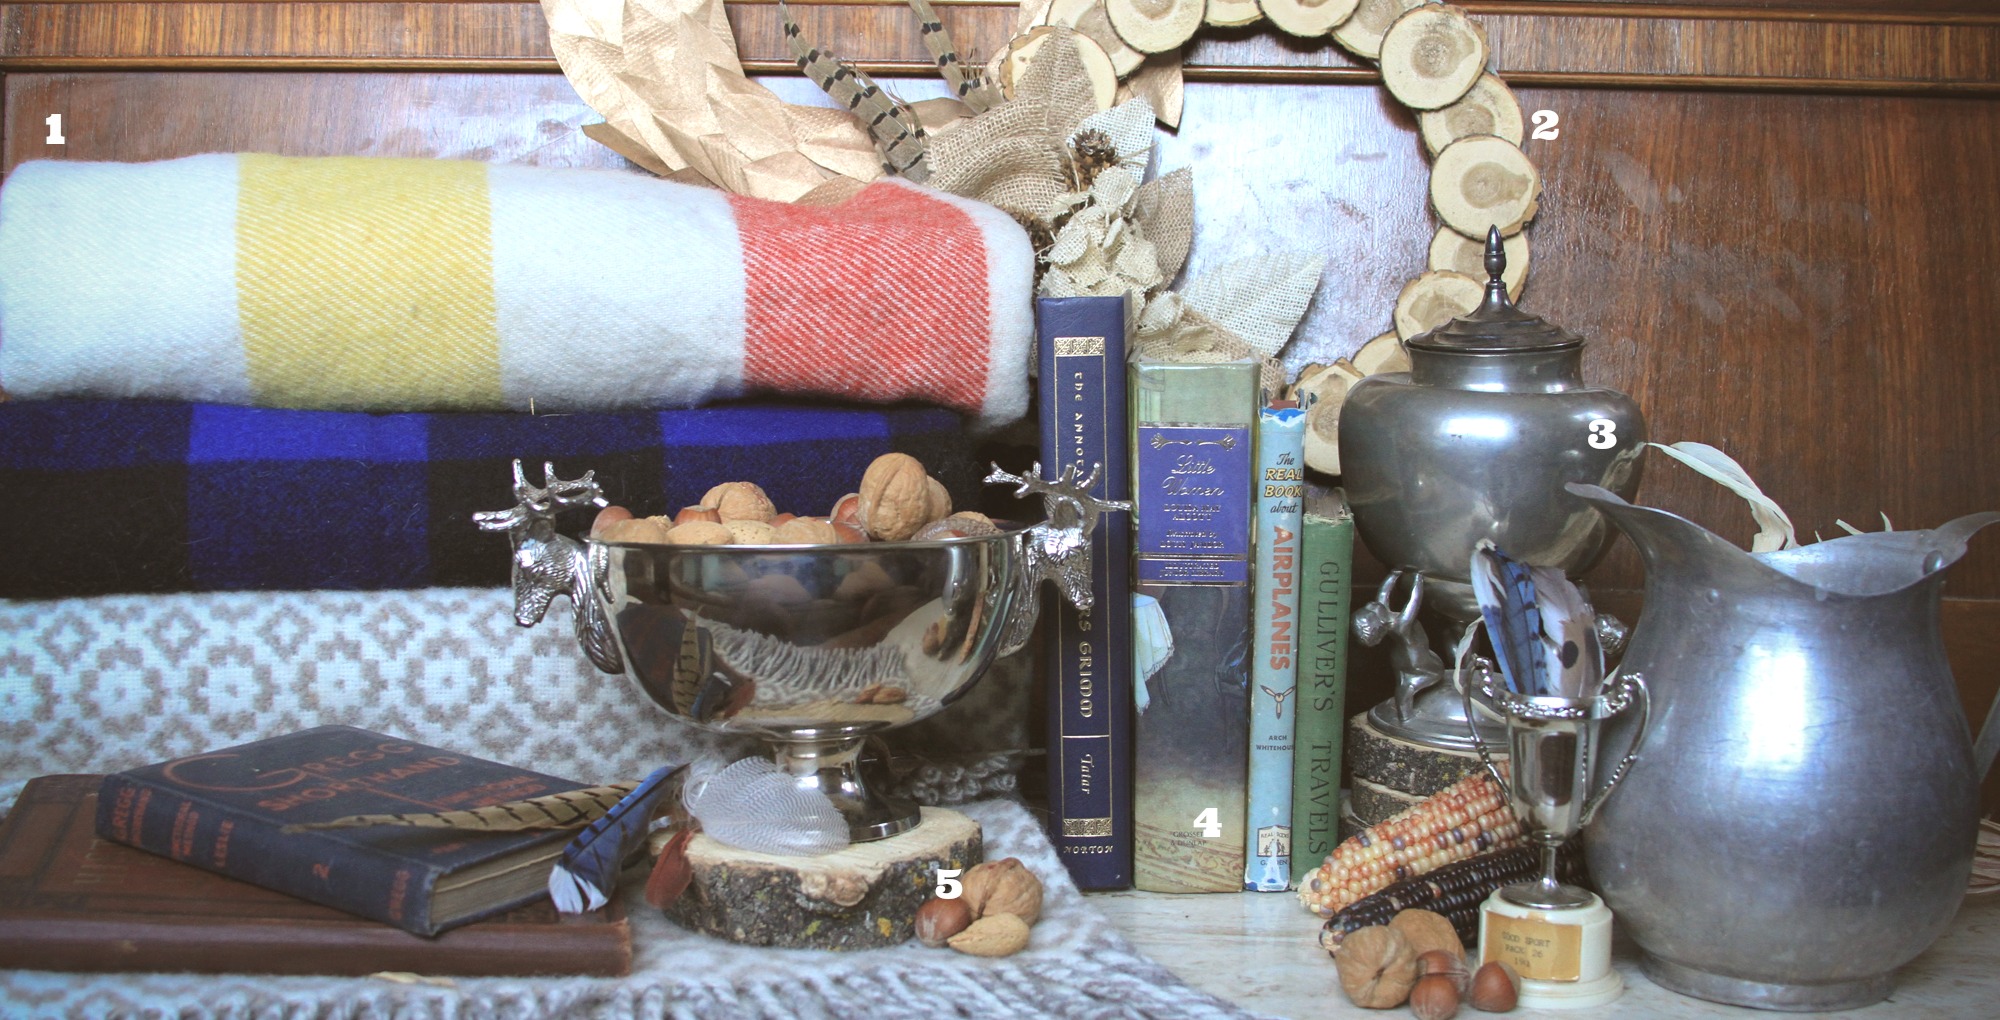
It’s been a while since I’ve posted. And I’m hoping to come to you with a big fat explanation of all the adventures that have been taking place here. Let’s just say it has involved dead bats, a new house, endless woodwork to refinish, contractors, and sliding to the door Risky Business style {fully clothed, of course} to answer the door when I thought it was Derek…only to find it was a new neighbor {who I’m pretty sure thought I was 15.} It’s been one awkward adventure after another.
But in the midst of the arrival of boxes and furniture, unpacking, and shifting furniture around to refinish fabulous hardwood floors…I was inspired by the lovely folks at Arhaus to put together a post about fall decor ideas. Now…you know I’m a fan of total transparency, so I’m going to be honest. My house is currently decorated with polyurethane cans, rags and step ladders. However, my family is coming from far and wide {Indiana and Wisconsin} to spend Thanksgiving with me, and I’ll be a monkey’s uncle before I let my house go decor-bare for one of my favorite occasions. So this year, more than any before, I’m relying on my easiest, quickest, most trusty fall decor methods to turn my middle-of-a-remodel abode into something more guest appropriate.
For fall and Thanksgiving {much like the other holidays} I like to decorate with things I have on hand or things that are easily accessible and shiftable after the season is over. Therefore, the five items I’m going to showcase today are all things I have around my house that I like to bring front and center in the fall. Let’s go.
1. Wool Blankets. I love wool. It’s a problem. And it’s growing as I age. I love wool blankets and wish I was rich so I could buy every single one in the Filson, Pendleton and Woolrich catalogs. I consider them a good investment, since wool never goes out of style and will last lifetimes if properly cared for. {I like to tell Derek I’m buying heirlooms…} As soon as cooler weather starts to hit and leaves change, these puppies come out of hibernation. I fling them over an arm chair, stack them on a trunk or end table for easy access, and layer them up on beds. They don’t have to match, they don’t have to be perfect. Just the fuzzy, warm texture is enough to bring a sense of fall into your living room. And since they can be pricey, but do last a lifetime–keep your eye on online markets {like eBay}, estate sales and auctions, and flea markets to score wool blankets for a fraction of the catalog cost. Bonus, if you come across some that are damaged you can scoop them up and repurpose them into pillow covers for you couch throws.
2. Natural Elements. I love that fall starts out with a big burst of color. Then things start to fade out and we are surrounded by an awesome neutral pallet. For this reason, I’m into using natural elements and textures to decorate for this season. It’s calming to have a house full of low-key tones after the brightness of summer and the colorful pops that come with the Christmas season. Really anything that let’s you bring a piece of the season indoors is fine by me. A few of my favorites. include wood discs, golden paper leaves, burlap of all kinds, birch wrapped candles {not pictured above}, feathers of all sorts and leaves straight from the tree. Use these items to make wreaths, fill vases and mason jars, and accent any other arrangement you might be working on.

Originally from Good Housekeeping, image found on Everything Fabulous. Click image to be taken to their site.
3. Silver and Pewter. Something about silver and pewter just sings about fall to me. While I think it’s a little drab for summer, these items come front and center in the fall. Something about them reminds me of spooky Halloween stories, rustic pilgrim meals, and medieval feasts. Group weathered silver items together on an end table or as a center piece. Fill them up with leaves, feathers, mums, or nuts. If you are shopping, suggest looking for things that are a bit imperfect, have a matte or pewter finish, and are not cheap-chincy chrome. One of the best features of these items is that they are a perfect backdrop for nuetral-fall elements, then transition seamlessly to Christmas by filling them with lights, glittery ornaments and evergreen branches.
4. Vintage Books. Fall ushers in a time of early sunsets and long evenings spent indoors. I like to hearken back to a time before Netflix, when our grandparents and great grandparents spent evenings entertaining themselves with books. Reading stories aloud to one another, using the energy of their imagination to generate the images. In my house, it’s mostly board games and movies after dark {at 5:30 or so}…but I like to give a nod to this old tradition by stacking up my favorite classics on end tables. Or using them as pedestals for my favorite pewter pitcher.
5. Nuts. Nuts get a category all their own–even though maybe they are a natural element. Transparency: I’ve had these nuts for years. We own a nut cracker. Each year I get a few fresh nuts for cracking. Each year, more get added to my “decor” nut box. Nuts are a conversation piece…because no one really knows how to crack them any more. Kids are hilarious when they try to break in. And they can give your Thanksgiving guests something to do while they wait for the turkey…without getting overly snacky. You can spray paint them gold. You can fill jars in all sizes for a centerpiece. You can put them out in a pretty bowl on the end table. You can add them to wreaths. You can buy them dirt cheap. Pick up a few from the grocery store, set them out for all to see–and just that easy…you’ve decorated for fall.
I want to extend a BIG THANKS to Arhaus for featuring this post and these ideas on their site! Be sure to check them out and see what’s inspiring them this fall. They have super pretty furniture and lots of inspiring decor–I’m flattered to be included. {Disclaimer…Arhaus has in no way paid or compensated me for this post or these compliments.}
More soon,
Amy
Sam and Katie’s Place | House Tour
**This space has been featured on Shutterfly’s interactive album “How to Decorate a Small Living Room.” Click over for more great ideas, cool spaces and inspiration from other talented designers and decorators.***

Tonight is a super special, super exciting night. And yes…it’s very much night. My day has gotten away from me, but I simply couldn’t wait one more day to write this post. I’ve had some busy days lately shuffling my suitcases and precious Panda kitten from hotel to hotel and Derek and I house hunt. Before you think I’m writing a big complainy post, hear me out. Yes, moving rooms has been a pain. But–pretty much every day I wake up and praise Jesus for the miracle of living in Rapid City. Seriously…I cannot believe I get to live here. The thrill of living in the Dakotas still hasn’t worn off and I don’t think it ever will!
Okay. But back to the super special night ahead.
Remember Sam and Katie? Their home was flooded in May after an unfortunate plumbing issue. You can read about that here. Long short version is that the house had to be nearly gutted–and they hired me to help them restore it’s charm. My job included installing baseboards and trim, creating adorable house-age-appropriate window frames, helping choose paint colors, shopping for finishes, eating Dairy Queen on the deck, soliciting help from the church youth group, refinishing furniture, and making a million trips to Menard’s.
Rooms completely refinished include two bathrooms, living room, basement living room, deck. The kitchen was only half pooped but we restored that as well.
Fine…enough of me talking your ear off. Let’s take a tour!
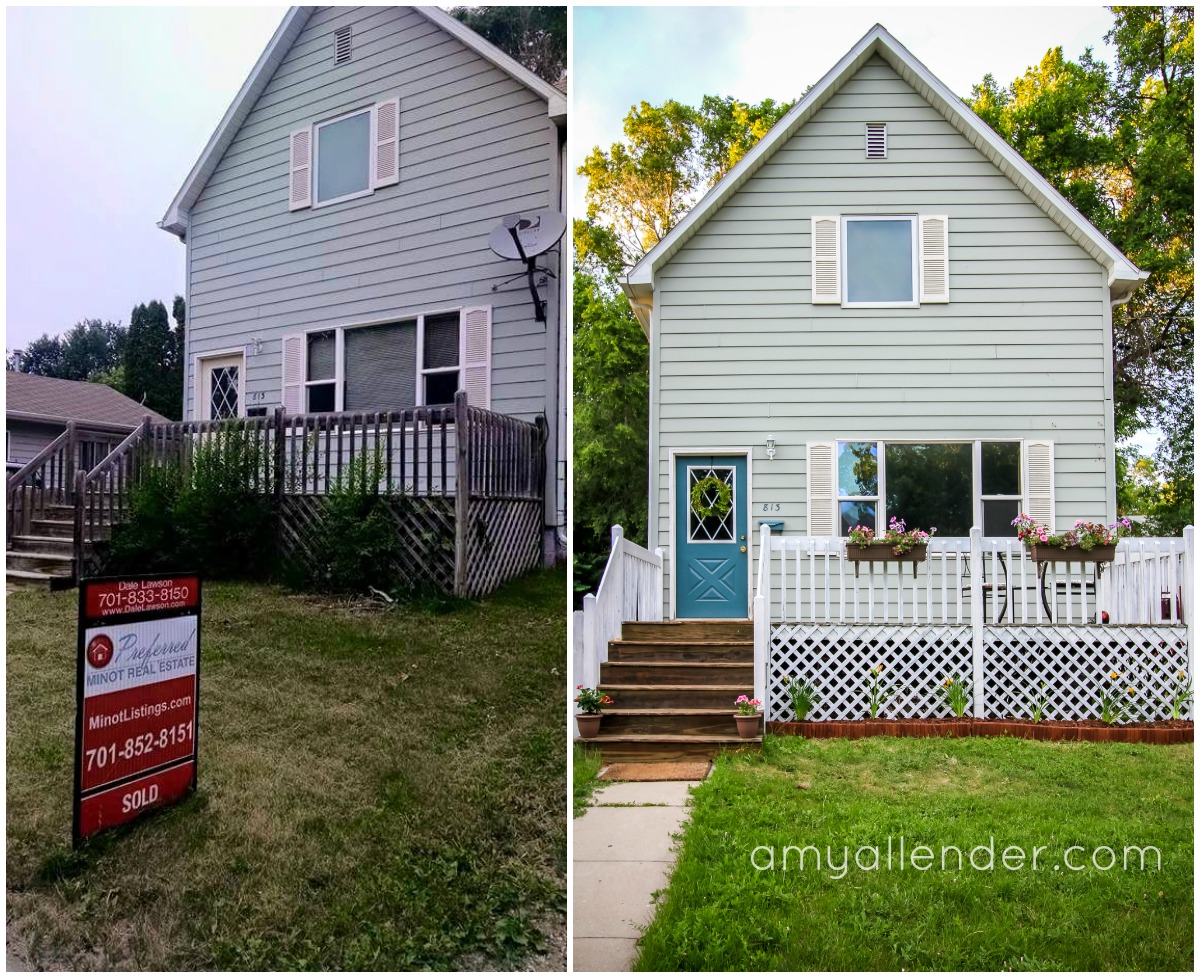
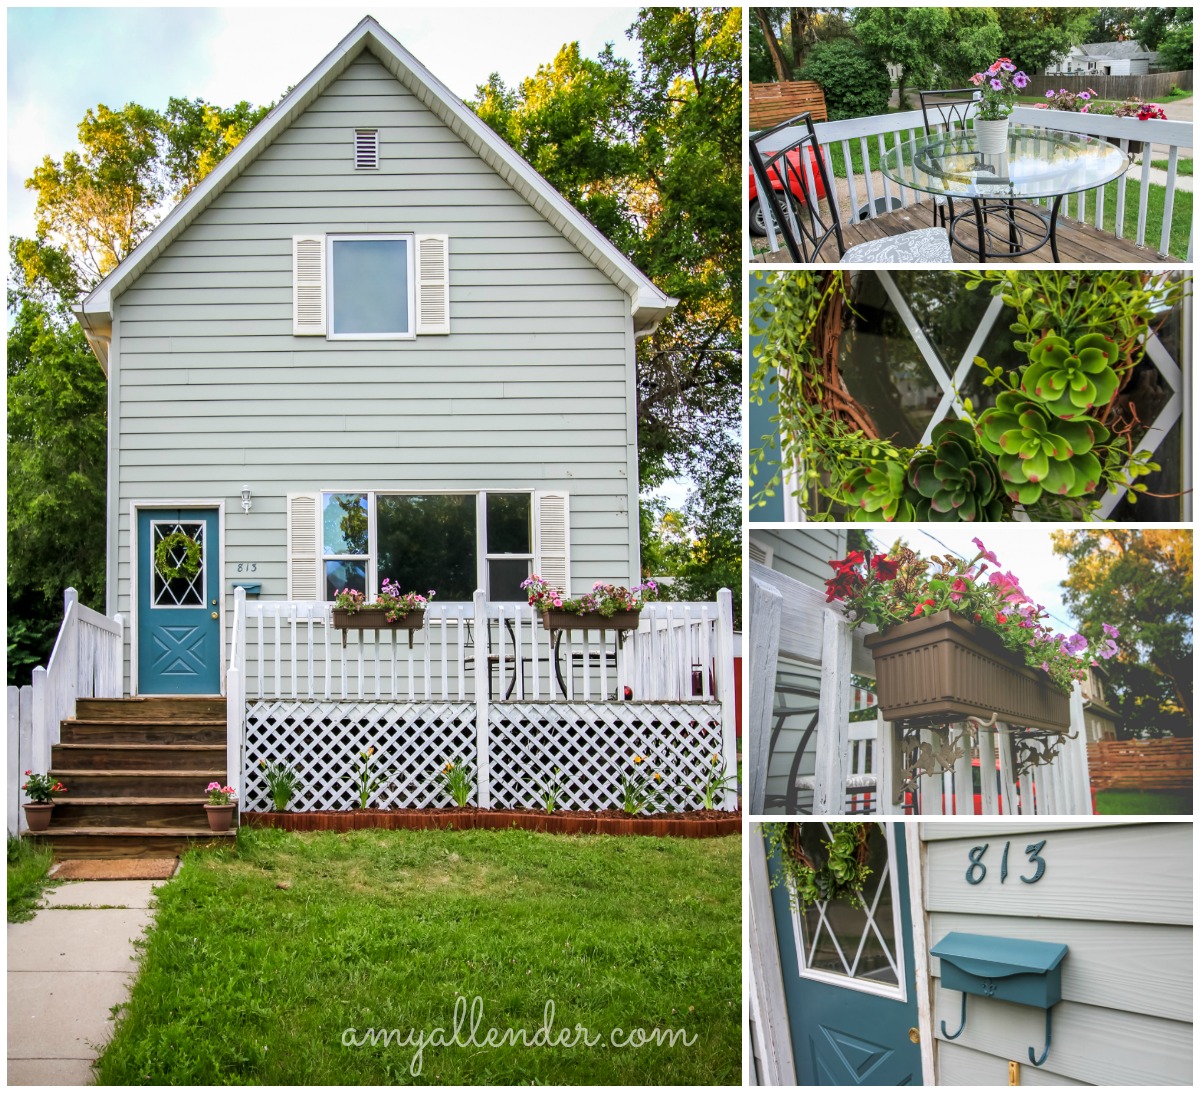
Let’s start outside. First of all, let me state that we didn’t paint the siding. The color shift is from a super cloudy night shot versus a sunny afternoon shot. What we did do–paint and restain the deck/lattice, upgrade landscaping, add window boxes to the rail, paint the door/mail box/house numbers, upcycle old kitchen furniture to deck seating.
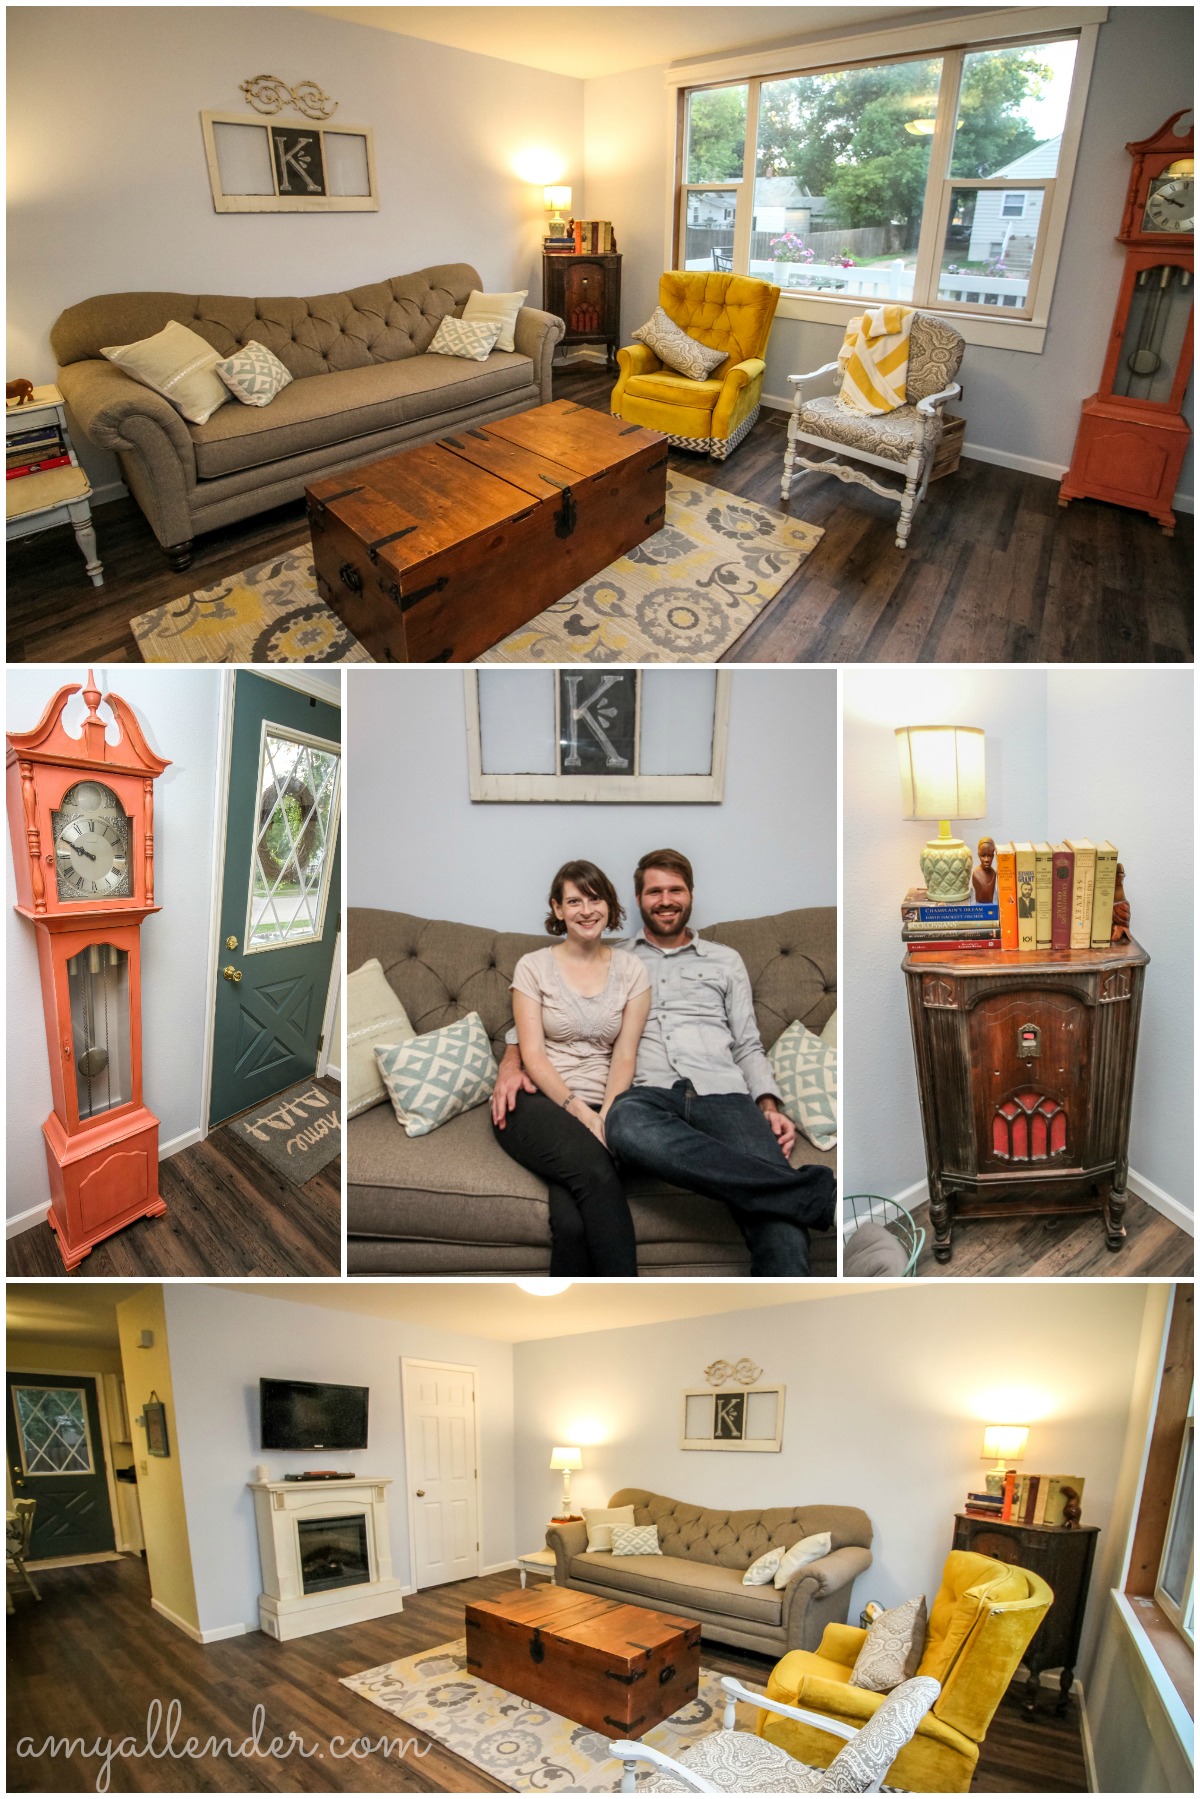
Living room? You got it! Look at this amazing transformation from gutted to completely finished! When Derek saw this photo just now he said, “Oh, is that their basement when it was gutted?” Nope. This is all photos of the living room.
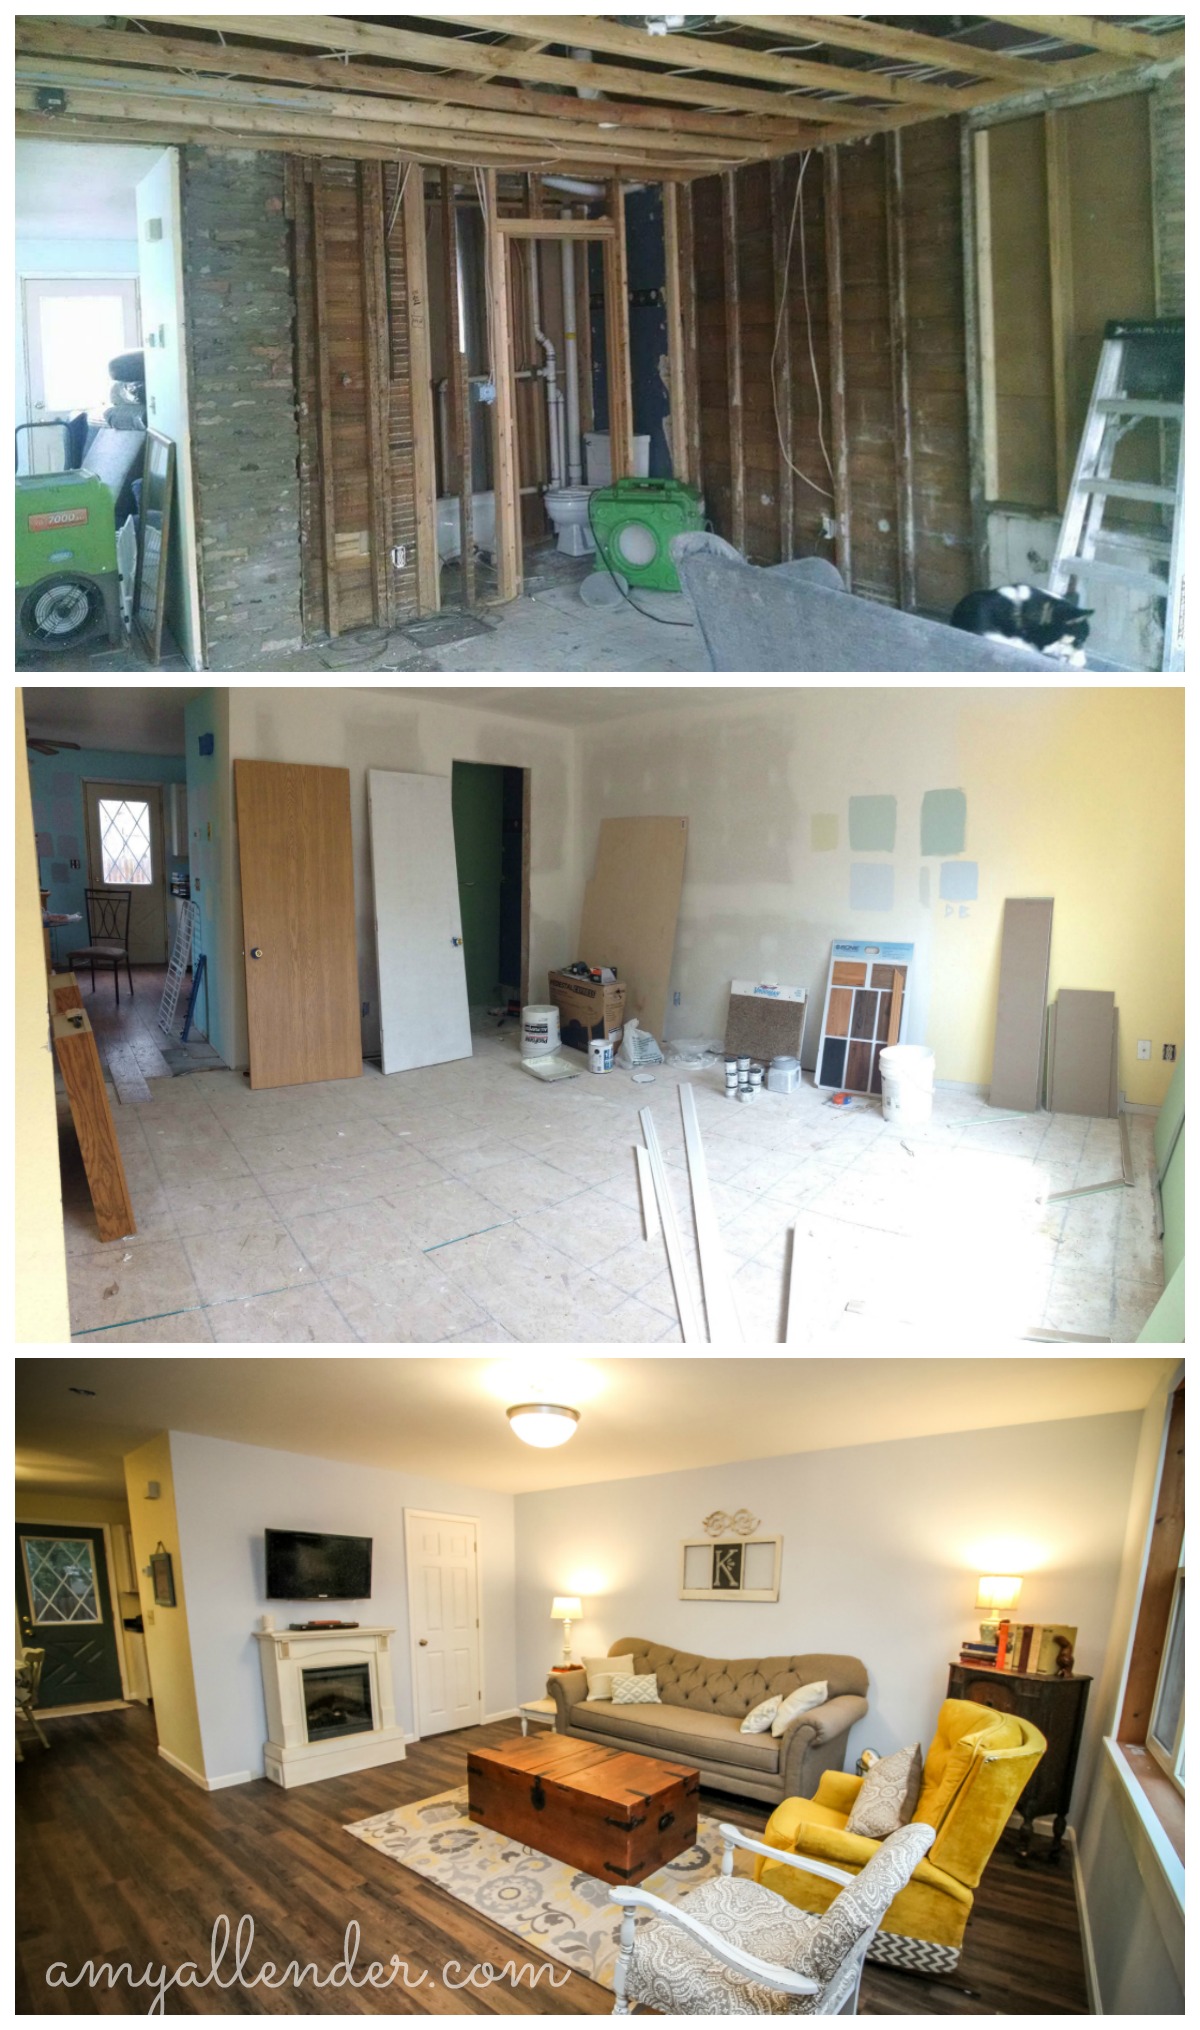
Since this is an old home, Sam, Katie and I wanted to keep it’s original charm–even though we were working with new materials {since the original finishes were a little soggy.} I think it turned out fabulous. Simple. It looks lived in. Classic.
Here’s a little list of what went down. Drywall {not by me.} Painting, new flooring {not by me}, craftsman window trim, baseboards, upcycled vintage radio to blue-tooth speaker holder {that’s like my favorite thing!! the old radio was totally gutted and Sam had the genius idea to use it to hold their speakers}, new lighting and lamps, refinished end table/fireplace/clock, reupholstered chair, cleaned up recliner, gallery wall.
Next, take a look at the kitchen.
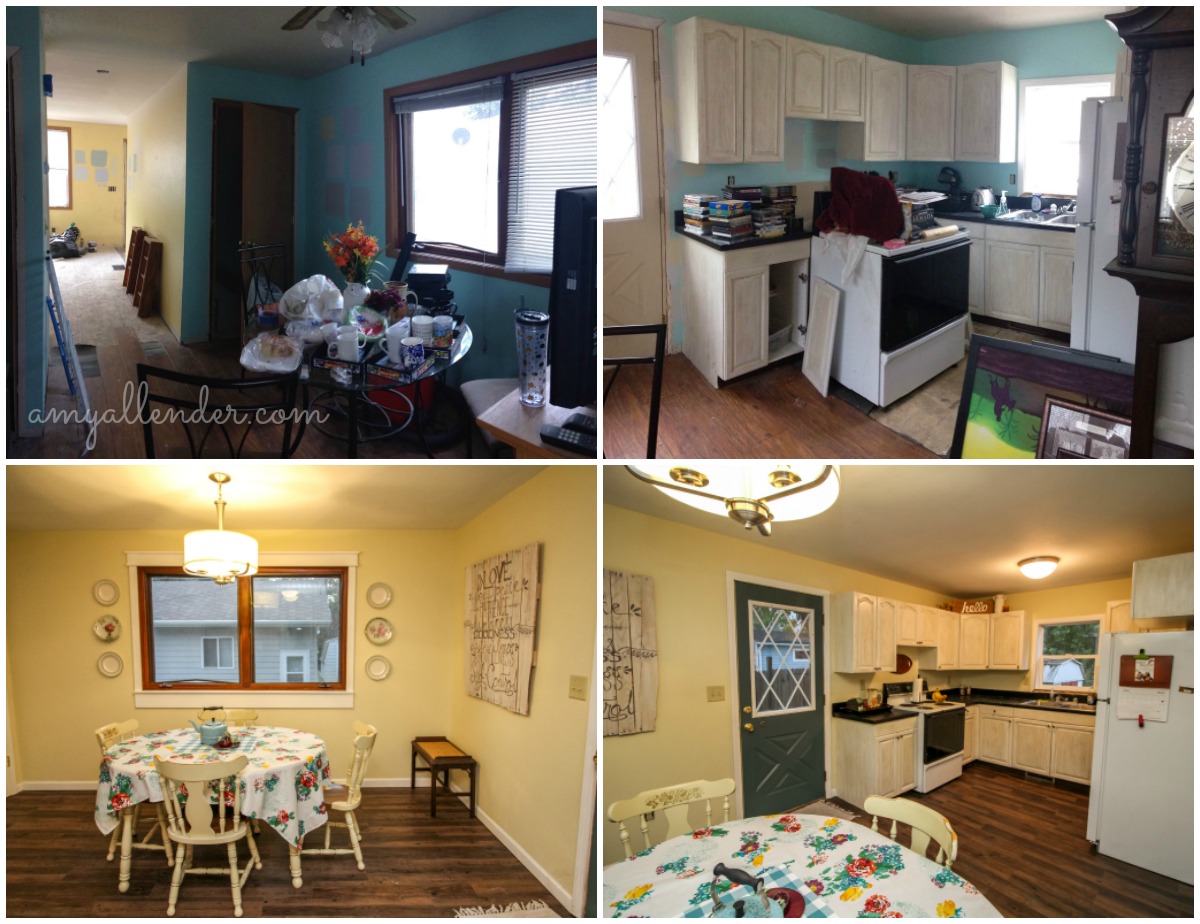
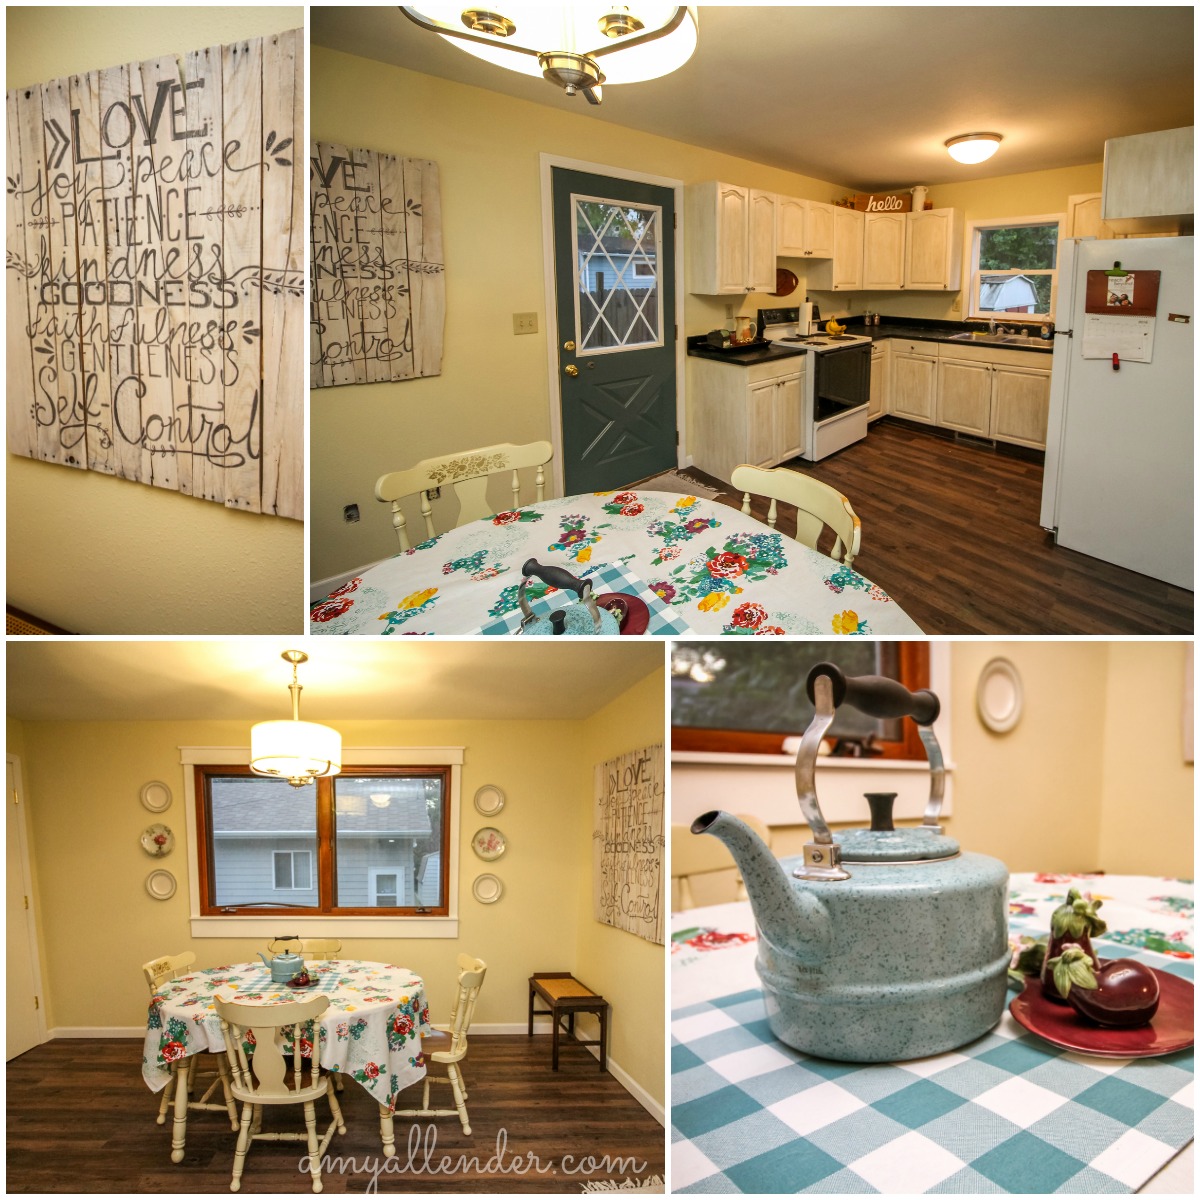
In the kitchen I added craftsman trim to the beautiful window, painted the door, hung new lighting, hung vintage plates on the wall and created a custom piece of pallet art. The room also got a fresh coat of paint and a new floor.
The bathroom where this whole project began now looks like this:

I didn’t have too much to do with this. Just a little help with the floor and paint. But it’s too pretty to leave out. Don’t you love that shower curtain?!
Last, let’s look at the basement. Again, the whole space was gutted. Unfortunately, I forgot to get a total before photo. This is an image of the old closet after the drywall was finished.
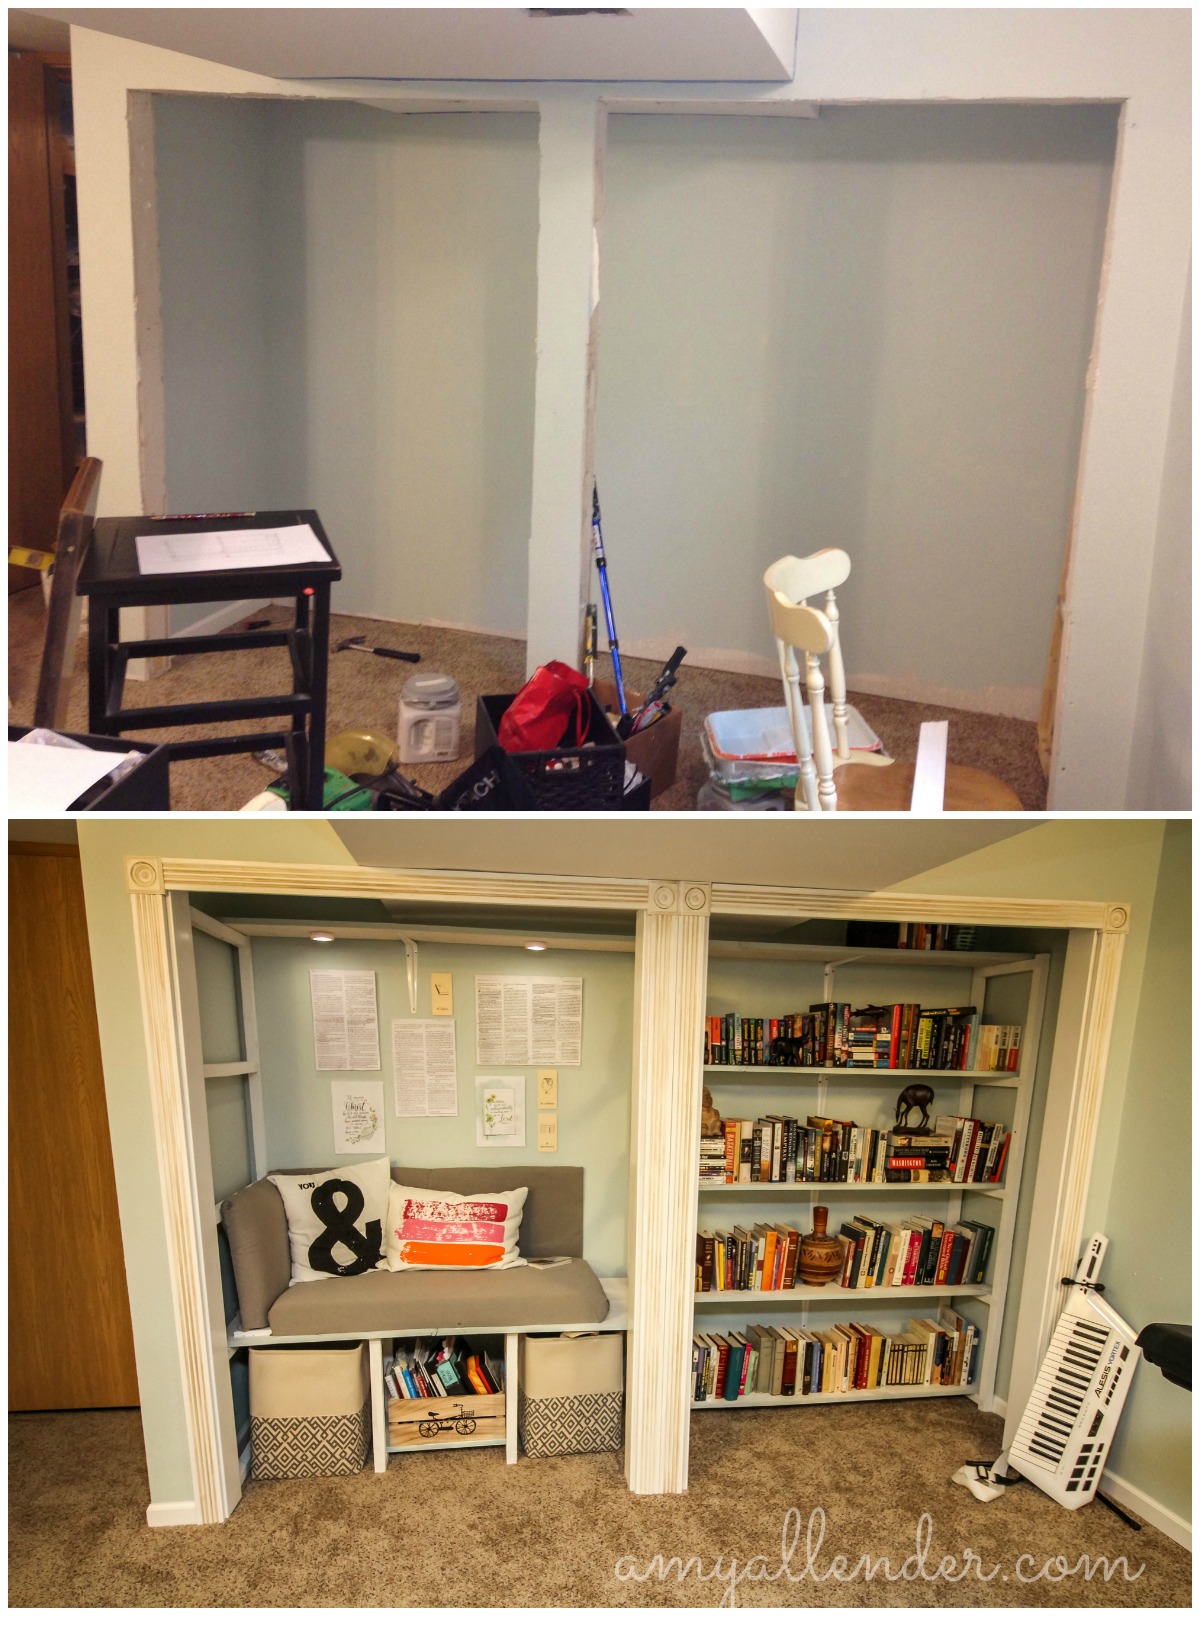
Sam and Katie like to read, so one thing they requested was space for their books. Since this space was not going to be used as a bedroom, I converted the standard closet into a book nook. This gave them space for their library, a quiet place to read, and a cool place to hang out when the youth group kids come over.
These two are also super musical–so it was also important to give them space for their instruments. So in addition to the book nook, this room acts as a space for them to practice their music and play music together. I think their basement totally delivers. It’s a perfect harmony of books, music and quirky style. All paired with lots of storage and {of course} pretty finishes.
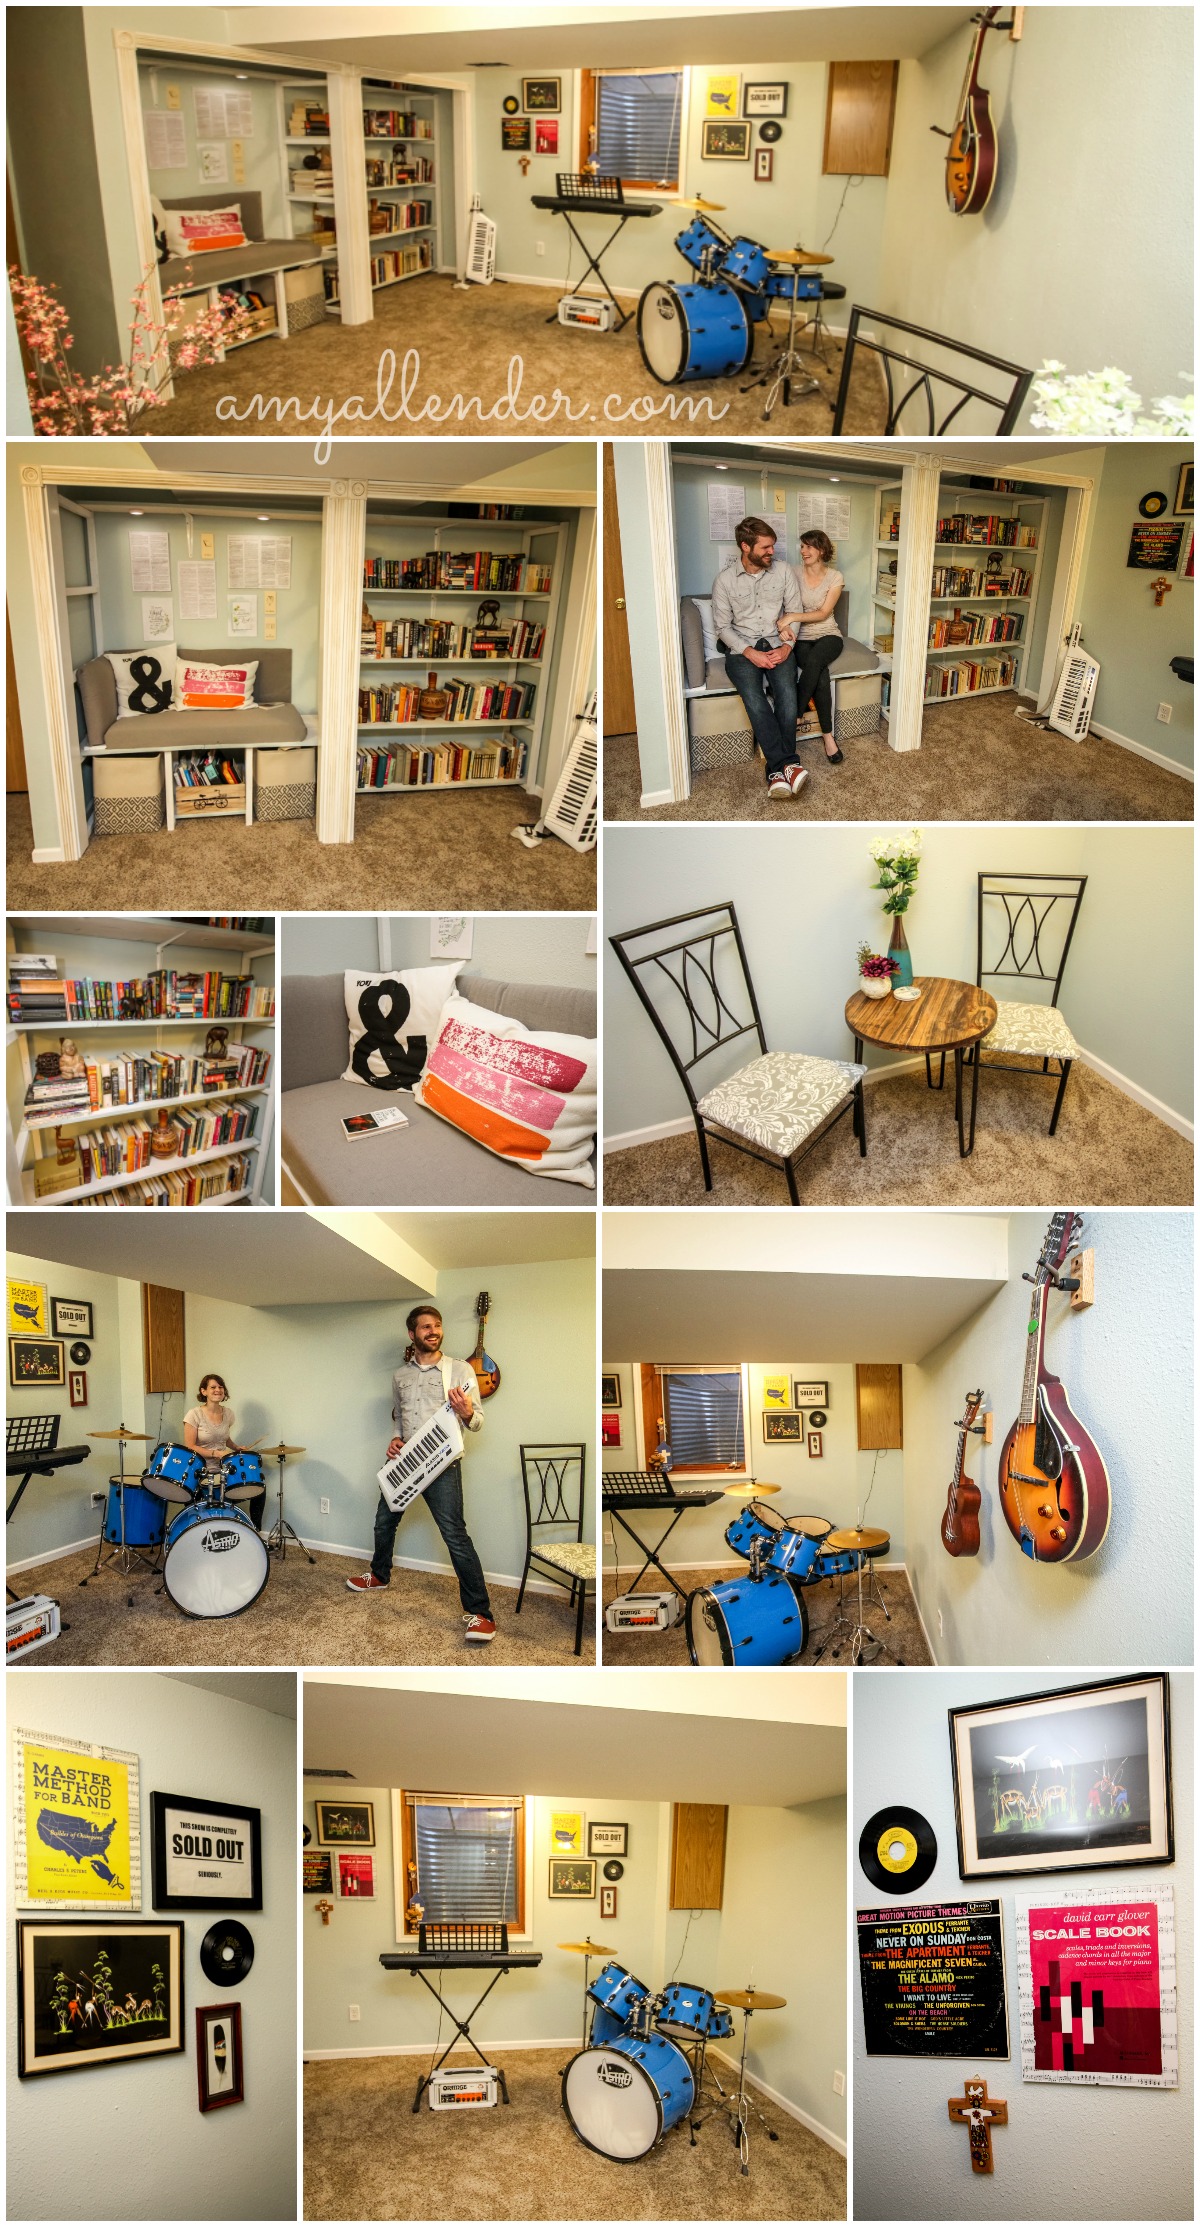
There you have it. Isn’t it just the cutest??! Every time Katie posts a photo on Facebook I just stare at it because the place is so pretty. I loved working with the homeowners to create a finished project–but I mostly loved this project because it let me work with friends!
Great work, team.
Amy
Chalked : Fireplace Redo : Product Review
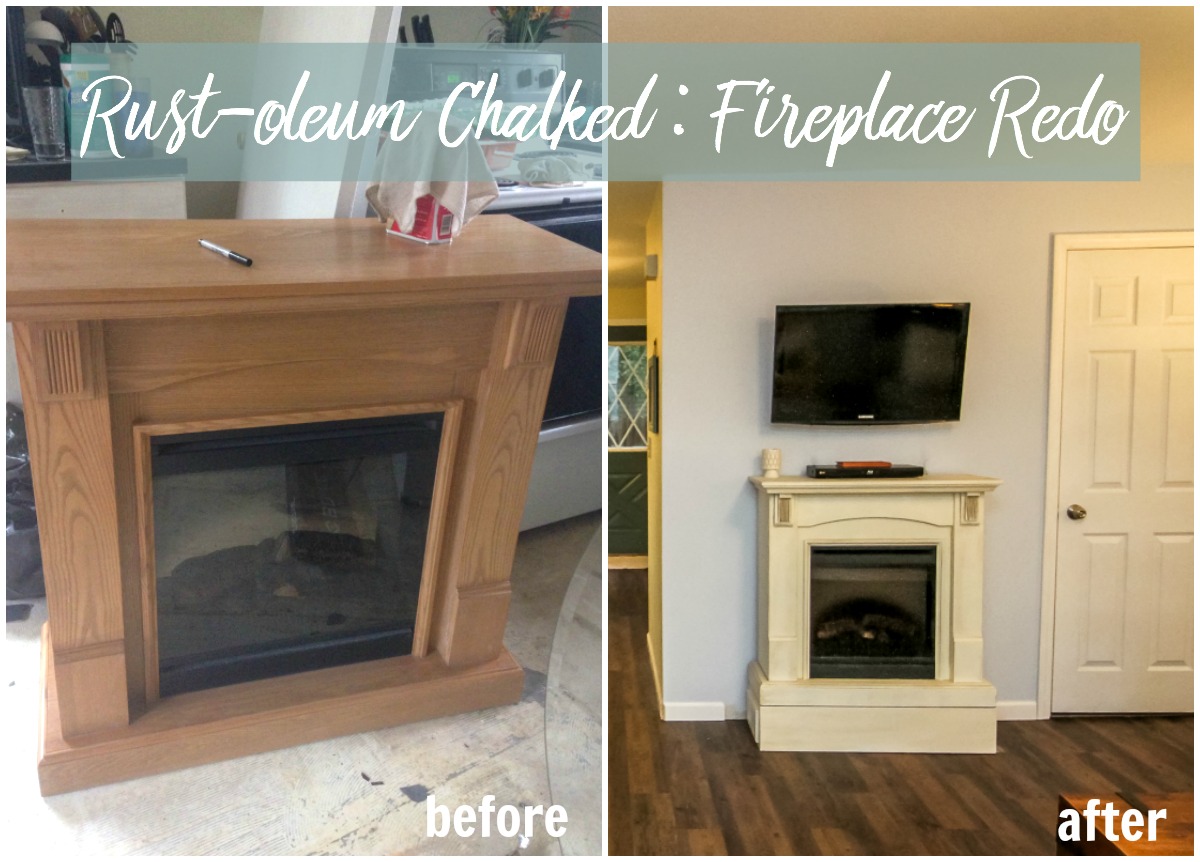
Tonight I’ve got more from Katie and Sam’s place. If you have a piece of furniture sitting around your house that you have been itching to paint, but are too nervous to dive in…read this post. I’ve used lots of refinishing techniques before…but tonight I’m telling you about a product I just tried that is simple to use and left me with fab results.
I really wanted their home to have a “lived in” look to it, which was kind of tricky…because on many of the rooms we were starting from scratch and building something totally brand new. One thing that really helped give their rooms some character was refinishing and repurposing pieces that they already owned {like that rad grandfather clock} and selectively buying new or new-to-them pieces that looked like they’d been around a while.
Through the process of creating that lived-in look…I refinished a lot of pieces. This was super fun and a great learning experience. I didn’t tell them at the time…but I kind of guinea pigged with their items–trying new techniques and products to see if I could unearth a new product that I loved. And I did!
I could write an absolute love story about how much I adore Zinsser and Rust-oleum products. If you read my blog, you probably know I’m in love with these product lines. So when I was at Menard’s {my home away from home} for the zillionth time that week…and a new, pretty end cap featuring a new paint line from Rust-oleum caught my eye…I was immediately itching like a kid with pox for a project to try it out on.
The product feature was a display for Rust-oleum’s “Chalked” paint line. It’s pretty, chalky colors that go on with the tenacity of chalk paint and dry to a smooth, chalky finish {something that hides flaws much better than a high gloss coating.} Paint comes in brushable cans that can be tinted to lots of colors or sprays that come in limited colors.
When Sam told me that he wanted their fire place painted {because he, like lots of us hates clashing wood tones} I knew this was the perfect opportunity to try out that Chalked line. I loved it. It was so easy to use. It turned out great. If you are thinking of refinishing your first ever piece of furniture…I highly recommend starting with this line–it was that easy to use and the results were outstanding.
Here’s what I used. If you read the post on the grandfather clock–a lot of this will look familiar. Once you’ve got the basics you’ll be set to refinish lots of pieces!
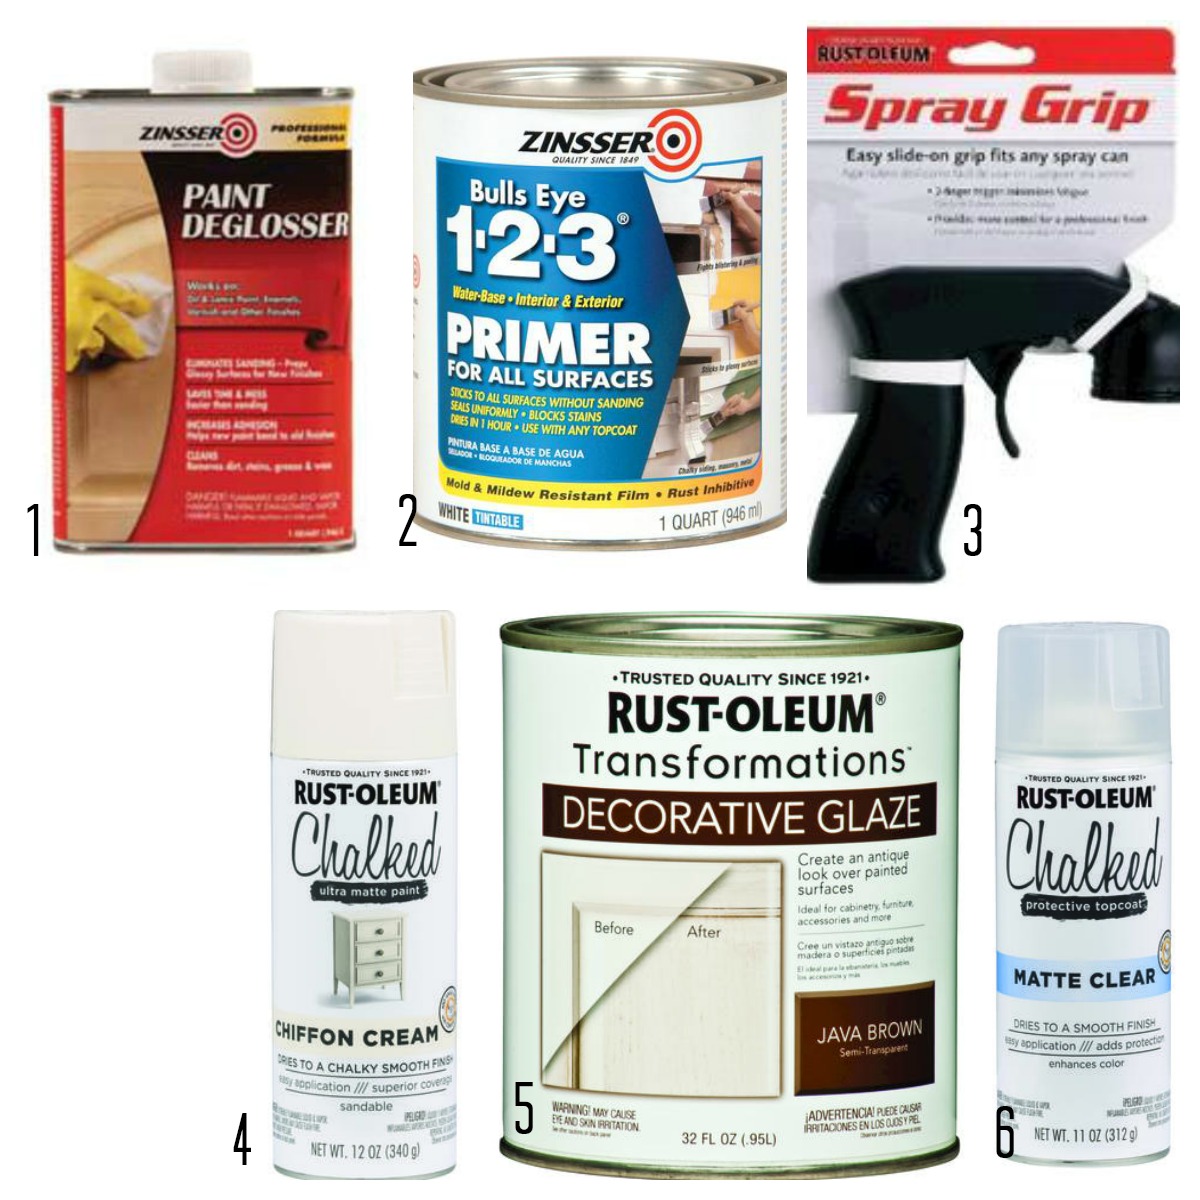
- Zinsser’s deglosser. This strips away and dulls furniture’s existing finish so you can repaint without sanding or fully stripping a piece.
- Bull’s Eye 1-2-3 Primer. Although chalk paints claim to go on smoothly without primer or any kind of surface prep–I’ve always found that laying a base coat is a good idea. Your paint will go farther and the finish will adhere better.
- Spray paint nozzle. It costs like $2 and will change your life.
- Chalked in Chiffon Cream–When painting a piece of furniture “white” I always opt for a cream or off-white option. It hides dirt and feels less stark.
- Java Brown glaze–I had this left over from my cabinet redo several years ago. A little goes a looong way. You can also use wood stain if that’s more readily available to you.
- Chalked clear top coat–to seal in your finish and protect its longevity.
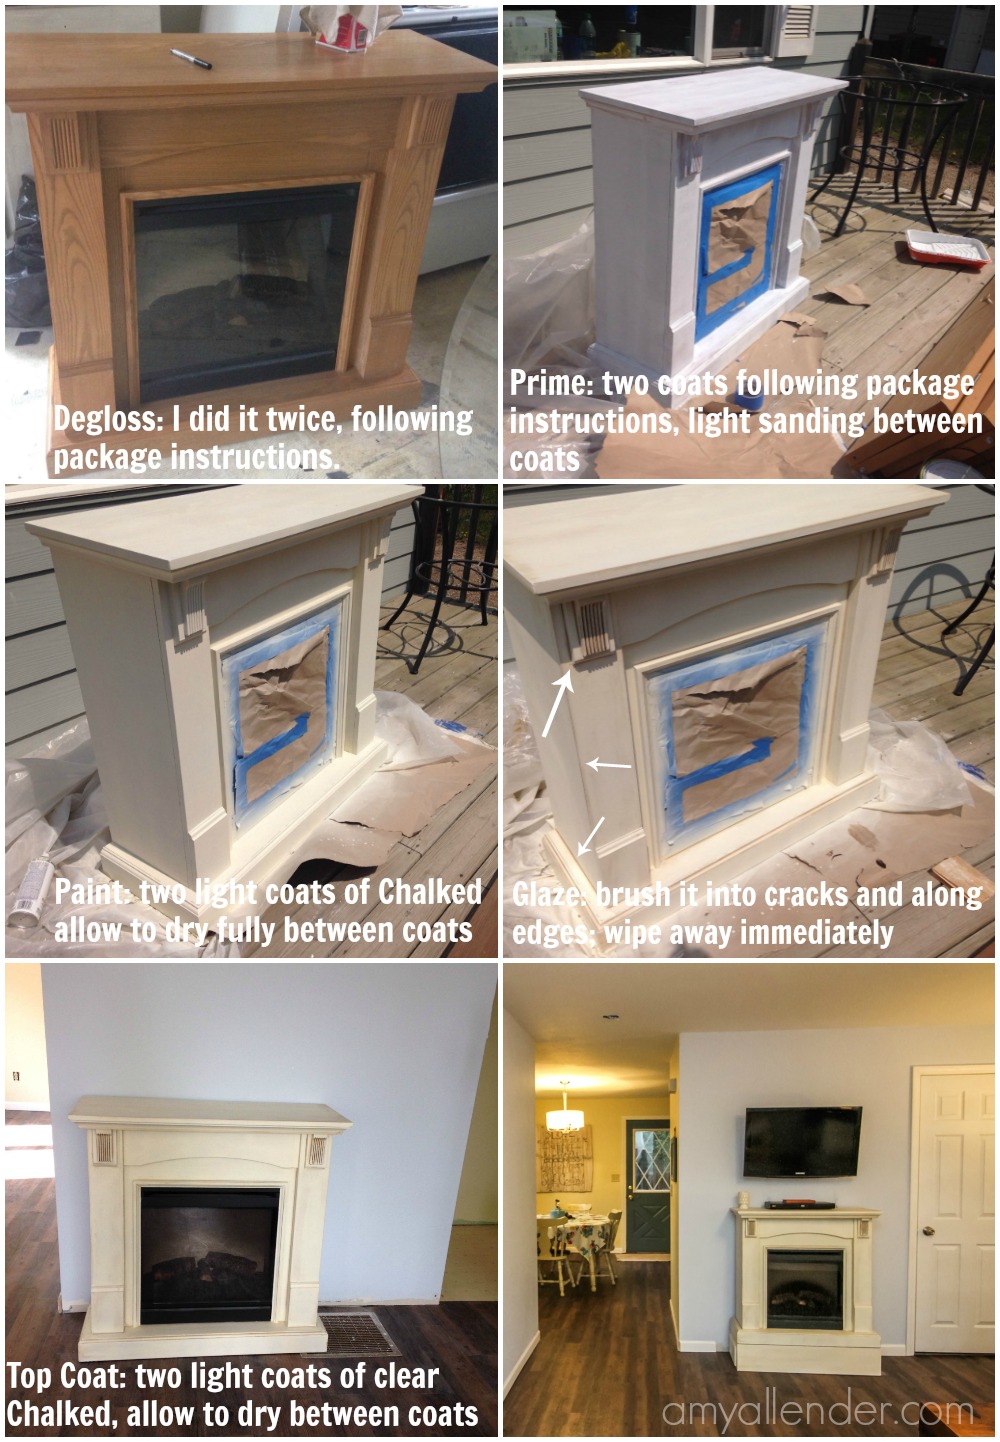
I tried something new tonight–putting the instructions right on the image. Do you like? I’m kind of torn.
At any rate…it’s just that simple. Follow all the instructions on all of the packages. Do this all in a well ventilated area–or outside on a not-windy day…it’s pretty smelly, and it’ll dry faster. I promise you. If you can follow instructions, you can do this.
The trickiest–most artistic–part is the glaze. But even that isn’t too hard. I think glazing pieces makes a huge difference. Look at the difference between the painting and glazing steps. The glaze defines all the cool detailing on the mantle. Suddenly, the ridges and grooves that were all but lost when it was naturally finished stand out like the star of the show.
If you are spray painting something with a glass front–like this–be sure to fully tape/paper it off so it doesn’t collect spray dust. Let ‘er dry and bring it inside.
Have you used Chalked? What did you think? Is there a product you’ve tried and loved? If so…I wanna hear about it! {And NO–Zinsser and Rust-oleum don’t give me any bribes for plugging their products. I just genuinely love them.}
Amy
Erik | Class of 2017
It’s no secret that senior portraits are my absolute fave. And when it comes to shooting seniors, I try not to pick favorites. As the summer progresses I meet one awesome kiddo after another and every session seems to be better than the last. But this year, I’m in limbo–living in a hotel room on the Surface of the Sun. Away from my beloved Practically Canada and all the teens there that are so very, very dear to me. All in all, this summer has felt odd, with the lack of families to photograph and seniors and their moms to tell lame jokes to in an effort for a “real” smile. But alas, in a far away place called God’s Country {northern Indiana} I traveled and photographed my one and only senior session of the season. My very favorite. Of all time. Ever. {At least for the next couple years.}
My precious cousin, Erik.
Does he approve of the word precious? I don’t know and I don’t care. He’s precious to me and has been since the day I first met him in the hospital when I was 12 years old. He was precious when he would giggle as I cradled him like a baby when he was six, and too old for that. And he is still precious to me now. But mixed in with the precious–perhaps even over shadowing it–is handsome, smart, and adult. When I look at him now, I see the little one I knew and the man he is–it’s a funny thing. Sometimes, in photographs I think he looks just like our grandfather. Sometimes when he laughs he looks just like he did when he was little and I didn’t live many states away. Sometimes I think he looks so grown up that I must officially be old. Most times, I hate that I live so far away. Which is precisely why this session is just so darn special.
I’m terribly pleased and proud to be related to this one. He drums. He’s smart. He built a computer {whhhatt??}. He’s kind.
Okay. No more gushing. I promise. My aunt is probably crying by now–and I’d be lying if I told you that I didn’t tear up at the beginning of the editing process. Let’s look at these photos. The art of this moment.

Besides the fact that this session revolved around a family member, this session was super fun and special because I got to shoot it in some nostalgic places. Football is a pretty big deal in the little place called Jimtown and Erik is the Center Snare in our high school’s drum line–which I guess is a pretty big deal {we never had a marching band when I was in school}…so we took the drum out to the field. It’s a place saturated with music and cheers, a place that is iconic to every Jimtown Jimmie–and I’m so relieved we had the place to ourselves.

I know most of you aren’t familiar with Jimtown…but those of you who are will recognize this place: The old gym. It stands in the center of our little township. Abandon, unused, across from the pizza place, full of asbestos. A place that looks a little haunted and mysterious. A place that looks downright awesome in photos.

You know that thing that drummers do…where they are constantly drumming on any surface they can find. Yeah, Erik does that. But it totally works. Because photos always look best when the person being photographed is caught in the act of being completely normal. Right?

Well that’s it. Kind of. I’ll be honest and tell you that I went totally overboard on this. Family…I loved every minute of this session…and you are about to receive a giant flash drive. Oops! I just couldn’t narrow it down.
Happy Monday,
Amy
Not Your Grandfather’s Clock
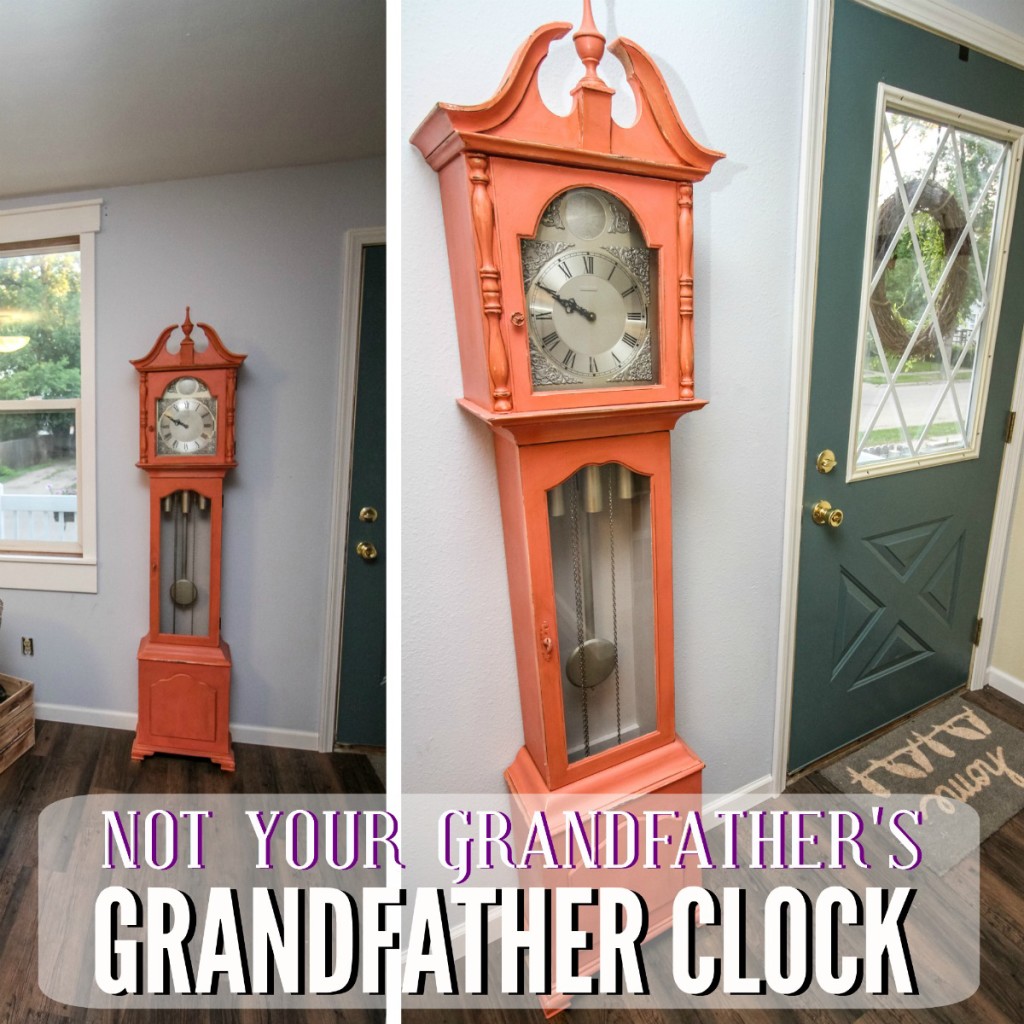
I start lots of thoughts and stories with the phrase, “Here’s the thing…” And as hard as I’ve tried to think of another way to start this post, I just can’t. So…
Here’s the thing about really gutsy accent pieces. I find them very easy to create for other people…and I’m terrified to make one for myself. Is this because I’m a safe person? I don’t know. I don’t think my mom would use “safe” as the first adjective to describe me. It’s probably that at heart I’m a big scardy cat of commitment. In my house, I stick to what I know–white, white and more white. Or–I just leave a piece untouched and spend months years mulling over what color to paint a ratty old chair.
BUT–I’m a lot more brave when it comes to other people’s things. Especially if they are confident, and bold, and hip enough to want a funky accent piece. Which is exactly the case with Sam and Katie.
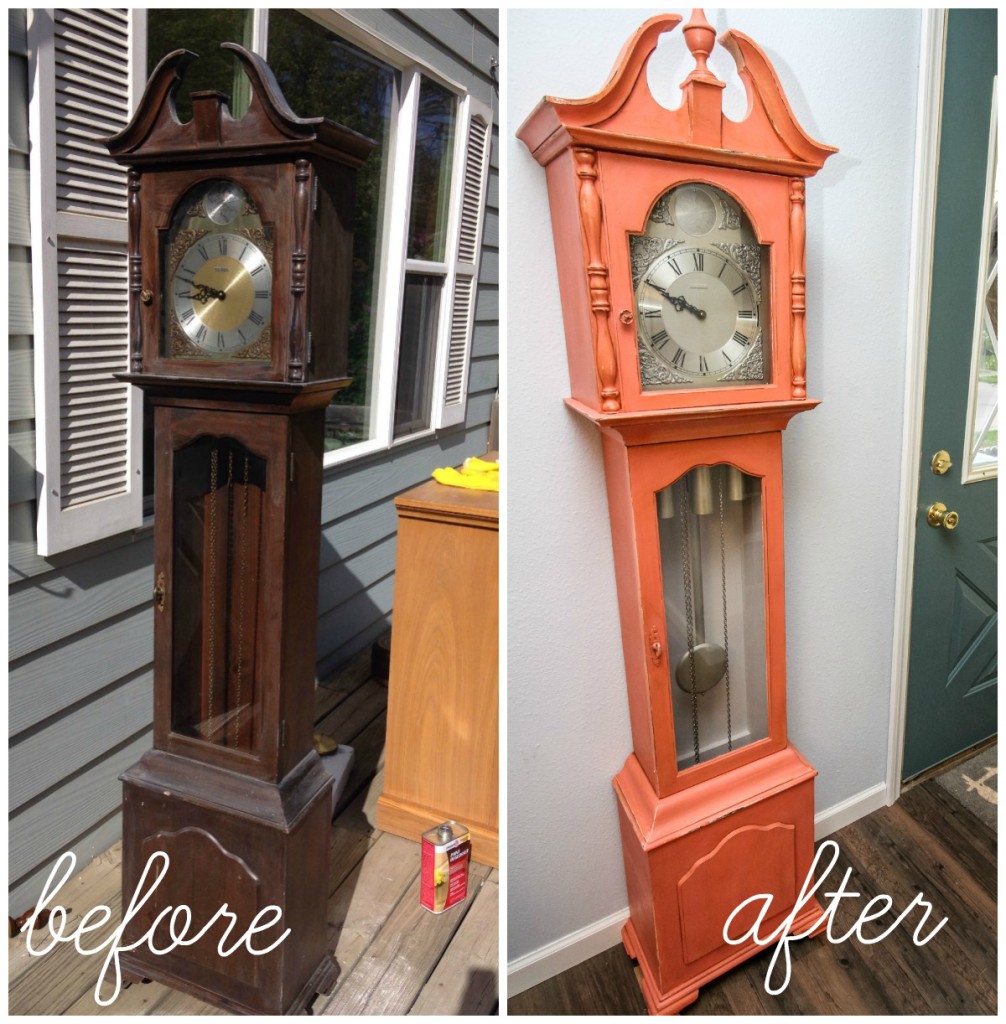
Here’s the other thing–usually it’s the wife who wants furniture painted, and the husband is all, “…that’s real wood! You can’t paint that. I like how it is…” Not in this house! In this case Sam was the big, bold, furniture-painting, color-popping machine. When he told me they had an old grandfather clock that he wanted painted in a quirky color, I knew it’d be a fun project…but never in a million years did I imagine just how fabulous it would turn out. I think the moment when the last bit of paint was dry on this bad boy and I peeled off the last scrap of tape was a momentous moment in my life: It was a moment when I shed a little color fear and my eyes were opened to just how awesome something totally bold can be.
This is one of my most favorite things ever. For real. I want to make one for myself. Or steal theirs. Luckily–it was pretty easy. Here’s how we did it.
Shopping List
Here is a handy list of all the supplies I used on this project. I got them all at Menard’s {who should really be sponsoring this blog because I love them so much and I give them a lot of free advertising.} But I’m sure you can get most of this stuff at your local store.
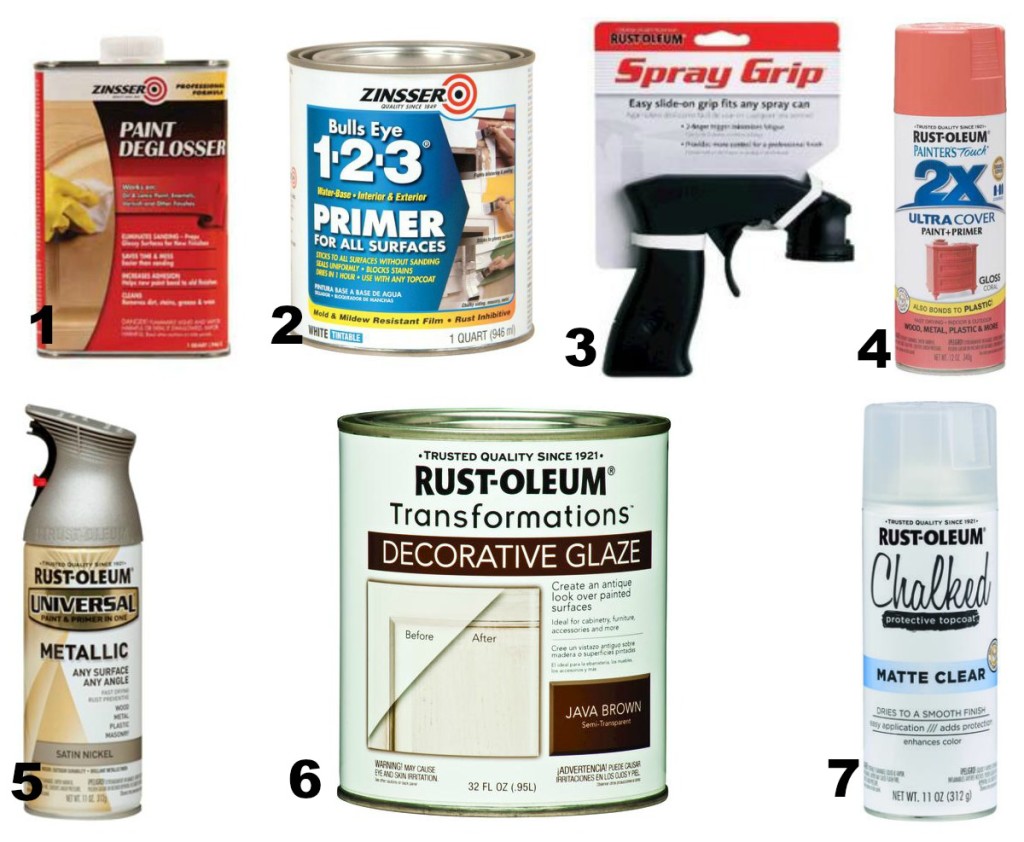
I’ve conveniently listed the supplied in the order they are used. Just use one after the other {follow all package instructions} and you’ll be good to go. Click the links and you’ll be taken to the Menard’s product page.
- Paint deglosser from Zinsser {I love their products and trust them all.}
- Bull’s Eye Primer–it’s formulated to stick to all surfaces
- Spray paint nozzle–this will change your life for $2.50
- Spray paint
- Rustoleum satin nickel finish spray paint
- Java Brown decorative glaze–I used the leftovers from my cabinet project
- Chalked clear top coat {can you guys tell I’m a huge fan of Rust-oleum?}
Find Your Piece
Step one is choosing a cool piece to accent. The clock came out especially cool because it’s a very classic and formal piece in a totally unexpected color. That kind of juxtaposition makes for a great accent. They had this clock sitting around. They didn’t love it. It wasn’t getting used or looked at. It was a little beat up. It was not a family heirloom, so if it got messed up, they wouldn’t be heart broken. All these factors add up to a good make over piece. {Especially for a beginner.}
Don’t Skip Steps
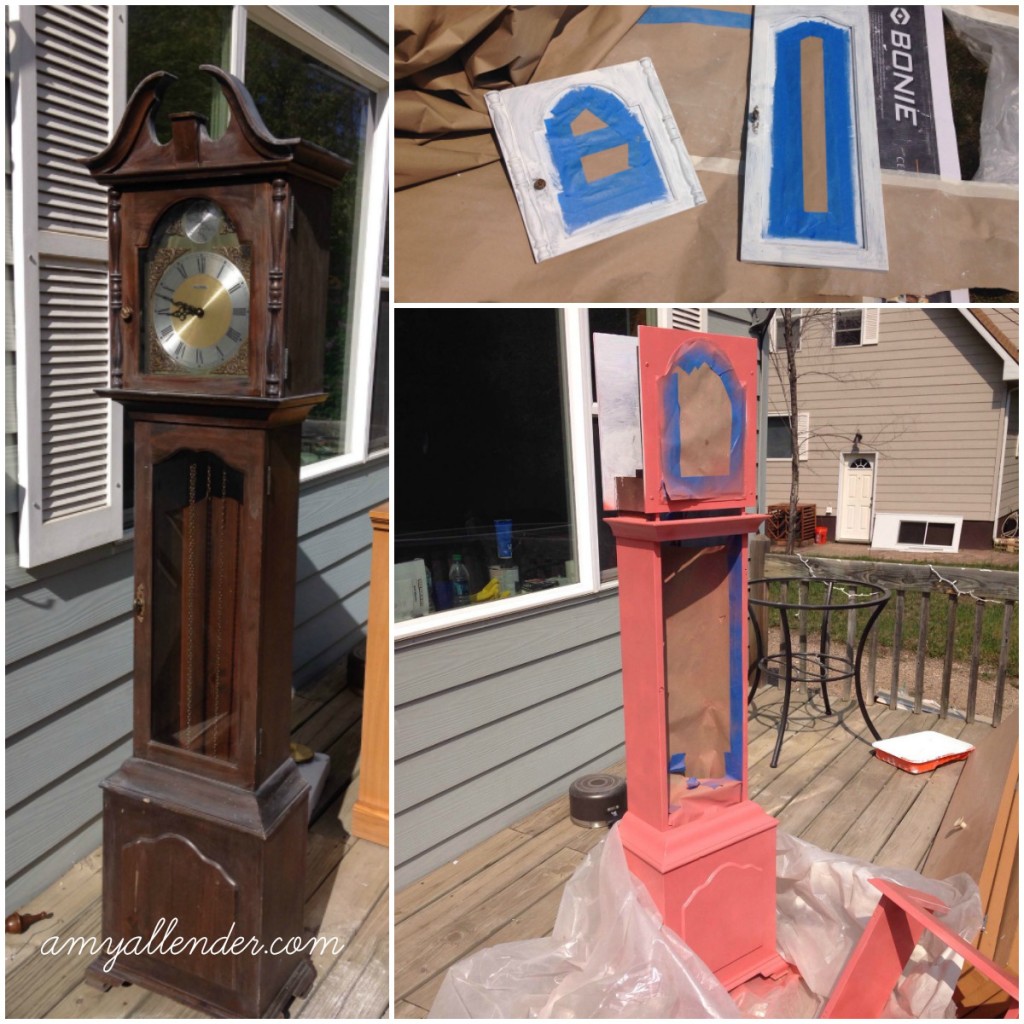
If you want your paint project to last, don’t skip steps and definitely don’t skip prep! For something that’s not going to get touched very often, or treated roughly you have a little more leeway. Since the clock probably isn’t going to endure a lot of abuse, using mid-grade products and prep will do just fine. For something that will see heavy traffic–like a dining table–you’ll want to go to extremes to make sure your finish isn’t going to chip off.
First I dissembled the clock as much as possible–be super careful with the springs and gears, though! Carefully remove the head and doors and finial. Take out the weights and protect anything that you don’t want painted with tape or paper.
Next, degloss the whole surface. Grandfather clocks are typically pretty shiny/glossy. Dulling that surface down will give you a clean surface to work with–and will help the paint adhere better.
Prime all your pieces using a brush. I did two coats of primer and a light sanding afterward to get rid of any drips or brush lines.
Now spray paint your surface. Seriously, get one of those spray nozzles if you don’t already own one. In my ideal world, I would have been able to find a matte spray paint in the color we wanted…but it didn’t happen. The end result of my spray painting left me with a very shiny, very Barbie-pink clock. To tone it down I added a few extra steps:
After the pink paint had dried {you might need two coats}, I went over the whole piece with deglosser again to get rid of the shine–just don’t rub too hard, or you’ll strip the paint. Then I sanded down the edges of the details {any curved piece, sides of doors, etc} to add a little wear to it and expose the dark wood tone below. Finally, I used the glaze to bring out the detail even further. Using a small paint brush, brush glaze {or use wood stain} into the crevices of the piece–then immediately wipe out the excess…leaving dark stain or glaze in the cracks. I also brushed and wiped glaze off of the sides of the clock to tone down the color a bit.
Then…while all that was drying, I went to work on the inside of the clock. We painted the inside using one of the paint samples that was not chosen for the living room walls {see discussion on paint samples here.} I sprayed the weights satin nickel, and carefully taped off the wood and also sprayed the face of the clock–the gold just didn’t seem to fit with the funky new color.
After it’s all dry, move it inside and bask in the glory of your clock. Awesome, right?

How to Pick Paint Colors | 5 Easy Steps

Can you tell me how to pick paint colors for my house?
Man, oh man, oh man, oh man. This is a million dollar question that I get asked all the time. And by million dollar–I mean, if I got paid a dollar each time I’ve been asked how to go about picking paint colors without regret…I’d probably have a million by now.
Not that I get tired of fielding this question. It’s valid. And picking paint colors is super stressful! {At least for people who are afraid of commitment…like me.} If you’ve ever picked a color, and disliked it as you were rolling it on the wall, telling yourself, “Maybe I’ll like it better when it’s dry…” Or, “It’ll look better when the whole room is painted…” only to hate it even more once it’s dry and once you’ve dedicated a whole weekend to painting–you know the pain of picking poorly. If at all possible, it’s best to avoid that situation all together. So here…is my very best advice for picking colors with no regrats….I mean, no regrets.
As you may remember, I started telling you about Sam and Katie’s house. Long story short, there was an epic indoor floor and I was lucky enough to come on board {ahoy mateys!} to help with the recovery process. Since everything was ripped out {see before photos here} they had to start from scratch and pick wall colors for pretty much all their walls. Since their project is fresh in my mind, we’ll use them as an example.
How to pick paint colors | Five easy steps
1. Know Yourself.
This is key when picking paint. Just know what you like. If you gravitate toward cool colors–stick to that. If you love white and cream and gray in sweaters and typeface and accessories, you probably aren’t going to love waking up to a burnt orange bedroom. If you are completely indecisive, get to know yourself. Spend time making a Pinterest board {yes, I’m giving you this assignment.} Pin any room that you think has a pretty color. Pin cabinets that you like. Pin anything painted that strikes your fancy. Don’t look back at the board until you’ve got a bunch of pins. Chances are, you’ll see a theme. Proof? Here’s mine. See a trend? And if you wanna cheat, you can just follow my board here.
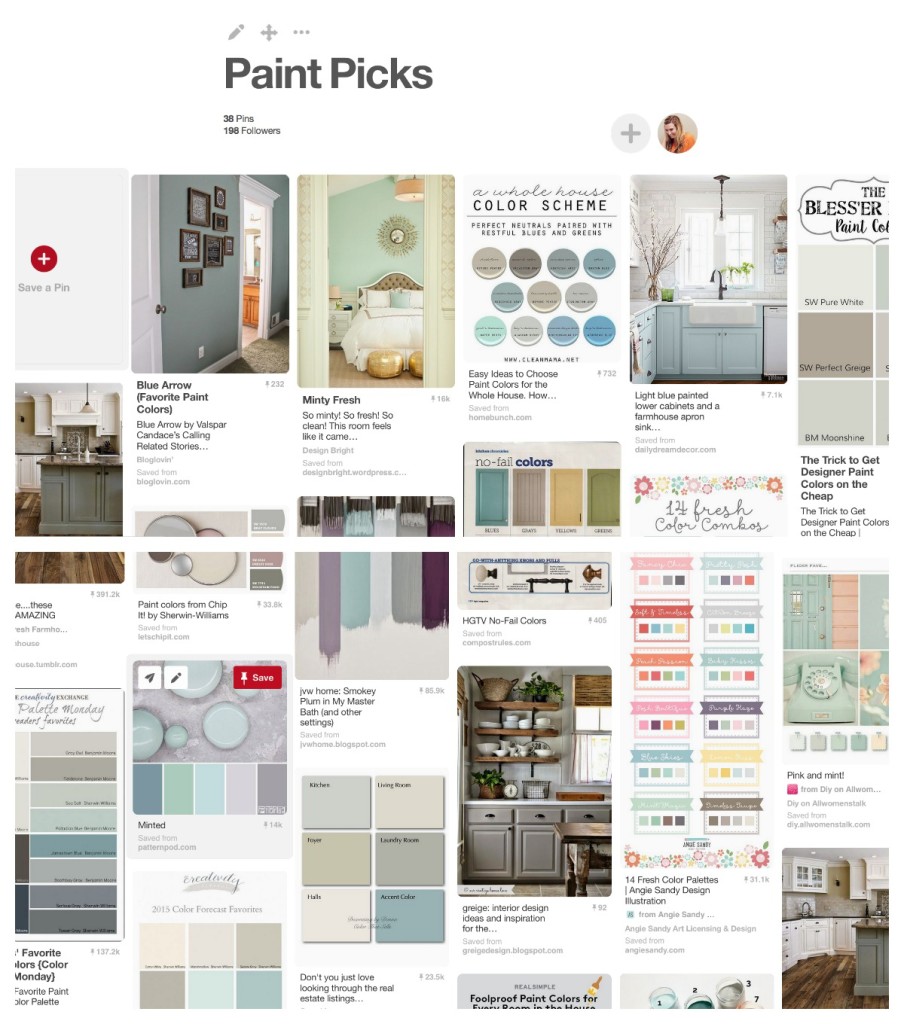
2. Take Out the Guesswork
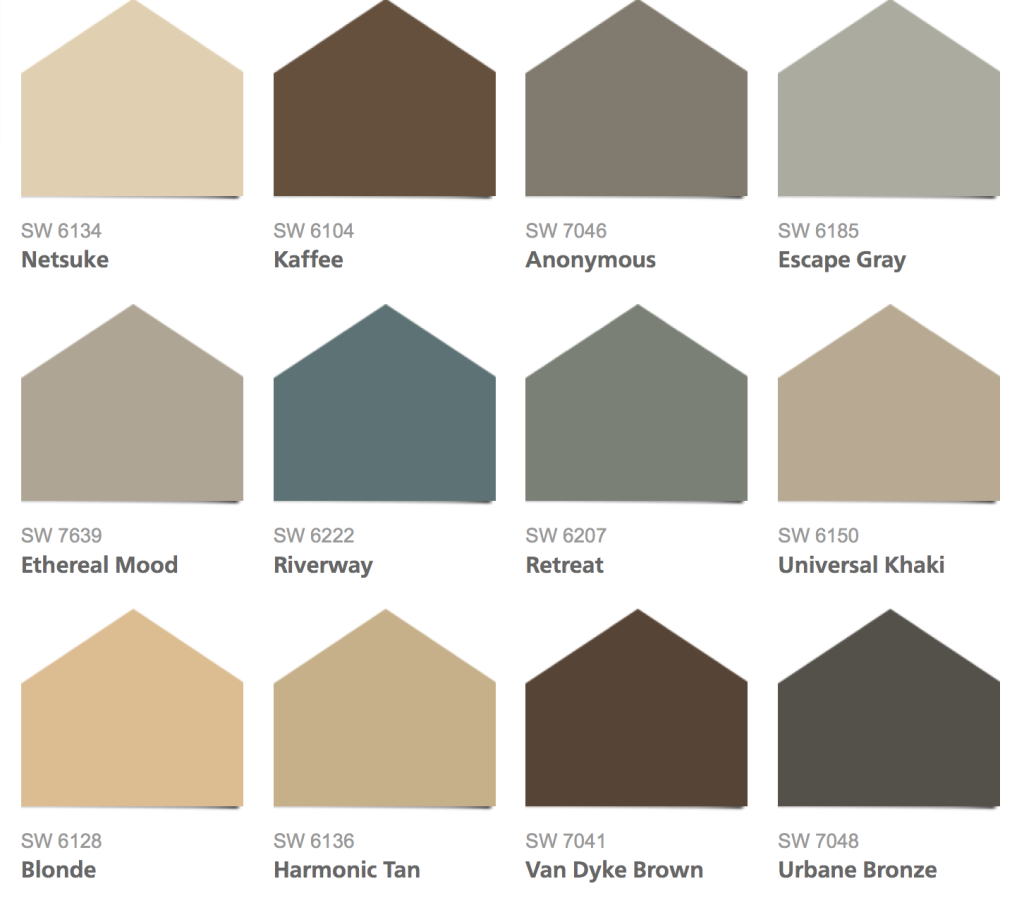
Once you kind of know what you like you need to find some paint. If you walk into a home improvement store and approach the rainbow wall of chips, you’ll soon see that liking “gray” isn’t as concrete as you once thought. Suddenly there are cool grays and warm grays. There’s sidewalk, and moonlit path, and ethereal mood. Take some of the guesswork out by going to a paint store–where the employees deal only in paint. {I love Sherwin Williams for this.} There you’ll easily find color pallets, premade, just for you. See SW’s color pallets here. Pick the one that has colors most similar to your pinterest board. Colors within the pallet are all made to look good together, now it’s just a matter of picking your favorites.
3. Don’t Trust the Pictures
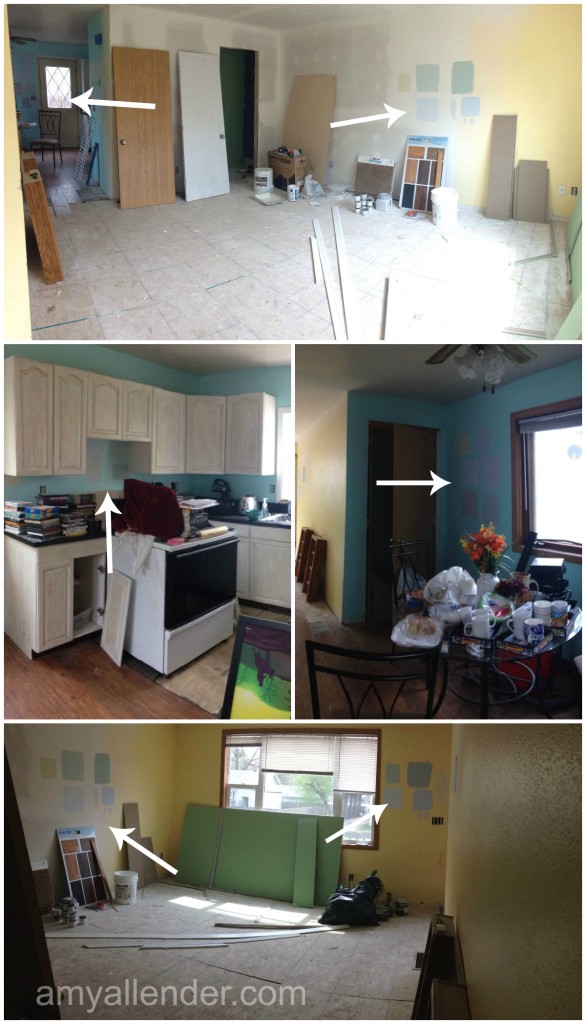
Paint pallets will often come with images of the paint color used in staged rooms. These are a good starting point–but don’t trust the photos. Paint is keenly effected by light. The direction of light coming in to your windows. The placement of your lamps. The warmth of your lightbulbs. The strength of the sun in your zip code all effect how a paint color will actually look on your actual walls. It’s all very sciency and light wavy.
Photos in the professional images are made to look perfect with flash bulbs and perfectly controlled lighting. You probably don’t live on a photo set…so you’ll need to shell out a few bucks for some sample jars.
Samples cost money–true. But they could also save you bigger money on wasting a gallon of paint that you hate. So, get out the cash {they usually run about $5 each}. And don’t sweat the left overs. These are all colors you like anyway, so you can put them to use later on smaller projects. {I’ll show you how to use them next week.}
When you sample, sample right. Put up a big swatch of color on every wall in the room you’ll be painting. The color will look different on different walls. Keep track of what color you put where–I like to make a grid on the wall, and on a piece of paper. If there is a shadow {like under a kitchen cabinet} paint it there. If you can see from one room into another, paint where you can see the two colors coming together. You can see in the image above where we put samples for Katie and Sam. Once they are up–wait. Leave your swatches alone. Look at them in the morning. See how they look with your lamps on. See how you like them with over head lights on. Then decide.
4. Limit Yourself
A lot of variety is good sometimes. Like…in a workout routine or in ice cream flavors. When it comes to paint–limit yourself. Different paint colors will help define separate areas of your home–but too many colors will cause disunity and confusion, and an overall circusy feeling. And it’s a lot of work and a lot of left over paint.
I like to stick to about four colors in a home. You can go bigger if you like. But four is a pretty safe area. There is some repetition which lends continuity–but there is enough variety to keep it interesting. I like to play it safe when it comes to color commitment. Then I get gutsier with smaller, more mobile things…accessory accents.
5. Accent Colors
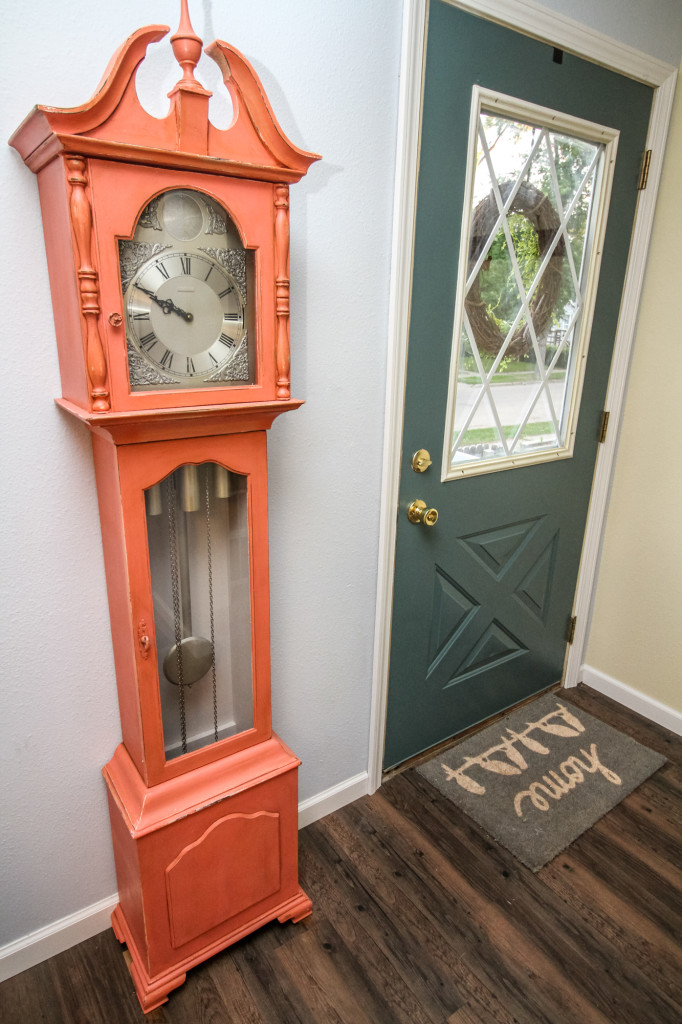
Once you’ve got your walls done you can think about accents. If you are aching for a pop of color, decide on where you’d like it. Do you have an old piece of furniture you’d like to paint? Perfect. This can be an accent! Wanna paint your bland, beat up door? Perfect. Paint the inside too!
Go through a similar process. Look at colors you like. Grab a paint chip {the paper with the color on it} and tape it to the furniture/door/area your accent will live. Give it a day or two before you decide.
If you don’t know where to start–start with a paint pallet…those often include accent ideas. Or make another Pin board. If in doubt, mustard yellow, peacock blue, and a toned down coral are always good “pop” pieces against a fairly neutral wall.
Happy painting! Did I miss anything? How do you pick your paint colors? Oh–and don’t you love that clock?!! I’ll show you how I made it happen tomorrow.
xo
Amy
How To Tackle a Big Home Improvement Project
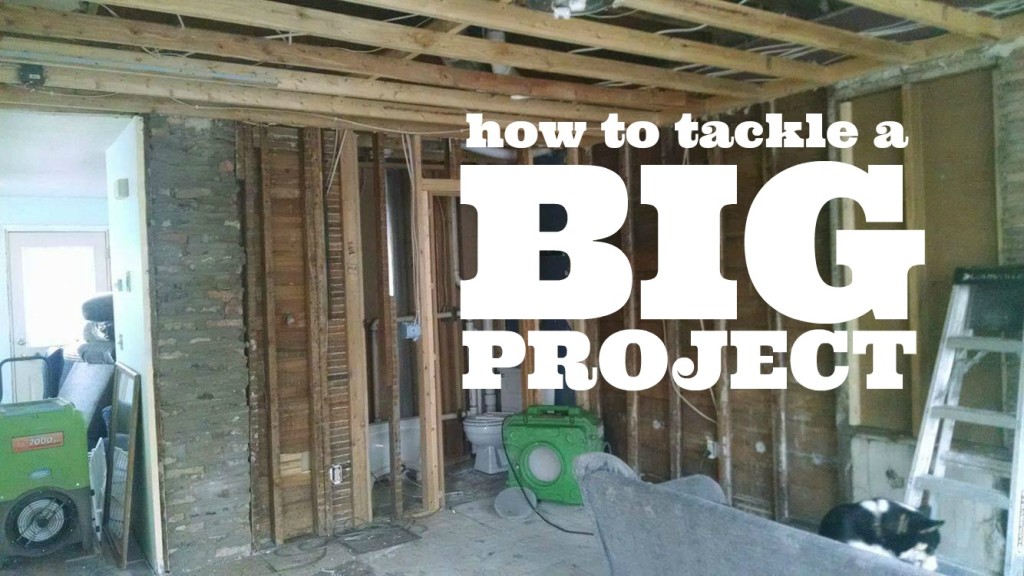
Have you ever faced a goal or wanted to start in on a big project, but were unsure of where to begin? I think most of us have been there. I know I’ve been there many times. But being unsure of how to start a big project, is no reason to avoid ambitious undertakings. I wrote a piece on tackling large goals for Start Up Mindset a while back–you can see the piece here. Today I’m going to talk about tackling a big home improvement project.
Whether your projects are big or small–when you’ve got lots of things that need to be done, it’s tricky to find a good starting point and have the tenacity to get the job done. Today, I’ve compiled a list of five tips for tackling overwhelming home projects.
Yesterday I told you about Katie and Sam’s tragic indoor flood. Since the water laid waste to most of their house, and the rest of it was already on the do-list, their home is the perfect case study for undertaking a big project.
1. Identify the most important things.

Take it from me, some parts of a project are much more fun than others. Picking out a new couch, potting plants, and hanging a gallery wall are all super fun and super rewarding. They offer instant gratification and rarely leave your mind frazzled or toes stubbed. But–these are not the most important components of your project.
Don’t get side tracked by the stuff you find fun. Keep a rational mind. Look around objectively and decide what is most important to your day to day living.
For Katie and Sam, the absolute most important thing was getting their full bathroom up and running again. The flood displaced them from their home and they were unable to move home until they had a place to shower and a toilet to use.
Take care of the necessities first. A working bathroom. A water heater. Working appliances. Proper plumbing and working sinks. Safe, working lights. Fix broken windows. Take care of leaks.
2. Know your limits.

After you’ve decided on your priorities, think about your limits. Are you capable of putting in a new toilet? Do you know how to hang drywall? Can you safely and properly install new wiring? If vital parts of your project are outside of your scope–outsource them. Delegate. Years down the line when your wiring isn’t catching fire and your pipes are intact, you’ll be glad you trusted a pro–even if it did cost a little extra.
Another limit to think about is your time. Even if you can do these things–do you have the time? Can you commit to getting these things done in a timely manner, or is it worth the extra expense to have it done quickly, efficiently and professionally? Lots of folks want to be DIY-ers, but soon find out that home improvement takes a lot of time and projects can drag on much longer than expected. I believe in finishing projects–as well as starting them. It becomes cumbersome to live in a construction zone–if you don’t have the skills {or energy/ability to learn the skills needed}, or time to commit, delegate.
At Katie and Sam’s place they helped with lots of stuff and delegated lots of stuff. Proper flood clean up, plumbing, drywall/texturing, doors, trim and floor installation were delegated to contractors. They helped with painting, prep, shopping, electronic installation, etc. It was important to them that they project was done quickly and skillfully–so they outsourced the big stuff and some of the smaller things that they were capable of, but didn’t have time to commit to.
3. Make a list of wants and objectives.
Outside of the things that must work and must be done to give you a functional home–home improvement gives you a lot of creative freedom. How do you want your rooms to be used? What do you want to do in your yard? What is important to you? Do you need space for entertaining? A place to read? Peace and quiet? A durable home that can endure the wrath of teenage shenanigans? Discuss these things and come up with a “dream sheet” of sorts. My list for a living room might look like this:
Durable furniture that I won’t stress about getting dirty or dinged up, new floor, big rug, fresh window trim, wall mounted-floating TV, gallery wall, washable wall paint, cozy seating with space to add extra seating for large gatherings.
Once you know what you want out of your rooms you can get to work.
4. Work rooms from most visible to least visible.

I already covered starting with repairs that make your house safe and livable. Once your leaks have stopped and your wiring isn’t threatening a fire, start improvements from the most visible rooms in your house to the least visible.
Start by tackling the room you spend the most time in–and where guests spend the most time. For me, this is usually our living room {a kitchen is usually a close second.}. Next up it’s a common area bathroom. Then any other common space. Then outdoor entertaining space, bedrooms, and finally hidden storage spaces that only I lay eyes on.
5. Work top to bottom.
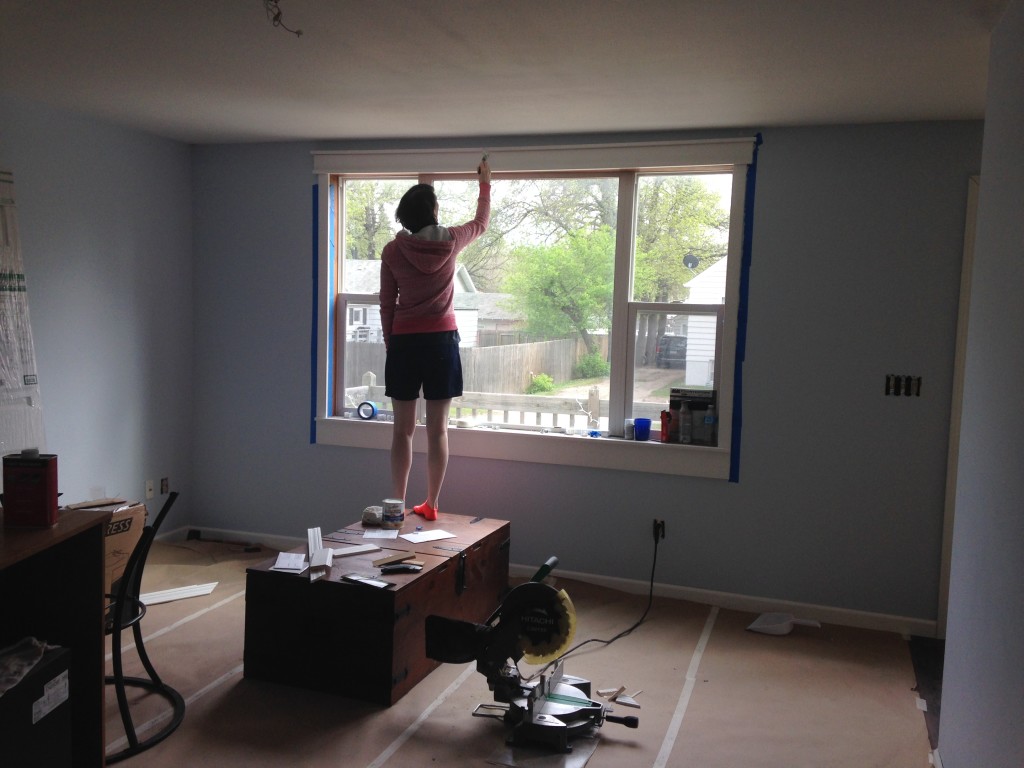
My dad taught me to work top to bottom when washing a car. My mom taught me to work top to bottom when cleaning the house–any dust that fell would be vacuumed up last. Now, I’m telling you–in your home, work top to bottom, outside in.
Take a look at what you are doing and execute it from the top down. Work from the outside–from the outermost part of your walls {for example: wiring/plumbing..things that go inside the walls–drywall–paint–trim–curtains}
First do anything that lies behind the wall–electric, plumbing, recessed shelving. Next tackle texture and painting from the top down, starting with the ceilings {if you are replacing the floor always do the painting before the new flooring is installed so you don’t need to stress about spills}. Finally hit the floor.
Once you’ve got a floor, start working inward–add trim and baseboards before any permanent fixtures are installed {like a toilet, mounted TV or fireplace} so you don’t have to work around them. After permanent pieces are in place tackle the moveable–furniture, rugs, curtains. Finally–breaking the pattern just a smidge–add the semi-permanent. I consider anything that will most likely not be moved often, but can be moved if needed–peg racks for coats, gallery walls, wall decor, etc. I put the semi-permanent up last because I like to see the furniture and rugs in the room first. And I like to have a place to sit down at the end of the day.

