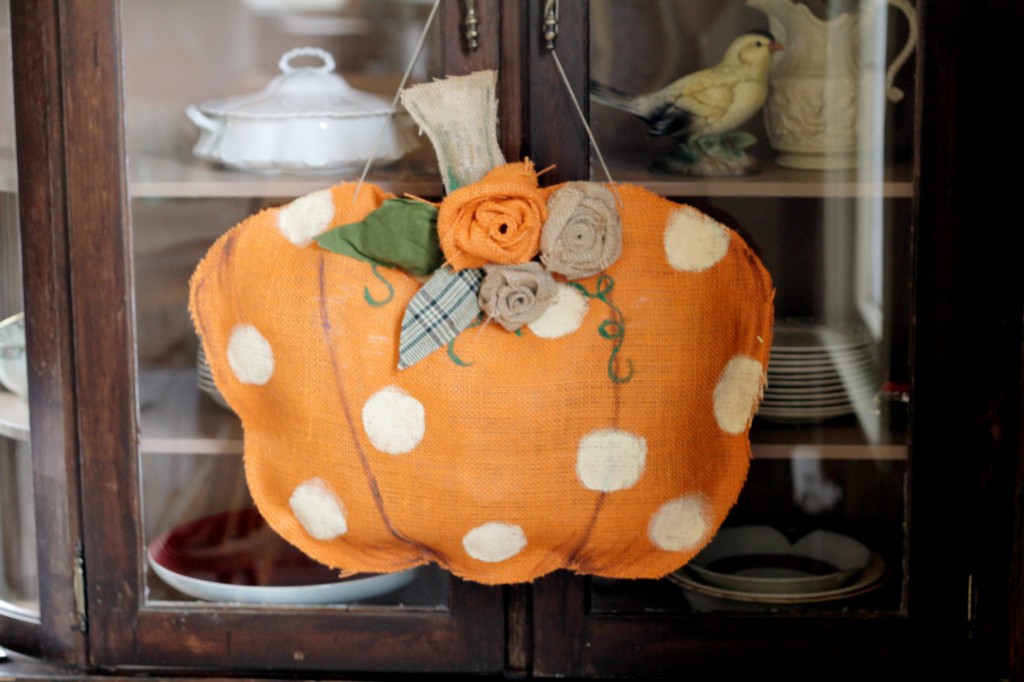
A while back {see the cabinets are still brown??} I did a little fall DIY crafting. I got together with a girlfriend and we made these super cute burlap pumpkins. Her neighbor had one. They are all over the Internets. {Yes, sometimes I call it the Internets. With an “s.”} They are retailing on Etsy for around $35.
Well…you know me. $35 for something made of burlap?? Maybe if the burlap also came with a gift card for some fro-yo and breadsticks at Olive Garden. Maybe…
So anyway. We made our own and I think they came out pretty darn cute. And now is the perfect time to whip one up as you swap your scary-spooky for harvest-happy. The best part? Ours cost $6. For both. What up? The second best part? It’s an awesome way to upcycle your plastic grocery bags! {Remember what we did with paper bags?}
Here’s what you’ll need: Burlap 1/2 yard per pumpkin {Hobby Lobby carries it in orange} | scraps of tan burlap | white & green paint | paint brush {bonus points if it’s one of those nifty circle sponges} | scraps of felt or other awesome fabric | hot glue | plastic grocery bags {unexpected…I know}
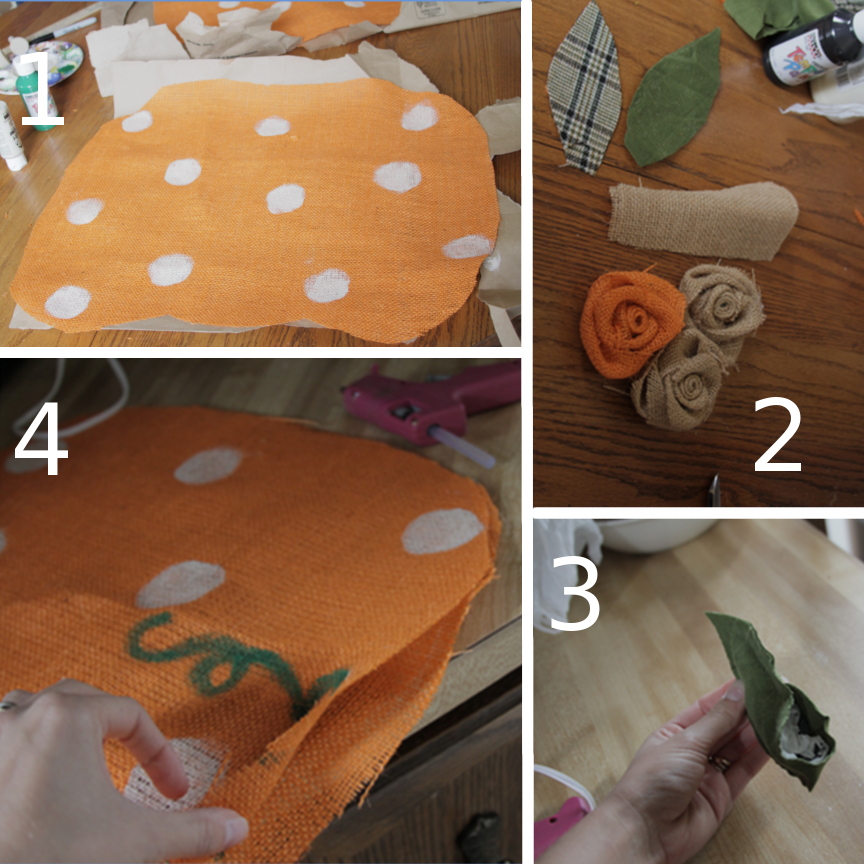
1. Cut out your pumpkin. Double your fabric up so you have two identical shapes. Mine is about 22″ wide and 16″ tall.
2. Cut a stem out of tan burlap. I cut leaves out of some scraps from the fabric bin. Wool, felt, and flannel from an old shirt are great choices. Use a few other scraps to make some burlap roses. Tutorial here at the old blog.
3. Start gluing your small pieces together. Lay them flat and run a bead of hot glue around the outside, leaving a little raw edge exposed. Be sure that both right sides are out!! When you’ve almost got the whole shape sealed up stuff it with some plastic baggies. For the small pieces you may need to tear the bag into smaller bits.
4. Almost done. Lay a paper bag between layers of orange burlap and paint. These look best when they are kept simple. I went with big polka dots…but you don’t even have to include the dots. Swirls, stripes, whatever…it’s your project. Add a few curly-q vines to the top. Follow your heart. Then repeat the gluing process. Leave the top open and stuff it with plastic bags. Glue your stem in place {sandwiched between orange layers} then glue the top shut.
Add your leaves and roses with a bit more hot glue.
I used a pen to open up a whole in the weave of the burlap, then I threaded a piece of craft twine through to create a hanger.
Why plastic bags? It’s simple. First of all…they are free, and we all have way too many on hand. Second, if you are planning to hang this gem out for all to see…plastic is an ideal choice. It won’t rot or get nasty. The rain won’t hurt it. I’ve seen other tutorials use brown craft paper…which is dandy…if you aren’t putting it outside.
As always, I love to see your creations. Feel free to send me a photo of your version of this craft {or any craft}. I love new ideas! AND…if there is a project you are drooling over, but can’t figure out how to make it happen…email me. I’d love to find a way.
Amy
This thrifty project is partying at Home Stories, My Uncommon Slice of Suburbia, Savvy Southern Style, and these other great parties.


