by Amy | May 2, 2013 | Blog, The Art of Projects
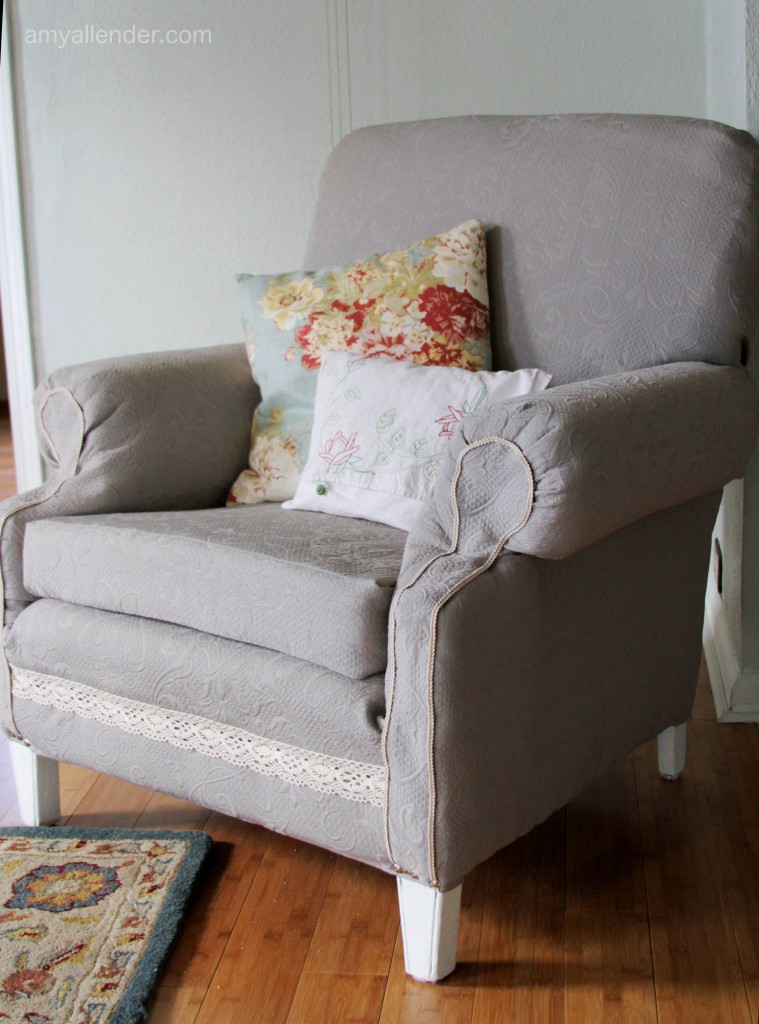
This is it! It’s not perfect. Not by a long shot. But I did it and it’s finished. I reupholstered this chair. I learned a few things…and I had a good time doing it. Such a good time, I just might tackle that other chair that is begging for a redo. But that will have to wait until the fall.
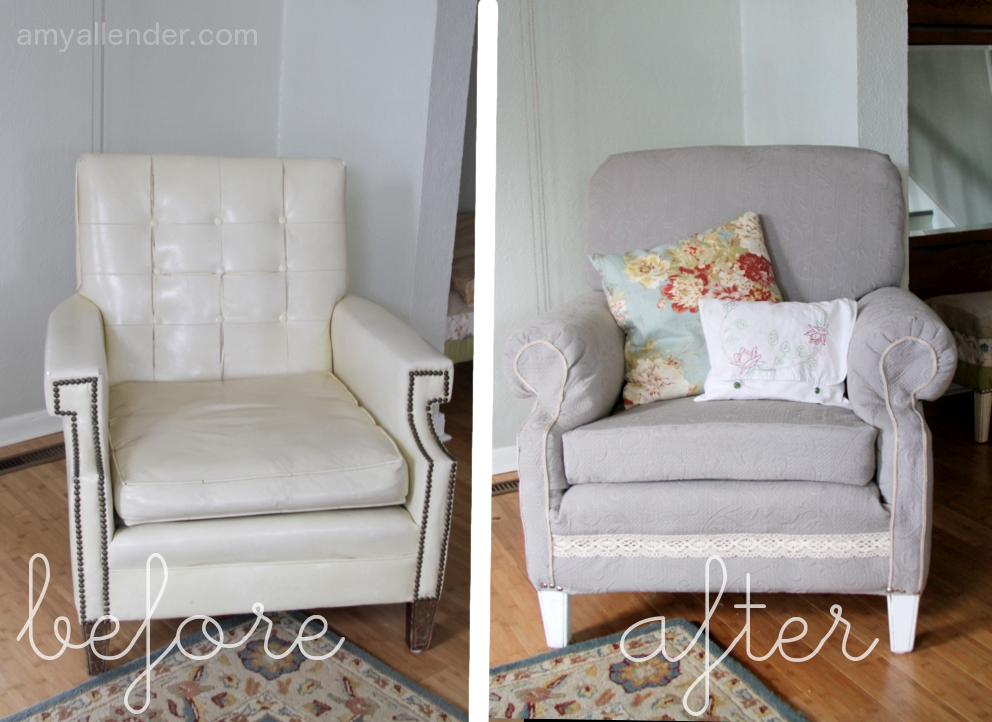
Just to remind you…here is the before and after. I’m pretty pleased. It’s not falling apart. It’s fully covered {with fabric from this millennium, no less.} And it’s sooo much more comfortable that it was before. Coming soon…a big long post on how I did it.
Amy
by Amy | Apr 30, 2013 | Blog, The Art of Projects, the house
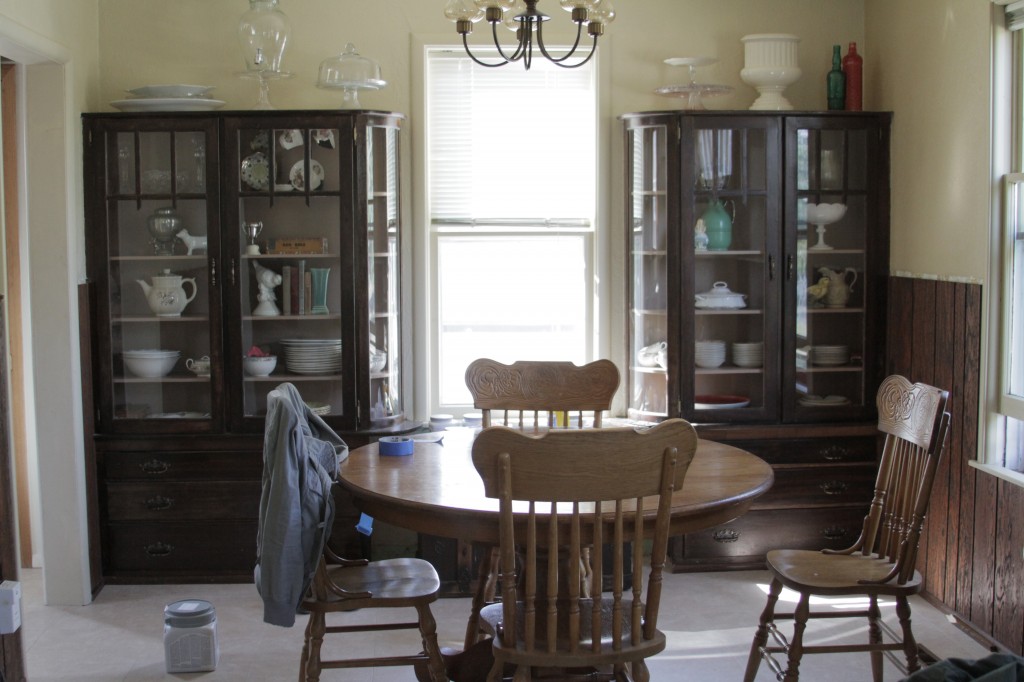
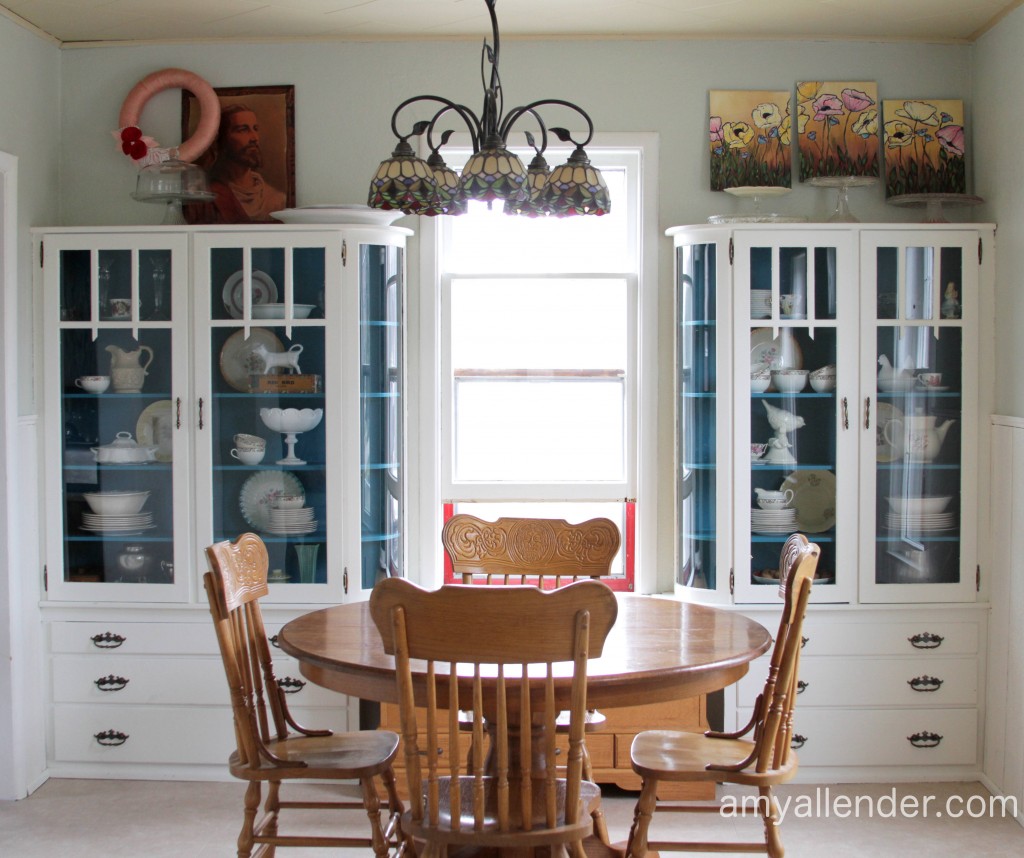
Remember when I told you about my recent project overlap? Well…both are done. Yes, I am a certified Project Finisher. {I think we should have T-shirts made for all of us who are…} Today I’m showing off my beautiful built-in cabinets. Last week I painted the inside of the cabinets a lovely, poppy teal. I love the added color!
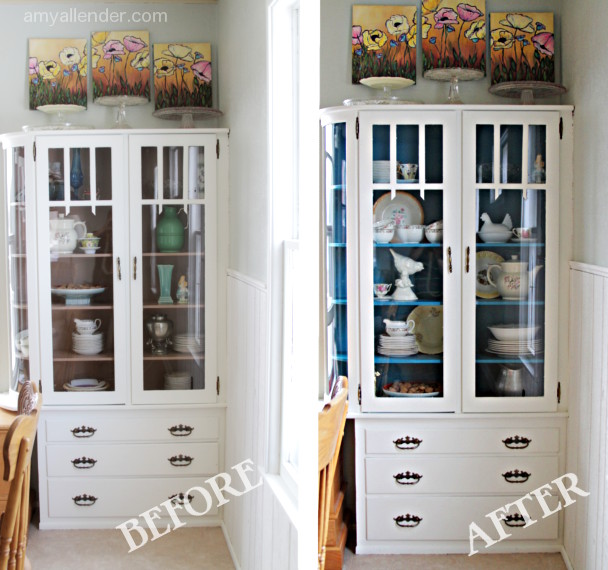
You may know that I’m a bit of a scaredy-cat when it comes to bold color. Inside my house I tend to stick with white, white and more white. Only off set by light subtle neutrals. But this is my summer of adventure, so I went bold. The inside of cabinets is the perfect place for a bold touch. It’s a small space and since it’s enclosed the darkness will help tone it down a bit.
Getting the job done was pretty easy. I primed with the best primer ever: Bulls Eye 1-2-3 Zinsser. You can read my rave about it here. Then I painted. To be honest, the toughest, most time consuming part was taping off all the glass. Remember to use these tips if you take a project like this on yourself.
Now, you wanna know something awesome? Who am I kidding? Of course you do. I painted all the color using only a sample carton from Sherwin-Williams. Which means this makeover only cost me $6!! {Since I had tape and primer on hand.}
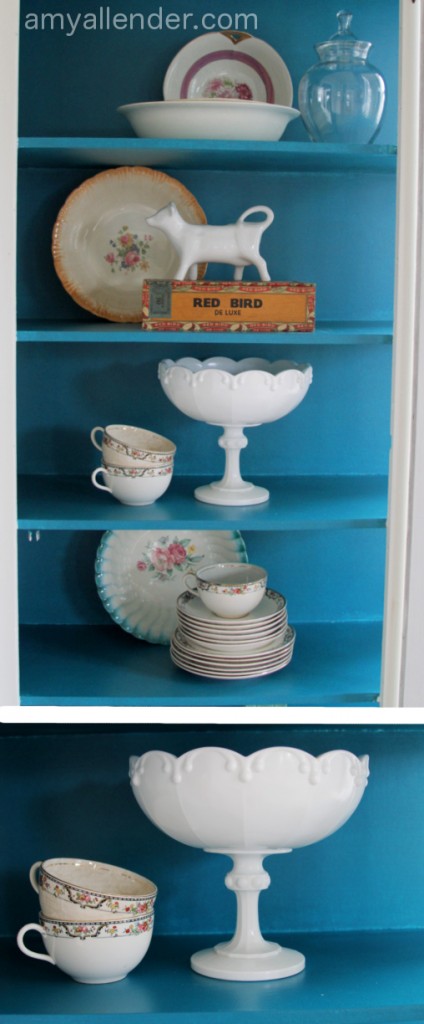
If you love the color…it’s SW’s “Intense Teal.”
Now, you really want to see a change? Let’s compare the way the dining room looked when we first moved in….and the way it looks now. It’s so extreme! I simply love it.
Tomorrow I’ll show you how my chair turned out!
by Amy | Apr 26, 2013 | Blog, The Art of Projects
Have you heard of Gliffy? I hadn’t until just about a year ago. And, let me tell you…it changed the way I rearrange my furniture. It changed the way we moved in to our house.
Intrigued?
Gliffy is a free program online. It’s basically draft paper that you can draw your house plans into. They have graphics for furniture, walls, windows, etc. So you can virtually rearrange things before you do any heavy lifting. Because we’ve all be there before…you think it’ll fit just perfectly…only to heave-ho and learn that the dresser is just an inch wider than the nook you had in mind.
Bummer.
Ever since our very first move Derek and I have kept a careful log of the dimensions of our furniture. That way when we arrived at our new home we could measure our rooms and decide where things would fit. When the movers showed up we’d be ready with a plan.
Gliffy takes that awesome logic a step further. It’s all saved on your computer. Well, the Internet. So it’s never at risk of being lost.
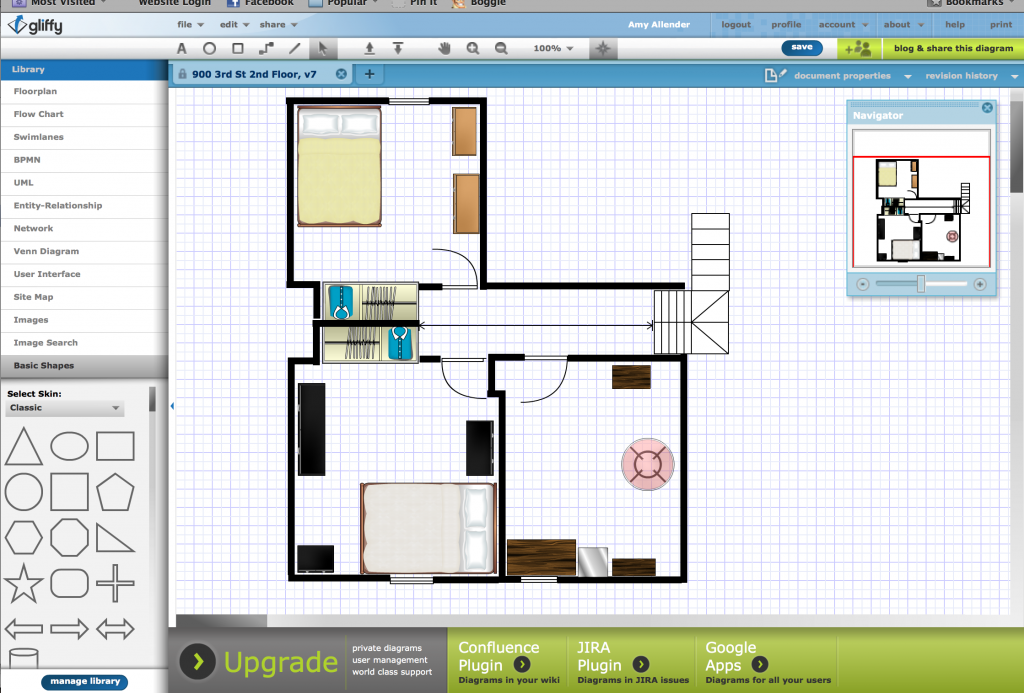
I haven’t visited my Gliffy worksheets for a long time. But all that is changing. My next type of separation therapy is on the horizon:
Destruction Therapy.
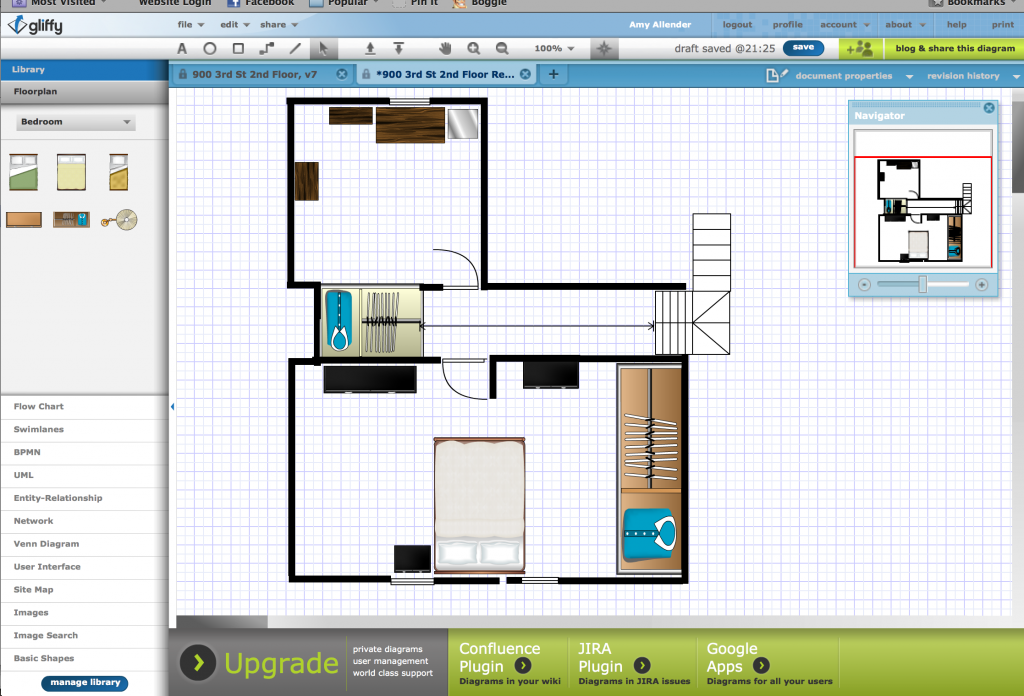
When we moved in we knew we wanted to renovate our second floor. Friends, it’s happening. May is a make-it-happen month. Hopefully by June things will look more like this: {Minus the fact that the guest room will still be there.} Still not 100% committed on where the new closet will be. The bottom line is that the wall will be gone and my furniture will fit more comfortably.
by Amy | Apr 25, 2013 | Blog, The Art of Projects, the house
My parents like to have a dog in the house. I never remember a time when we didn’t have a dog. In fact, usually they chose to overlap our dogs. As one was on its way out we bought a puppy. It eased the transition and kept our home at ease.
Projects are like puppies in my eyes.
This is how it usually plays out for me. As one thing is wrapping up, another thing starts. So here’s where I’m at today. The upholstery thing is wrapping up {and should be done at the end of this week.} Meanwhile another small project has started.
First, the chair. Impressive, right?
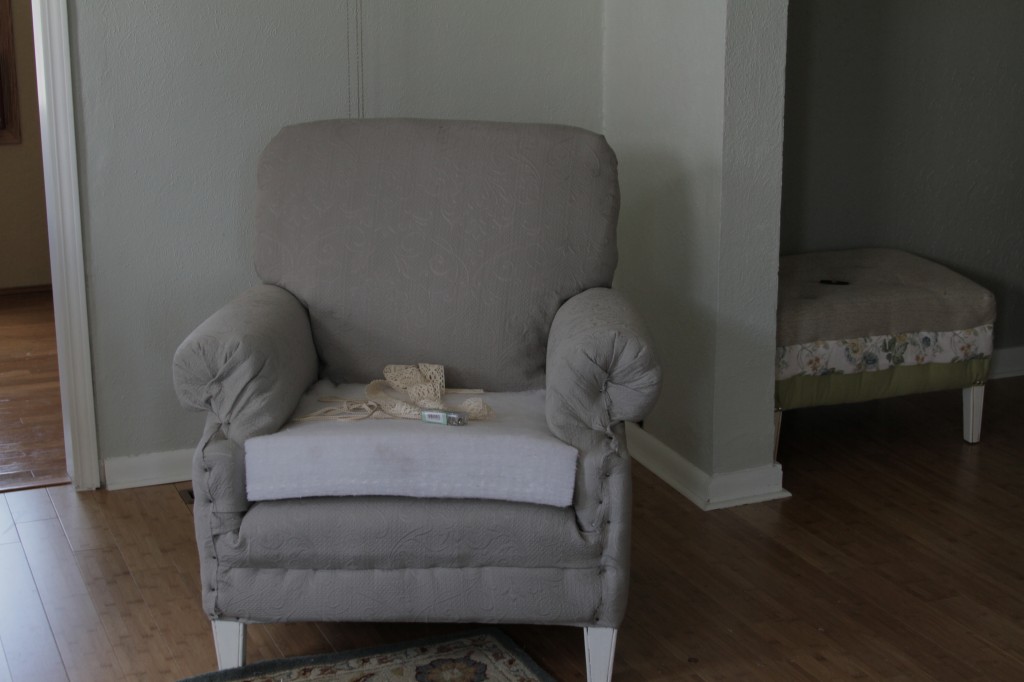
I just need to add cover pieces to the arms to cover the nails there and sew the seat cushion cover.
Second, I’m going to paint the inside of our built in cabinets. They’ve already gone through a pretty impressive makeover {which you might remember}, but I am really fed up with that ugly pinkish-brown. I want my collection of white wares to pop.
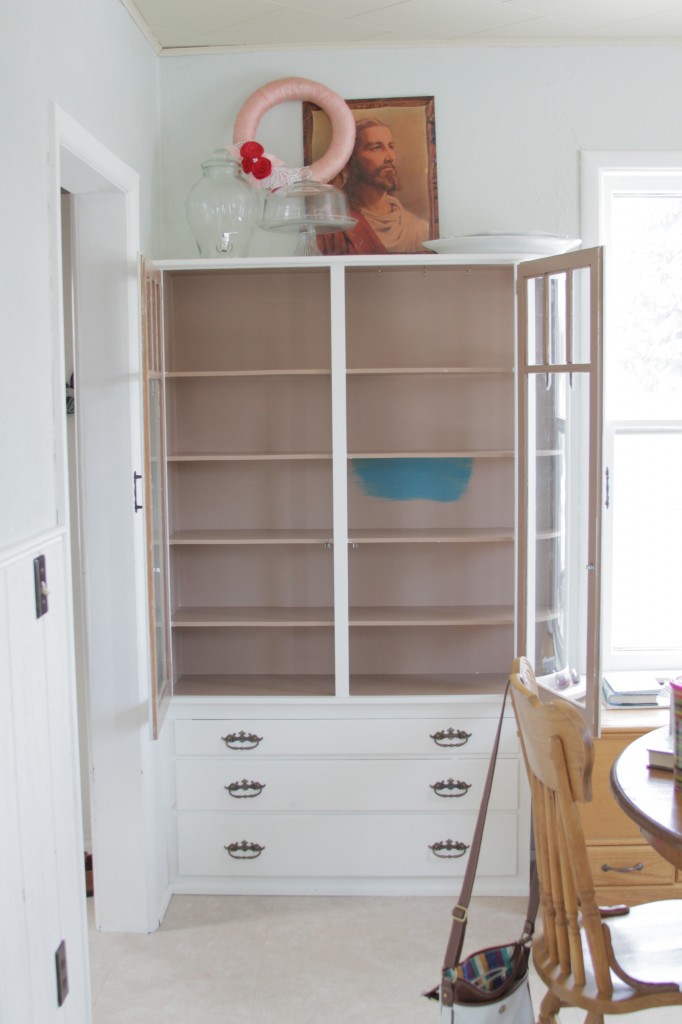
So today I taped. Tonight I upholster. Tomorrow I paint. {And I’ll buy one more yard of fabric. I’m just shy. Bummer!!}
Don’t you love adventures?
Amy
by Amy | Apr 18, 2013 | Blog, The Art of Projects
Okay guys. I did it. I’ve officially parted with my T-shirt collection. Which is a pretty big deal. Why do T-shirts hold such power over us? Like that 5K we walked in won’t exist if we don’t keep the T-shirt. Or we won’t remember anything about high school if we ever toss the shirt we got senior year on that marketing trip.
I don’t use my T’s any more. I used to work out in them…but since I teach so many classes these days I’ve accumulated a very nice collection of professional fitness gear. So I weeded out my T-shirts. Nearly all of them.

And I didn’t stop there…the more I put in the “get-rid-of” pile the easier it was to add to it. I really weeded the proverbial clothing garden in my closet. Anything that I didn’t wear this winter=gone. Things that don’t fit=gone. Things that I want to like, but never really do once their on=gone.
Add in the garbage bag full of clothes that Derek set aside for the “pass on pile,” our closet is looking pretty good. {It’ll look better in May…we are having some construction done!! But that’s a different post.}
Why, oh why did I pick this week, of all weeks to purge my closet? I’ll tell you…tomorrow…I head to Minneapolis…to go to the MOA! Yes, that’s right, The Mall of America, baby! I will never, ever buy more than I am tossing, but I will buy. I’ll buy things from this decade, things that fit, things that look like post-college.
Even if you aren’t going to the MOA {sorry for your luck} I bet you have some things to get rid of. And I was serious when I said it’s easier once you start. You’ll see. Try it. You’ll feel better without all that excess. I pinky swear.
For tips on getting organized this spring go check out Kuzak’s Closet. Amanda is a blogger buddy of mine and she totally rocks…her tips will have you whipped into shape in no time.
Amy
PS…this is the only kind of purging I encourage. You are beautiful just the way you are.
by Amy | Apr 17, 2013 | Blog, The Art of Projects
I’ve had lots of people inquiring about how my chair is coming. Honestly? Really good.
It’s been stripped down and restuffed. Now I’ll show you how to do it. This part is easy…as long as you are patient and take good notes.
Today we’ll look at the five easy steps it takes to get that fabric off and get the cushy padding on.
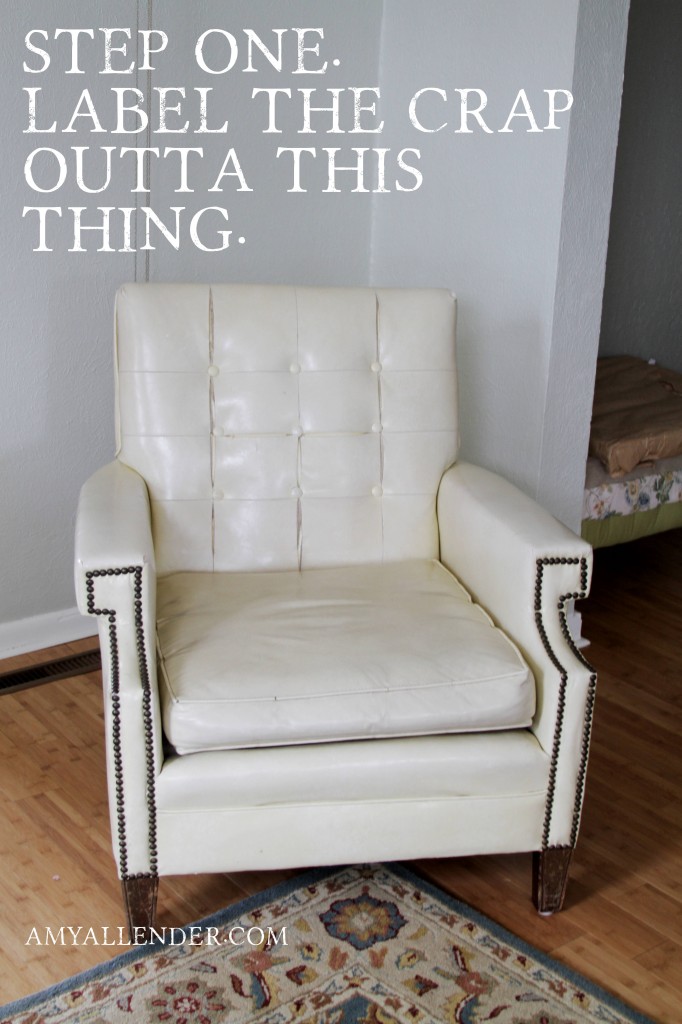
That’s right. The first tool you’ll need is a Sharpie. You’ll be taking the fabric all off, so don’t be shy. Write all over your piece. Everywhere you see a seam: label. Make notes. Note what side is up, where decorative brads are, etc.
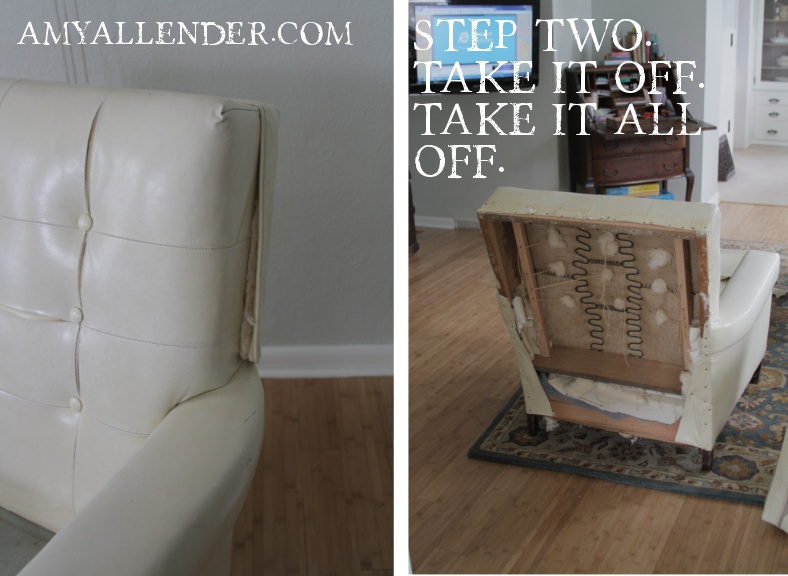
Once your piece is fully labeled it’s time to remove. Start by finding a seam. Upholstery has very little sewing involved. Most seams will be held together by staples or nails. As you can see, my chair was already falling apart, so it was a good place to begin.
Keep that Sharpie handy, though. As you remove each piece, number it. Then when it is time to cut new fabric and reassemble, you’ll put them back on in reverse order. On chairs the back is usually one of the last pieces on, so it will be one of the first to come off.
Take care as you remove. You’ll want each piece fully intact, with as little tearing as possible. The best way to pattern for your unique piece of furniture is by patterning after the fabric that comes off.
Tip: I used a small chisel for prying off stubborn upholstery tacks.
Tip: Remove as many tacks and nails as possible…this will make it easier to add new tacks later.
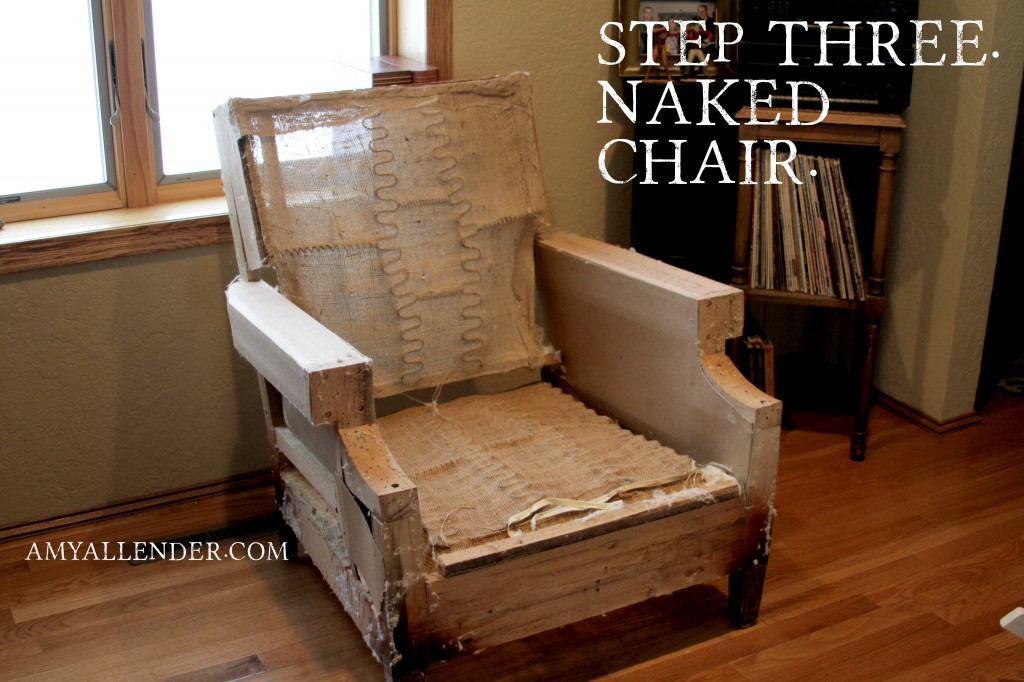
Step three is easy. You’ll have a naked chair. {A friend recently told me if I ever open a brewery it should be called the Naked Chair after seeing this guy…funny, right?
Take a look at your piece’s bones. Shake it. Is it rickety? Are there loose nails? Did you get all the upholstery nails out that you possibly could? Should you repaint the legs? Are the springs good?
If your furniture seems shady in any way, now is the time to fix it.
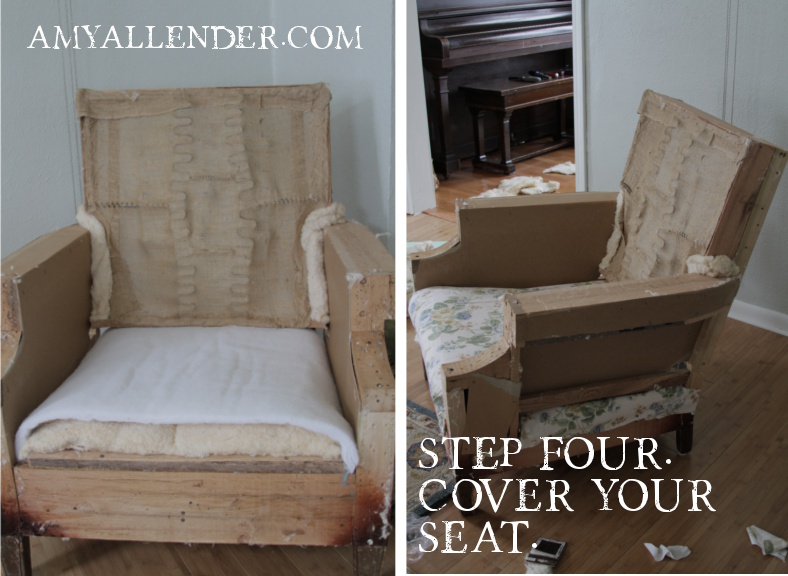
Now we start to make this baby comfy. I used two types of padding: cotton mat and 1″ foam upholstery batting. The fabric covering the thin layer of padding over the springs was last to come off, so it is the first thing to address.
I put the cotton over the burlap covering the springs, then a layer of foam {left image.} Tuck it into the sides. Then I covered that with fabric. I used the nasty, super-worn original fabric as a template for the new covering. Although this fabric is cute, it will be hidden under the seat cushion…still a pleasant surprise when you search the cushions for Waffle Cone Wednesday change.
Start by nailing the fabric to the front edge. {You can also use a good stapler.} If you are using nails, make sure you invest in a package of upholstery tacks. They are specifically made for holding this kind of stuff in place. After the front is secure, go to the back. Pull the fabric as taut as possible and nail down.
Repeat the process on the sides.
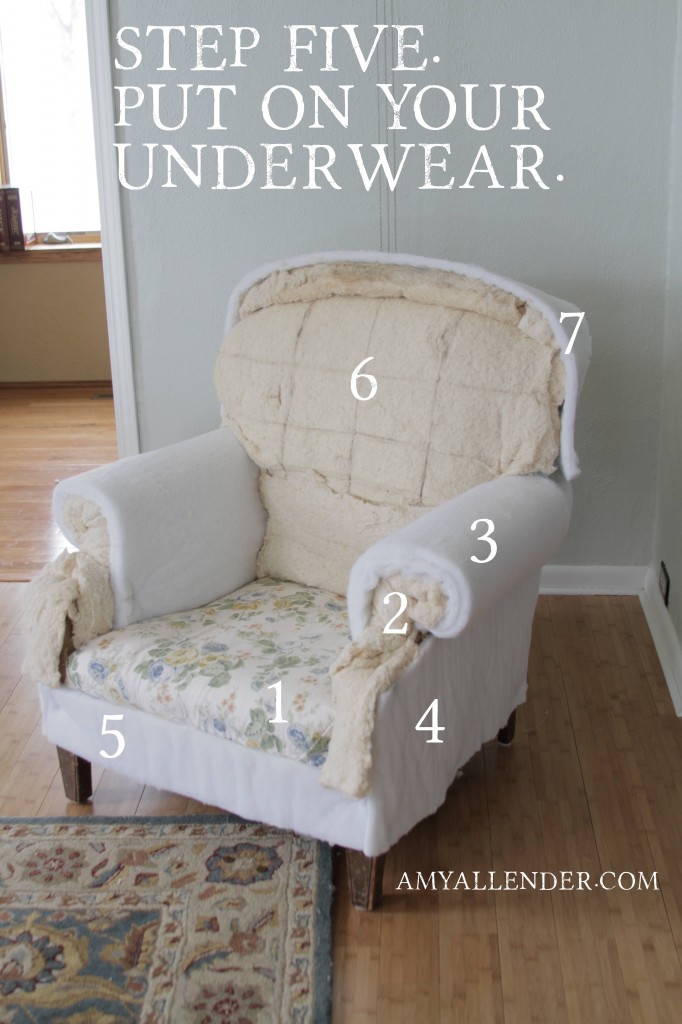
Okay, just like getting dressed…you need to put on underwear before you get dressed up. That’s what the padding does for the chair.
I conveniently numbered the order of the pieces I put in place. Seat was first. After that, put a thin layer over the front of the arm rests. Rule of thumb: Make the parts you lean on/sit on the softest.
#3, cover the arms. I doubled my 1″ foam for this part. Then cover the exterior side panels. Then the front.
Some of the padding may get too thick for using upholstery tacks. In that case, just use small, thin nails. For parts that have thin padding, use tacks. Either way, you’ll want to use enough tacks to keep things firmly in place. No one likes a shifty arm rest.
When it came to the chair back I really wanted to add some pad. I cut a piece of 2.5″ high density foam to cover the chair back, then a layer of cotton mat on top of that.
Last is padding to soften the edges of the top of the chair. I left the back totally open, since I’ll need to access it to add buttons later.
And there you have it! One stripped and repadded chair. Hopefully it’ll be totally done next week and I’ll have a B&A to show off.
Amy
by Amy | Apr 16, 2013 | Blog, The Art of Projects
Today’s adventure? Snow removal and stuffing replacement.

When I came home last night {about 9:30 pm} the snow was falling hard as ever. And it kept falling all night. And all morning. When it had finally let up I made a move to go out and shovel…only to find that we had received nearly a foot. 10 inches to be exact. But where snow drifts are concerned, nothing is exact.
I have one word for all of that: Woof.
This was the absolute hardest shoveling I’ve done all season. So heavy, so deep. I only cleared what I needed to get my car out and a single shovel width path down the sidewalk. I know, that’s the cheap move. It took nearly an hour and my sweatshirt was drenched in sweat by the time I came in. I think I may have hurt my back a bit too. It was seizing up all afternoon. Yuck.
Since Derek left I have really been fine, but I did miss him fiercely today. Not in the sense that I only want him around to do the heavy work…that’s not it at all. Instead, because I really felt his absence today. Our routine was unable to go on. If he was home, he’d have shoveled last night, then again early this morning. He doesn’t do it because I nag him to. Just because he enjoys taking care of me. And it’s a way to allow him to care for me.
Bummer.
So I came is sweaty and gross and bummed. Then 15 minutes later I heard a snow blower unusually close. I looked out and found my sweet neighbor Henry clearing my driveway. Even the stack of snow I’d piled on the unused part of the drive.
I needed to leave so I went out and thanked him. He assured me it was no big deal and that the work wasn’t too much for his heart. {He had a heart attack in the fall…but is the time that refuses to quit working for even a minute.} Your prayers are being felt my friends. This isn’t the first time divine intervention has stepped in right when I needed it most. Your prayers are getting me through this time.
As for my second adventure: AKA the first project of spring…well, take a look.
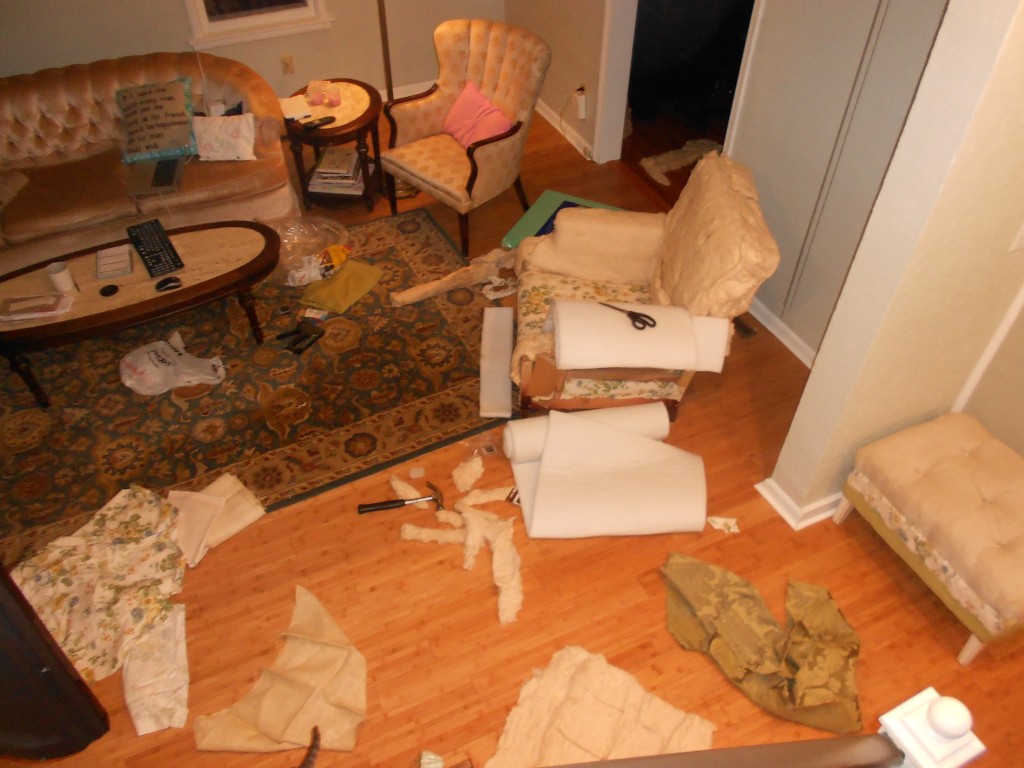
I spent the rest of my down time today replacing the stuffing. In fact, I’ll be completing that task as soon as I finish writing you tonight. {I should really get back on a schedule for writing…but that’s an adventure for another day.}
Tomorrow I’ll show you how to repad a naked chair. Until then I’ll be cleaning up the mess I’ve made.
Amy
by Amy | Apr 12, 2013 | Blog, The Art of Projects, the house
You know how sometimes I decide to start something on a whim?
Well, today I dove into a project that’s been on my mind for a long time. Years even. I’ve been ready, but always put it off because it wasn’t a top priority. I had other more pressing issues…like broken water heaters, ugly bathrooms or hideous built ins to address first.
Well today after editing so many photos I was sure my eyes would start bleeding, I tackled that put-off project. Or…at least I started to tackle.
Here is the victim:
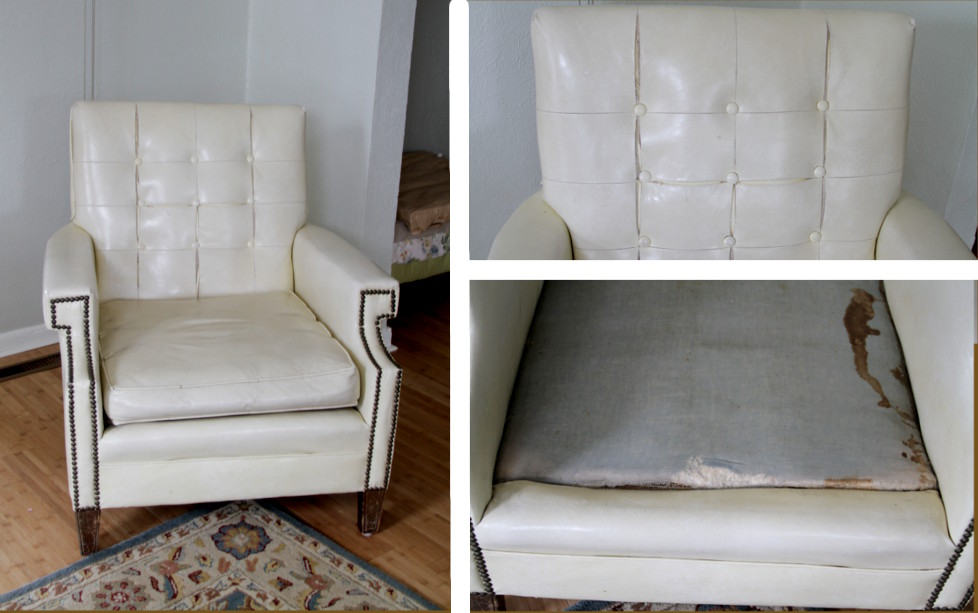
Age: About 55
Weight: Heavy enough that I have to grunt to pick it up
Status: Single, not part of a set…acquired from Derek’s grandmother’s estate.
I fell in love with this chair the first moment I saw it. The lines, those brads. It’s a classic piece. The fact that it is heavy and solid is a testament to its quality. The downside is that the upholstery is falling apart. The back is ripped, the seams are coming unnailed, stuffing is beginning to fall out of the loose seams. It’s gotten a little worse for the ware over the last few years and four moves. So, my friends, it is time.
I’m reupholstering!
I’ve only dabbled in the art until now. This is my first “real” piece of furniture. Up to this point I’ve only done seat covers and an ottoman.
Step one is to remove the old upholstery…being careful to keep it in full pieces in order to make a pattern later. This part proved more difficult than I had imagined. Proof of that is in the fact that I didn’t get it all removed in the two hours I ripped away this afternoon. And let me tell you, getting the upholstery off of this gem is gross work.
As I freed the fabric from the arm rests and seat a shower of decades old debris rained down on the floor. Seriously gross. Retro bobby pins, dried up rubber bands, change, candy wrappers, pocket lint, and dirt poured on to my floor. This is what I swept up after I finished for the day.
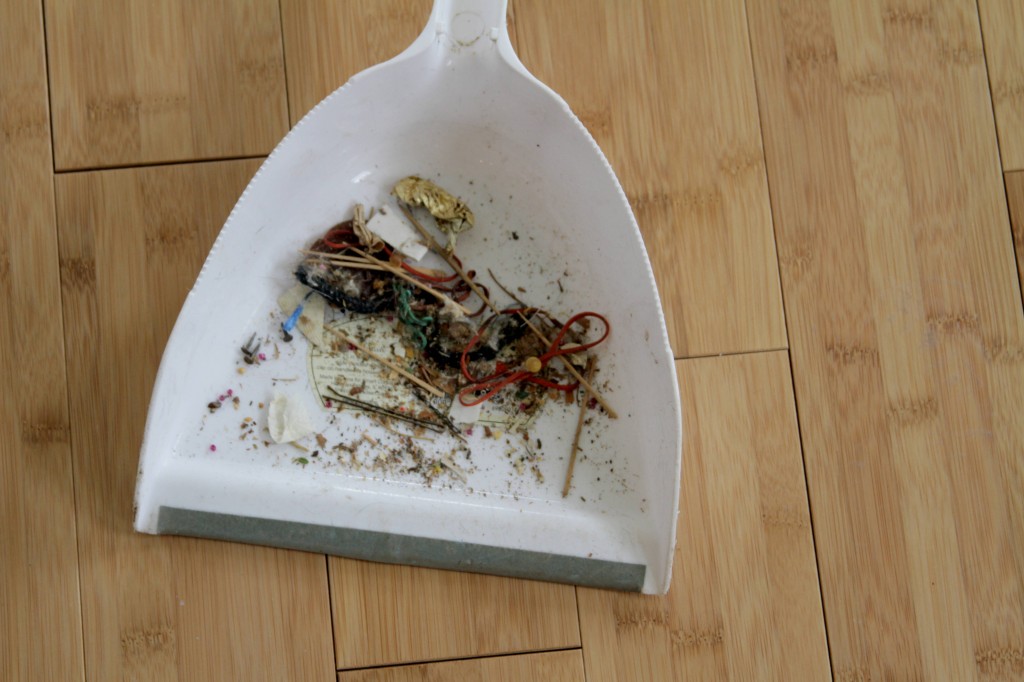
Upon examining the mess, I decided maybe this wasn’t the best project to do in the living room. I mean, I have a basement, why not make use?
Let’s just say that story didn’t end well. After grunting like Serena Williams in a heated tennis match I got the chair to the basement door, only to find that it doesn’t fit. By the time I reached that conclusion I had lifted, pushed, hoisted above the dishwasher, twisted and jiggled. To no avail.
All that to say, this project will take place in the living room. At least this way I’ll have to see it every day and be encouraged to finish it quick.
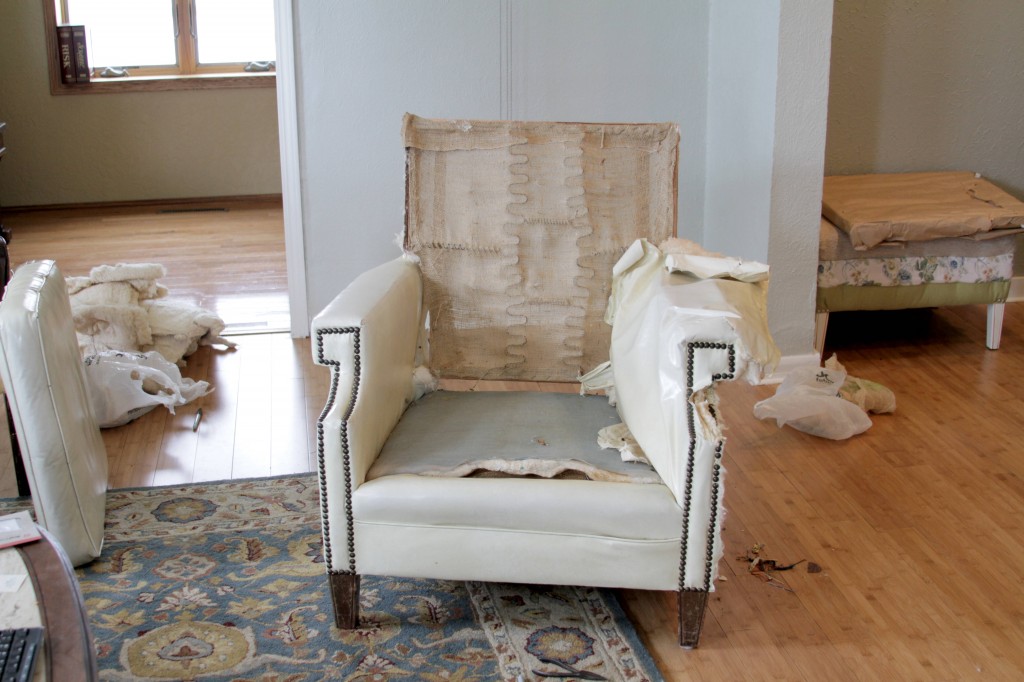
Can’t wait to keep you posted. This could be great…or a total fail. We’ll have to wait and see.
Amy


