You know how sometimes I decide to start something on a whim?
Well, today I dove into a project that’s been on my mind for a long time. Years even. I’ve been ready, but always put it off because it wasn’t a top priority. I had other more pressing issues…like broken water heaters, ugly bathrooms or hideous built ins to address first.
Well today after editing so many photos I was sure my eyes would start bleeding, I tackled that put-off project. Or…at least I started to tackle.
Here is the victim:
Age: About 55
Weight: Heavy enough that I have to grunt to pick it up
Status: Single, not part of a set…acquired from Derek’s grandmother’s estate.
I fell in love with this chair the first moment I saw it. The lines, those brads. It’s a classic piece. The fact that it is heavy and solid is a testament to its quality. The downside is that the upholstery is falling apart. The back is ripped, the seams are coming unnailed, stuffing is beginning to fall out of the loose seams. It’s gotten a little worse for the ware over the last few years and four moves. So, my friends, it is time.
I’m reupholstering!
I’ve only dabbled in the art until now. This is my first “real” piece of furniture. Up to this point I’ve only done seat covers and an ottoman.
Step one is to remove the old upholstery…being careful to keep it in full pieces in order to make a pattern later. This part proved more difficult than I had imagined. Proof of that is in the fact that I didn’t get it all removed in the two hours I ripped away this afternoon. And let me tell you, getting the upholstery off of this gem is gross work.
As I freed the fabric from the arm rests and seat a shower of decades old debris rained down on the floor. Seriously gross. Retro bobby pins, dried up rubber bands, change, candy wrappers, pocket lint, and dirt poured on to my floor. This is what I swept up after I finished for the day.
Upon examining the mess, I decided maybe this wasn’t the best project to do in the living room. I mean, I have a basement, why not make use?
Let’s just say that story didn’t end well. After grunting like Serena Williams in a heated tennis match I got the chair to the basement door, only to find that it doesn’t fit. By the time I reached that conclusion I had lifted, pushed, hoisted above the dishwasher, twisted and jiggled. To no avail.
All that to say, this project will take place in the living room. At least this way I’ll have to see it every day and be encouraged to finish it quick.
Can’t wait to keep you posted. This could be great…or a total fail. We’ll have to wait and see.
Last week I showed you a little tease of a project I’d been working on. Below you can see the problem. In our bathroom we have some really convenient storage…but it’s open and an eye sore. So Derek and I came up with an idea of how to maintain our space without showcasing our clutter.
Here is the after! I’m so pleased. It was really a pretty easy project.
First we built a drawer for the bottom shelf. It’s retro-fitted with drawer sliders. Really, not that hard at all. Just build a box, then add the sliders. This was a big help because now we can take advantage of the deep storage available without having to dig around in the closet to look for a specific item.
While Derek was working on the drawer I worked on the doors. I bought six fence posts from Menard’s to use as the door. After getting them primed and painted I cut them to the right length and braced them together with a few 2×2 scraps. Once everything was put together we hung the doors and added a hook and eye to keep it stylishly closed.
Once everything was in place it was time to declutter. We have not purchased a towel since getting married nearly four years ago. We have towels that we never use and others that are mascara stained and overall very dingy. So I weeded them out, refolded the good ones and stocked the cupboard. Much better.
I love a project that makes my storage more efficient and my house prettier. Oh, and I should add that this gem cost us less than $30! Even better.
I’m calling it done for now…but I’m not sure this one is “finished.” I think maybe it’s missing something. Maybe I’ll do some sign lettering on the shutters. What are your thoughts? Add something, or leave it be?
Did you like critical thinking problems as a kid? I did. I loved them…like isn’t even a good word for how I felt about creative, critical thinking. I still love them. Maybe that’s why I like home improvement so much.
When all is said and done, home improvement is just one big critical thinking problem. Whether the improvement you are looking at is major {a complete over-haul} or minor {improving the look of that blank wall with a little gallery}, it’s all about problems and solutions.
As with any CT puzzle, the first step is identifying the problem. I’ve identified many a problem in this house {the stairs, the floors, the built ins}. A problem I saw very early on was in the bathroom. But, in the big puzzle it really wasn’t that important. I tackled the first floor, first…since that’s what is most visible. Now I’m getting into the other parts of the house.
So here is the problem. There is a gaping shelf/cabinet thing in the wall. Perfect for storing towels. But my towel collection isn’t really worthy of being showed off {neither are my folding skills.} The solution? Well…it has to do with these painted fence posts. For now, I’ll keep you guessing. I’ll tell you this, though: I’m excited about this one. I’m looking forward to a morning when towels and medicine cabinet junk isn’t the first thing {beside Panda Cat, of course} to greet me in the a.m.
On a side note, please let me tell you how crazy I looked buying only six fence posts, in PraCan, in 20 degree temps, with more than a foot of snow on the ground. The kid processing my order gave me a look…but he didn’t ask. So I didn’t tell. My weird hardware store purchases are my business. {And yours too. There are no secrets between us. Especially when it comes to my awkwardness.}
Let me be honest. Never in my life have I felt air as cold as what I felt today in Practically Canada.
I’ve been cold before. My senior year of college classes were cancelled because it was just so cold. Highs of 3 degrees with -20 wind chill. Well…Muncie, IN wouldn’t even know what hit them if they experienced today in North Dakota.
When I woke up this morning I looked out the window at the thermometer on the garage. Certainly it was broken. It registered -10. By the time we were home from our afternoon errands and activities the thermometer looked like this:
Yep. You are seeing that right. Nearly -20. The wind chill ranked in around -45. Tomorrow morning at 9 a.m. the real temp will be -24. I just can’t even believe that this is happening. And locals say sometimes it gets even colder. HOW?!
It’s so cold this crazy sciencey thing happens. You aren’t even going to believe this…so we got video of it. To prove to you that it’s real. It’s so cold that if you throw a cup of boiling water into the air it all turns to steam before hitting the ground. When I heard about this I thought for sure it was a joke. Let me assure you, it is not. It’s really that cold here.
This little party trick kept up entertain for quite some time this evening. {A whole kettle full of entertainment.}
So, yes. This is crazy. If you need me, I’ll be on the couch Netflix-ing under the electric blanket. The only thing that warms me up on a cold night like this is a super cute, cuddle kitten. Really, is there anything better than a sleepy kitten? I highly doubt it. Panda Cat has pretty much given up on life outside of the down comforter. What a baby.
See you tomorrow! Be sure to come back for the no-sew Valentine’s Day pillow tutorial.
Here it is! It hardly looks like the same room. I know, amazing…right? I’ll just let the photos speak for themselves tonight.
Here’s a tiny peek at the process. Luckily we ran into some friends at the hardware store who offered the services of their brad gun, air compressor and miter saw.
We covered the linoleum with red rosin paper so that if there was asbestos on the backing it wouldn’t get kicked up in the air when we nailed into it. Then it was a matter of interlocking the planks and nailing each one in place. Oh, and lots and lots of cuts to make everything fit just right.
The whole project took 9 days to complete. From the day that I tore out the carpet until the last tool was put away. Read yesterday’s post about dealing with project aftermath for more on how to cope with the mess. Actually laying the flooring took two full days of work.
We went with bamboo for a few reasons. First of all, we really liked the look of it. I loved the color and texture. Second, bamboo is not a scarce commodity…it grows fast and is durable and hard. And third…because it grows so quickly it makes it an affordable choice too.
So, what do you think? Panda likes it. After all, we did find her wandering in the bamboo behind our house in Louisiana. I like it too. I really couldn’t be more please. So we will mark this one complete. Ahhh…it feels good to finish a project.
So often we can be fooled by DIY project photos. And I’m guilty of misleading you too.
We see the hideous “before.” The beautiful “after.” Photos of the steps that fall in between. But you know what you don’t see very often? The project aftermath.
The aftermath is all the things that are amiss you your home and life after a project is complete. As you well remember, just over a week ago I impulsively ripped out our nasty, smelly brown carpet. Eight days later we had a new floor and were able to call this project complete.
Seven days after I ripped up that carpet we had a new floor. Project done? Not hardly. Once you brush the saw dust off your hands, look proudly on your accomplishment, then promptly turn around to view the aftermath. Let’s see…there are tools strewn about. A Shop-Vac taking up half the dining room, the furniture is stacked Egyptian-tomb-style in the front room, empty boxes block the kitchen sink and cupboards, a basement full of saw dust and flooring scraps. And let’s not forget the non-project things that get neglected when doing some DIY…laundry, fast food containers {who has time to cook?}, the litter box…
Here are my ways of coping with the aftermath.
1. Don’t freak out. Yes, the house will be a mess. Don’t even try to stay on top of things while you are knee deep in project. Just let it happen.
Schedule in an extra day at the beginning of your project. Do laundry, make a big meal that makes good left overs, take out the trash, clean the litter box…do all those little things ahead of time. Make your unaffected rooms clean.
Schedule an extra day at the end of the project. When you put in that last nail, revel in your accomplishment. Go out for ice cream. Use the following day to put tools away, vacuum, do more laundry, etc.
Save the prettiest part for last. I use my favorite part of the project as a reward for getting the aftermath cleared. Rearrange my furniture in the living room until this afternoon…when everything had been put away and all the boxes were taken to the recycling center. I wanted the room to look finished, but knew that I had to do the lame stuff first.
Make piles. Don’t wear yourself out by making a million trips to the garage or basement. Instead, sort things out…then use plastic bins, bags or laundry hampers to haul big loads at once.
The moral of the story is that home improvement is more than just a before and after shot. {But seriously, who doesn’t love a good B&A?} I’ll show you the pretty before and after tomorrow. But for now, to be fair and totally transparent, I needed you to see the aftermath. Because I know we are all anxious…I’ll give you a preview.
That’s all you get. Now, don’t get your panties in a twist. The big reveal is happening tomorrow evening. So be sure to check back! And like the Facebook page, while you’re at it!
So when we moved in to our house here in Minot I was still blogging at my old blog. Since then I’ve moved here. To this prettier, roomier site. When I posted the carpet-rip-up post yesterday I realized that maybe I should house all the house before photos here. If you are a long time reader, you probably saw this post in July when we closed. Otherwise, enjoy these befores.
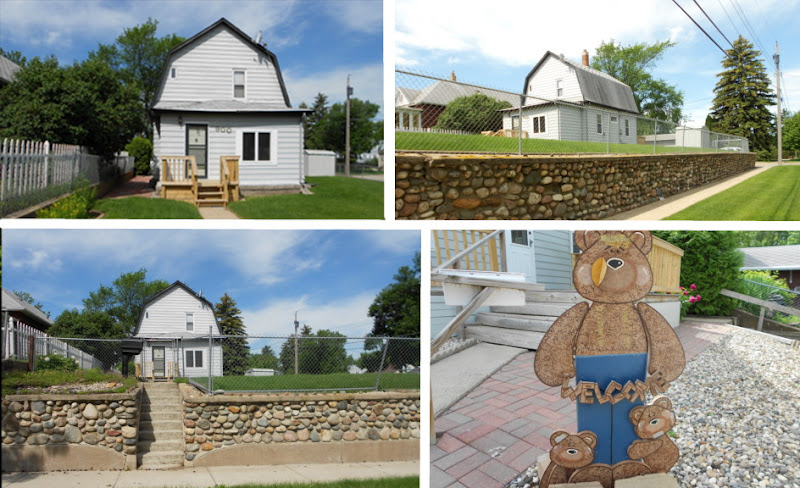
1. I was pleasantly surprised by the size of the house and yard. PS…the weather is just fantastic up here. It’s a dutch colonial revival circa 1911.
2. I love that the house sits up above the sidewalk. How cute is the stone wall?
3. I’m trying to convince Derek that we need a white picket fence. But in the mean time we’ve given the decks a makeover.
4. I found this gem in the back. Maybe it’s thrown in with closing costs?
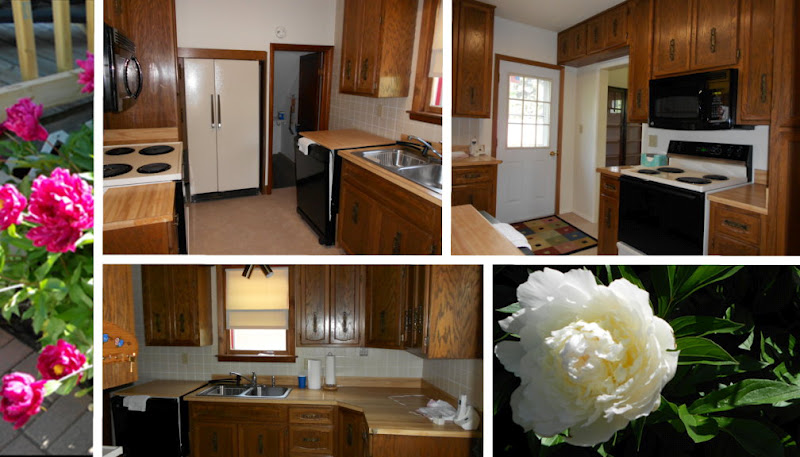
1. In the backyard peonies are in full bloom.
2. The kitchen is small but efficient. That door goes to the basement.
3. There’s the door to the back deck. I’m in love with the fact that the cupboards go all the way to the ceiling. I’ll need a ladder to get up there!
4. The kitchen has a lot of potential…but it’s so dark! We’ll have to change that.
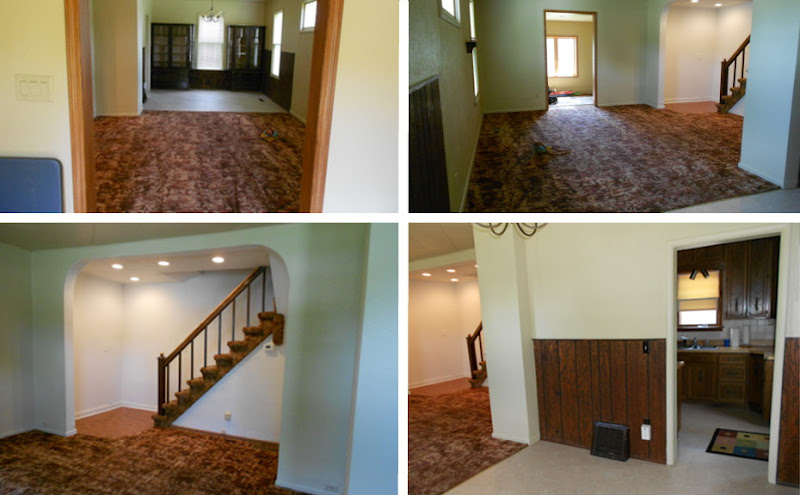
1. This is the view from the front sitting room. That’s the living room with the brown carpet, then the dining room beyond that.
3. LOVE the open stairway. I’ve already given that a redo. All that can lighting is just begging for a gallery display on the wall there.
4. Looking into the kitchen from the dining room. What would a house be without some wood paneling?
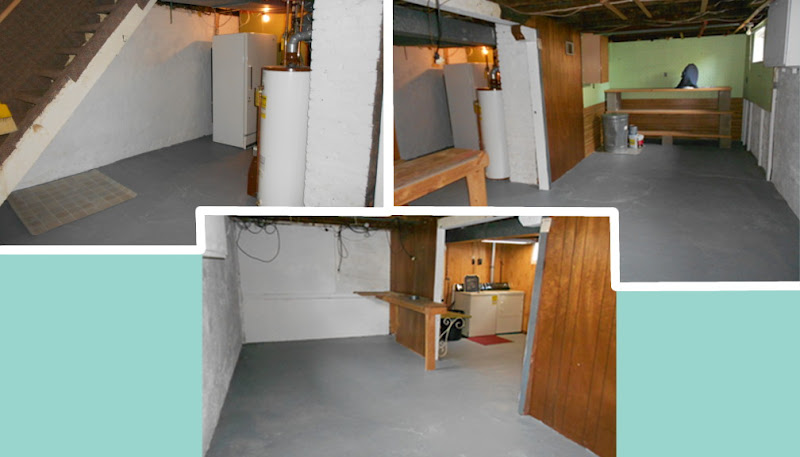
Here she is. The basement.
1. Stairs coming down to the basement from the kitchen.
2. Past a makeshift wall looking back toward the freezer from photo 1.
3. Looking toward the base of the stairs…To our “laundry room.”
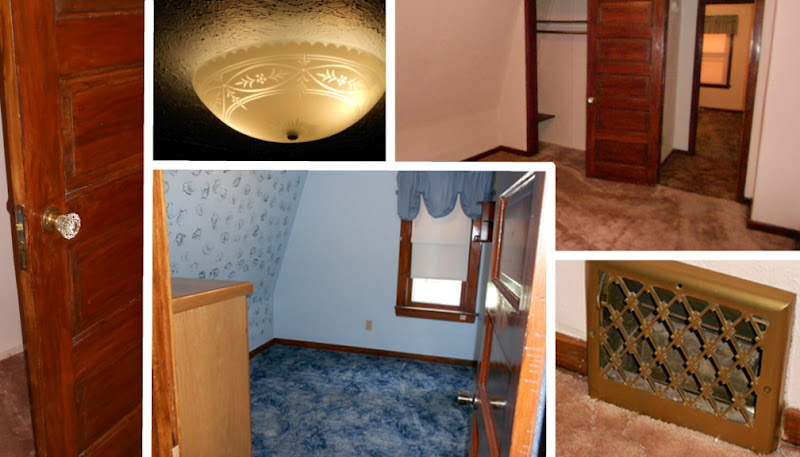
Now let’s venture upstairs. There are three bedrooms and a bathroom up here. But they were hard to photograph. I didn’t want to post just photos of empty corners of rooms. So I’ll give you a few highlights.
1. Some of the doors have the original crystal knobs!!
2. While the house needs lots of updating, there are definitely lots of charming features, like these vintage ceiling lights.
3. Looking from the master bedroom across the hall to another bedroom.
4. Vintage vent covers are beautiful.
5. Another bedroom. Don’t ask about the paint job. The plan is to tear down the wall that joins this room to the master bedroom to make one large suite. Then we’ll add a third bedroom to the basement…stay tuned!
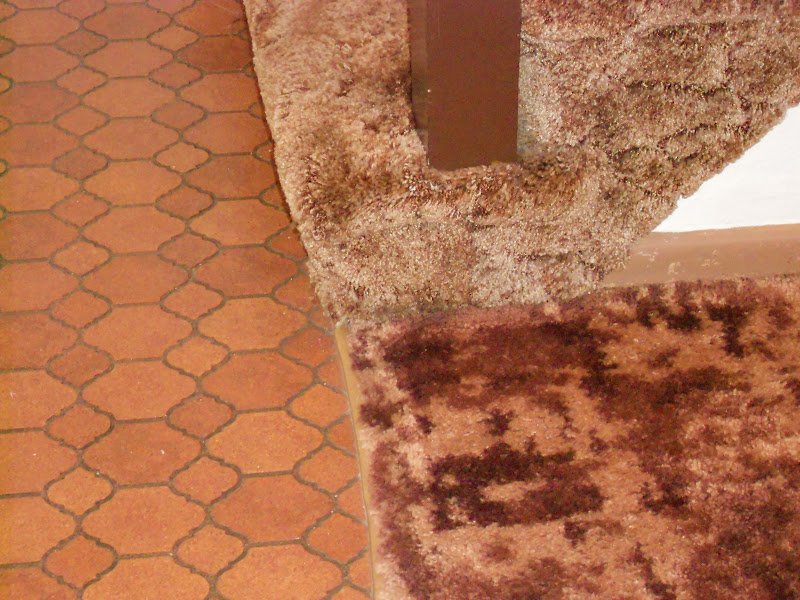
Oh, and one last thing. Did you notice the carpet? This is a classic shot of the flooring in this house. In the living room these three outdated flooring piece come together to form one nasty trifecta. As of yesterday the last of the brown flooring on the first floor is history.
Yes…there is a different dark brown carpet running up the stairs and in the living room. And yes…that is linoleum and the landing…
If you saw the Facebook post I made last night…you know I was up to something.
Here’s the thing. Derek went to a friends house to work on a project for a while. Ever since the Christmas hubbub came to an end I’ve been itching to do a project. Not a craft {I did plenty of those leading up to Christmas time} but a real, serious project. And I had my eye set on a certain, brown, shaggy, smelly prize.
I have been threatening Derek for a week now.
“I’m going to do it. Don’t test me. You’ll come home and that carpet will be gone.”
And guess what. Last night I did it.
At 5:30 I got off the couch. I had just watched the season 2 finale of Downton Abbey in preparation for the season 3 premiere last night. A friend was going to come over for Revenge at 7:30. Two hours is enough time to rip up carpet and padding, remove a few staples and drag it all to the dumpster, right? Sure. So I went for it.
Here is where the house started last night. If you really want to know why I hate this carpet…look all the way back to this post. Where I show off our many shades of nasty brown carpeting.
First I moved all the furniture out and covered things up. I have this fear of old dust. It’s rooted back to my studies of the crew who opened King Tut’s tomb. They breathed that ancient dust and got real sick-like. I realize this isn’t ancient Egypt. But caution never hurt anyone.
Then I started tearing it up. Which, honestly went very quickly.
Once the shag was up I was simply disgusted at how NASTY the padding and belly of the carpet was. No wonder it has been smelly.
Next I rolled up the padding…and took all of it to the curb for garbage pick up. Finally, I rolled the carpet as good as I could. Then I started working my way toward the door. And here is where things got tricky. Carpet is heavy. And this stuff all came up in one piece. So I was dragging it through the dining room out the kitchen door, onto the deck. I got it about a full foot through the door when it got stuck. After pulling and pushing, grunting and cursing I resigned myself to the truth that I couldn’t budge it. Either way. You just can’t make this stuff up.
I couldn’t get it back inside. Or further outside. So I sat down, all sweaty…letting the cold breeze blow through the door that wouldn’t shut. Then, miracle of miracles…Derek got home. It’s funny how much easier it was with two people.
And there you have it. The brown carpet is simply a memory. Remember when we moved into that house in Minot and it had terrible brown carpet? Ahhh…I’ve been waiting so long to use past tense when talking about that wretched stuff.
But now…present tense. My living room is covered in bubble gum pink linoleum. Woof. Gross, yes. Up I still consider it an upgrade.
The project continues. I promise, some day soon I will have flooring from this millennium.
Renew your zeal for the Bible with three days of exclusive devotionals! Interesting and relevant writings and reflection questions will remind you why the Word of God is so awesome. You'll learn a lot and you'll leave excited to know God more and grow deeper in your faith.
Your kick-start is on the way!
You've always dreamed of reading the Bible in chronological order. Now you can!
Getting my printable PDF plan is easy. It's not fancy, but it does fold easily into a bookmark, so you can keep it close by and easily see what's coming next. I hope you find it as useful as I do.
**Remember to check your PROMOTIONS FOLDER. Even if your confirmation comes to your normal inbox, the actual download may come to that pesky promotions folder instead!**